background image

Electrical connection

All electrical work should be carried out
by a suitably qualified and competent
person in strict accordance with current
local and national safety regulations.

The appliance is supplied with a mains
cable and moulded plug ready for
connection to an AC single phase
220-240 V 50 Hz supply.

The voltage and frequency are given on
the data plate. Please ensure that these
match the household mains supply. The
fuse rating is quoted on the plug.

Connection should be made via a
suitable switched socket which is easily
accessible. For extra safety it is
advisable to install a suitable residual
current device (RCD).

Do not connect the appliance to the
mains electricity supply by an extension
lead or a plug adapter. Extension leads
do not guarantee the required safety of
the appliance (e.g. danger of
overheating).

Do not connect the machine to an
inverter such as those used with an
autonomous energy source e.g.

Solar

power

.

When switched on, peak loads in the
system can cause the safety switch off
mechanism to be triggered. This can
damage the electronic unit.

The machine must not be used with
so-called

Energy saving devices

either. These reduce the amount of
energy supplied to the machine,
causing it to overheat.

WARNING
THIS APPLIANCE MUST BE
EARTHED

Electrical connection

32

Summary of Contents for FN 9752 i

Page 1: ...tion instructions Frost free freezer FN 9752 i To avoid the risk of accidents or damage to the appliance it is essential to read these instructions before it is installed and used for the first time M Nr 07 926 750 en AU NZ ...

Page 2: ...mperature alarm 17 Door alarm 17 Activating the alarm system 17 Switching the alarm off early 17 SuperFreeze 18 SuperFreeze 18 Switching on SuperFreeze 18 Switching off SuperFreeze 18 Freezing and storing food 19 Maximum freezing capacity 19 Freezing fresh food 19 Storing frozen food 19 Home freezing 20 Hints on home freezing 20 Packing 20 Before placing food in the freezer 21 Placing food in the ...

Page 3: ...ction 32 Installation 33 Location 33 Climate range 33 Ventilation 33 Before installation 34 Did your old appliance have a different hinging mechanism 34 Stainless steel front 34 Building in dimensions 35 Adjusting the door hinges 36 Changing the door hinging 37 Appliance door 37 Building in the appliance 40 Weight of furniture doors 40 Building into a peninsular run 40 Fitting a furniture door 44 ...

Page 4: ...f button cTemperature display aFrost free system bFreezer tray dTemperature selector buttons for warmer for colder eSuperFreeze button and indicator light fAlarm off button cFreezer drawers with freezer calendar Guide to the appliance 4 ...

Page 5: ... be potentially hazardous to human health and to the environment They are however essential for the correct functioning of your appliance Please do not therefore dispose of it with your household waste Please dispose of it at your local community waste collection recycling centre and ensure that it presents no danger to children while being stored for disposal The plug must be rendered useless and...

Page 6: ...s The manufacturer cannot be held liable for damage resulting from incorrect or improper use or operation This appliance is not intended for use by persons including children with reduced physical sensory or mental capabilities or lack of experience and knowledge unless they are supervised whilst using it or have been given instruction concerning its use by a person responsible for their safety Sa...

Page 7: ...nd anything which creates a spark disconnect from the mains air the room in which the appliance is located for several minutes and contact the Service Department for advice The more coolant there is in an appliance the larger the room it should be installed in In the event of a leakage if the appliance is in a small room there is the danger of combustible gases building up For every 8 g of coolant...

Page 8: ... undertaken by a service technician authorised by the manufacturer Otherwise the guarantee will be invalidated The appliance must be isolated from the electricity supply during installation maintenance and repair work The appliance is only completely isolated from the electricity supply when it has been switched off at the wall socket and the plug has been withdrawn the fuse from the fused spur co...

Page 9: ...tles could explode Danger of injury and damage to the appliance When cooling drinks quickly in the freezer make sure bottles are not left in for more than one hour otherwise they could burst resulting in injury or damage Observe the use by dates given on food to avoid the risk of food poisoning Storage times will depend on several factors including the freshness and quality of the food as well as ...

Page 10: ...too low an ambient temperature e g a garage can lead to the appliance switching off for longer periods so that it cannot maintain the required temperature Do not use a steam cleaning appliance to defrost or clean this appliance Pressurised steam could reach the electrical components and cause a short circuit Disposal of your old freezer Before disposing of an old appliance first make the door latc...

Page 11: ...tion 4 to 5 C PerfectFresh zone just above 0 C Freezer section 18 C Wine storage section 10 to 12 C Use Do not change the arrangement of the drawers and shelves Only open the doors when necessary and for as short a time as possible Frequent opening of the doors for long periods will cause a loss of coldness Store food in an organised way If food is not stored in an organised way searching for an i...

Page 12: ...l be at its most effective after it has been in the freezer for approx 24 hours Switching off Press the On Off button until the temperature display goes out The cooling system is switched off If this does not happen the safety lock is still activated Safety lock The safety lock can be activated to prevent the appliance being switched off inadvertently Activating or de activating the safety lock Pr...

Page 13: ...of time e g whilst on holiday switch the appliance off switch off at the wall and withdraw the plug from the socket or disconnect the mains fuse or remove the screw out fuse in countries where this is applicable clean the appliance out and leave the door ajar to air the appliance If during a long absence the appliance is switched off but not cleaned out and the door is left shut there is a danger ...

Page 14: ...ten the door is opened and the longer it is kept open if too much food is stored in it at once the warmer the food is which is being put into it the higher the ambient temperature surrounding the appliance The appliance is designed for use in specific ambient temperatures climate ranges Do not use in ambient temperatures for which it is not designed Setting the temperature Use the two buttons unde...

Page 15: ...temperature display The temperature display will flash if a different temperature is being set the temperature in the appliance has risen by several degrees indicating that the appliance is warming up too much This loss of coldness is no cause for concern in the following circumstances when the door has been left open for a while e g for removing or storing a large amount of food when fresh food i...

Page 16: ... of brightness by pressing the temperature selector buttons You can choose from settings 1 to 5 1 dimmest setting 5 brightest setting Press the SuperFreeze button to save the setting Press the On Off button to come out of setting mode If you do not do this the electronics will switch over to normal operation automatically after a couple of minutes The correct temperature 16 ...

Page 17: ... freezing large amounts of food at once if there has been a lengthy interruption to the power supply Door alarm If the door has been left open for more than approx 60 seconds the alarm will sound Activating the alarm system The alarm system is always active It does not have to be switched on manually Switching the alarm off early Once the set temperature has been reached in the freezer the alarm s...

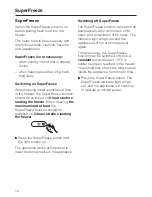
Page 18: ...on 24 hours before loading the freezer Press the SuperFreeze button until the light comes on The appliance works at full power to lower the temperature in the appliance Switching off SuperFreeze The SuperFreeze function will switch off automatically after a minimum of 30 hours and a maximum of 65 hours The indicator light will go out and the appliance will run at normal power again To save energy ...

Page 19: ... food If food is frozen quickly the cells have less time to lose moisture so they shrink less As there is not so much moisture loss it is easier for the food to reabsorb it during the defrosting process and very little water collects around the defrosted food Storing frozen food When buying frozen food to store in your freezer check that the packaging is not damaged the use by date the temperature...

Page 20: ...lets or rolled meat from freezing together in solid blocks when packed separate with a sheet of plastic freezer film Do not season fresh foods or blanched vegetables before freezing Only season cooked food lightly before freezing but care should be taken as the taste of some spices alters when frozen Do not place hot foods or drinks in the freezer This causes already frozen food to thaw and increa...

Page 21: ...ood already frozen does not come into contact with fresh food being frozen as this could cause the frozen food to begin to defrost Freezing large items If you wish to freeze large items such as a turkey or game the glass cold plates between the drawers can be removed To do this The lowest freezer drawer must always remain in the appliance Remove the freezer drawers and carefully lift and slide out...

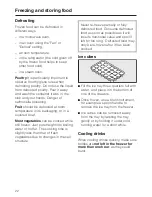
Page 22: ... water or hot fat The cooking time is slightly less than that of fresh vegetables due to changes in the cell structure Never re freeze partially or fully defrosted food Consume defrosted food as soon as possible as it will lose its nutritional value and spoil if left for too long Defrosted food may only be re frozen after it has been cooked Ice cubes Fill the ice tray three quarters full with wate...

Page 23: ...n the event of a power cut Place the cool pack in the upper drawer directly on top of food or in the freezer tray to save space The cool pack will be at its most effective after it has been in the freezer for approx 24 hours If there is a power cut place the cool pack directly on top of the frozen food in the top drawer so that the food will be kept cold for as long as possible When placing fresh ...

Page 24: ...e moisture generated by defrosting collects in the condenser and is automatically dissipated by the condenser from time to time This automatic defrosting system enables the freezer to remain permanently ice free however the food stored in the freezer will not defrost Automatic defrost 24 ...

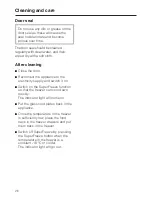
Page 25: ... e g pot scourers dirt erasers sharp metal scrapers Before cleaning Switch off the appliance Disconnect the appliance from the mains Switch off at the wall and withdraw the plug from the socket or disconnect the mains fuse or remove the screw out fuse in countries where this is applicable Take any frozen food out of the appliance and store it in a cool place Take out any removable parts e g shelve...

Page 26: ...city supply and switch it on Switch on the SuperFreeze function so that the freezer can cool down quickly The indicator light will come on Put the glass cold plates back in the appliance Once the temperature in the freezer is sufficiently low place the food back in the freezer drawers and put them back in the freezer Switch off SuperFreeze by pressing the SuperFreeze button when the temperature in...

Page 27: ...n because it has been opened and closed too many times in succession This is not a fault The suction caused by opening and closing the door is preventing the door from opening Wait a few minutes and then try again It should now open without force the temperature is too low Select a warmer temperature The SuperFreeze function is still switched on The SuperFreeze function switches itself off automat...

Page 28: ...l the Service Department nA appears in the temperature display The temperature has risen too high at some point during the last couple of days because of a power cut Press the alarm off button whilst nA is lit up in the display The temperature display will show the warmest temperature recorded in the appliance during the power cut Depending on the temperature displayed you should check the conditi...

Page 29: ...as been placed in the appliance at once There has been an increase in the humidity in the room Keep the door closed as much as possible so that the Frost Free system has a chance to melt the ice automatically This may take several days If you still cannot remedy the fault having followed these suggestions please contact the Miele Service Department To prevent unnecessary loss of temperature it is ...

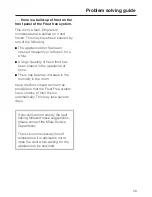
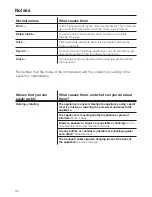
Page 30: ...e the appliance Remember that the noise of the compressor and the coolant circulating in the system is unavoidable Noises that you can easily rectify What causes them and what can you do about them Rattling vibrating The appliance is uneven Realign the appliance using a spirit level by raising or lowering the screw feet underneath the appliance The appliance is touching another appliance or piece ...

Page 31: ...t your Miele Chartered Agent or Miele You will find the address and telephone number of Miele on the back cover of the manual When contacting your Chartered Agent or Miele please quote the model and serial number of your appliance This information is given on the data plate inside your appliance After Sales 31 ...

Page 32: ... For extra safety it is advisable to install a suitable residual current device RCD Do not connect the appliance to the mains electricity supply by an extension lead or a plug adapter Extension leads do not guarantee the required safety of the appliance e g danger of overheating Do not connect the machine to an inverter such as those used with an autonomous energy source e g Solar power When switc...

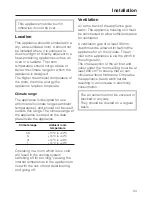
Page 33: ...ture SN N ST T 10 C to 32 C 16 C to 32 C 16 C to 38 C 16 C to 43 C Operating in a room which is too cold will result in the cooling system switching off for too long causing the internal temperature in the appliance to rise with the risk of food deteriorating and going off Ventilation Air at the back of the appliance gets warm The appliance housing unit must be constructed to allow sufficient spac...

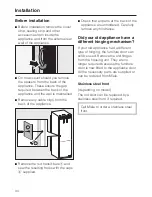
Page 34: ...g holes with the caps b supplied Check that all parts at the back of the appliance are unhindered Carefully remove any hindrance Did your old appliance have a different hinging mechanism If your old appliance had a different type of hinging the furniture door can still be used Remove the old hinges from the housing unit They are no longer required because the furniture door is now fitted to the ap...

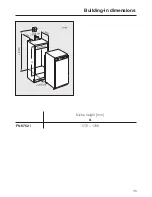
Page 35: ...Niche height mm A FN 9752 i 1772 1788 Building in dimensions 35 ...

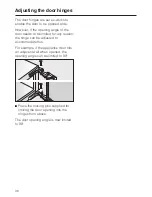
Page 36: ...d for any reason the hinge can be adjusted to accommodate this For example if the appliance door hits an adjacent wall when opened the opening angle can be limited to 90 Place the locking pins supplied for limiting the door opening into the hinges from above The door opening angle is now limited to 90 Adjusting the door hinges 36 ...

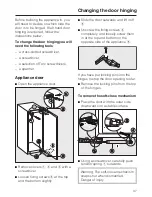
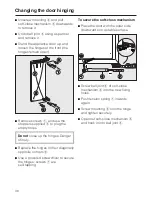
Page 37: ...screws d at the top and the bottom slightly Slide the door outwards and lift it off e Unscrew the fixing screws d completely and loosely screw them in at the top and bottom on the opposite side of the appliance f If you have put locking pins into the hinges to stop the door opening too far Remove the locking pins from the top of the hinges To remove the soft close mechanism Place the door with the...

Page 38: ...inges Danger of inury Replace the hinges in their diagonally opposite corners b Use a powered screwdriver to secure the hinges screws a are self tapping To secure the soft close mechanism Place the door with the outer side downwards on a stable surface Screw ball joint d of soft close mechanism c into the new fixing holes Push tension spring a inwards again Screw mounting b onto the hinge and tigh...

Page 39: ...appliance door onto the pre fitted screws and then tighten the screws Replace covers a b and c Replace the locking pins into the top of the hinges to prevent the doors opening too far Changing the door hinging 39 ...

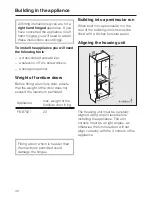
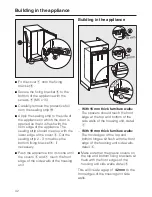
Page 40: ... does not exceed the maximum permitted Appliance max weight of the furniture door in kg FN 9752 i 23 Fitting a door which is heavier than the maximum permitted could damage the hinges Building into a peninsular run When built into a peninsular run the rear of the building in niche must be fitted with a kitchen furniture panel Aligning the housing unit The housing unit must be carefully aligned usi...

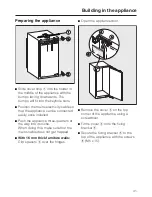
Page 41: ... installed Push the appliance three quarters of the way into its niche When doing this make sure that the mains cable does not get trapped With 16 mm thick furniture walls Clip spacers b over the hinges Open the appliance door Remove the cover c on the top corner of the appliance using a screwdriver Fit the cover d onto the fixing bracket e Secure the fixing bracket e to the top of the appliance w...

Page 42: ...e appliance into its niche until the covers d and g touch the front edge of the side walls of the housing unit Building in the appliance With 16 mm thick furniture walls The spacers should touch the front edge at the top and bottom of the side walls of the housing unit detail a With 19 mm thick furniture walls The front edges of the top and bottom hinges sit flush with the front edge of the housin...

Page 43: ...t furniture doors If the all round gap of 42 mm is not maintained between the appliance casing and the front edge of the housing unit side wall the door may not shut properly This could lead to a build up of ice and condensation and also cause operational faults Align the appliance on both sides by altering the adjustable feet using the spanner supplied c Securing the appliance in the niche Press ...

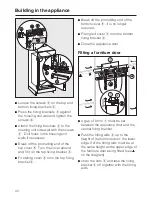
Page 44: ...onto the top fixing bracket c Break off the protruding end of the bottom cover e It is no longer required Fit angled cover g onto the bottom fixing bracket c Close the appliance door Fitting a furniture door A gap of 8 mm a must be set between the appliance door and the central fixing bracket Push the fitting aids b up to the height of the furniture door the lower edge X of the fitting aids must b...

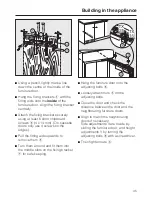
Page 45: ...e fitting aids upwards to remove them f Turn them around and fit them into the middle slots on the fixing bracket g for safe keeping Hang the furniture door onto the adjusting bolts h Loosely attach nuts c on the adjusting bolts Close the door and check the distance between the door and the neighbouring furniture doors Align to match the neighbouring doors if necessary Side adjustments X are made ...

Page 46: ...d holes in the appliance door Align depth Z on the furniture door loosen screws f at the top of the appliance door and loosen the screw g on the bottom of the fixing bracket By moving the furniture doors create a gap of 2 mm between the furniture doors and the front edge of the niche Close the door and align to match the neighbouring furniture doors Whilst counterholding the adjusting bolts i with...

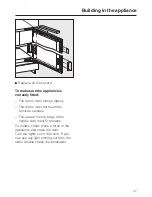
Page 47: ...rs must not touch the furniture carcase The seal at the top edge of the handle side must fit properly To double check place a torch in the appliance and close the door Turn the lights out in the room If you can see any light shining out from the sides double check the installation Building in the appliance 47 ...

Page 48: ...M Nr 07 926 750 00 Alteration rights reserved 4910 FN 9752 i ...

Reviews: