background image

Warning and Safety instructions

8

– it is switched off at the wall socket and the plug is withdrawn from

the socket. Do not pull the mains connection cable but the mains
plug to disconnect your appliance from the mains electricity
supply.

 

Repairs and other work by unqualified persons could be

dangerous. Maintenance work and repairs to electrical appliances
must only be carried out by a Miele approved service technician.

 

The manufacturer's warranty will be invalidated if the appliance is

not repaired by a Miele approved service technician.

 

Faulty components must only be replaced by genuine Miele spare

parts. The manufacturer can only guarantee the safety of the
appliance when Miele replacement parts are used.

 

In areas which may be subject to infestation by cockroaches or

other vermin, pay particular attention to keeping the appliance and
its surroundings clean at all times. Any damage caused by
cockroaches or other vermin will not be covered by the warranty.

Correct use

 

The appliance is designed for use within a certain climate range

(ambient temperatures) and should not be used outside this range.
The climate range for your appliance is stated on the data plate
inside the appliance. Installing it in a room with too low an ambient
temperature, e.g. a garage, will lead to the appliance switching off
for longer periods, with the result that it cannot maintain the required
temperature.

 

To ensure proper air flow in and out of the appliance, the

ventilation gaps in the appliance and built-in structure must not be
covered or blocked in any way. This would also increase the energy
consumption and could cause damage to the appliance.

Summary of Contents for FNS 37402 i

Page 1: ...d installation instructions Freezer To prevent the risk of accidents or damage to the appliance it is essential to read these instructions before it is installed and used for the first time en AU NZ M Nr 10 198 631 ...

Page 2: ...play 20 Setting the temperature 21 Using SuperFreeze 22 Temperature and door alarm 23 Temperature alarm 23 Switching the temperature alarm off early 23 Door alarm 24 Switching the door alarm off early 24 Further settings 25 Safety lock 25 Audible tones 26 Display brightness 27 Sabbath mode 28 Adjusting the interior fittings 30 Removing freezer drawers on telescopic runners 30 Removing the shelves ...

Page 3: ... in case of fault 50 Warranty 50 Information for Miele Experience Centres and Chartered Agents 51 Demo mode 51 Electrical connection 53 Installation advice 54 Side by side units 54 Location 54 Ventilation 56 Before installing the appliance 57 Does your old appliance have a different hinging mechanism 58 Stainless steel front 58 Building in dimensions 59 Limiting the opening angle of the door 60 Ch...

Page 4: ... and for use in similar environments by guests in hotel or motel rooms bed breakfasts and other typical living quarters This does not include common shared facilities or commercial facilities within hotels motels or bed breakfasts This appliance is not suitable for outdoor use This appliance is intended to store deep frozen food freeze fresh food and to make ice Any other usage is not supported by...

Page 5: ...ildren must not be allowed to use this appliance Older children may only use the appliance when its operation has been clearly explained to them and they are able to use it safely recognising the dangers of misuse Cleaning work may only be carried out by older children under the supervision of an adult Please supervise children in the vicinity of the appliance and do not let them play with it Dang...

Page 6: ...ppliance that no parts of the cooling system are damaged Leaking refrigerant can damage the eyes In the event of any damage avoid any flames or anything which creates a spark disconnect the appliance from the mains electricity supply ventilate the room where the appliance is located for several minutes and call Miele The more coolant there is in a refrigeration appliance the larger the room should...

Page 7: ...ed safety of the appliance e g danger of overheating If moisture gets into electrical components or into the mains connection cable it could cause a short circuit Therefore do not operate this refrigeration appliance in areas which are exposed to moisture e g in a garage or laundry This appliance must not be installed and operated in mobile installations e g on a ship Do not use a damaged applianc...

Page 8: ...reas which may be subject to infestation by cockroaches or other vermin pay particular attention to keeping the appliance and its surroundings clean at all times Any damage caused by cockroaches or other vermin will not be covered by the warranty Correct use The appliance is designed for use within a certain climate range ambient temperatures and should not be used outside this range The climate r...

Page 9: ...g carbonated drinks or liquids which could freeze in the freezer Otherwise they could burst Risk of injury and damage When cooling drinks quickly in the freezer make sure bottles are not left in for more than one hour otherwise they could burst causing injury or damage Never handle frozen food or the metal parts of the appliance with wet hands Your hands may freeze to the frozen food or to the met...

Page 10: ...or grease on the door seals as these will cause the seals to deteriorate and become porous with time Do not use a steam cleaning appliance to clean this appliance Steam could reach the electrical components and cause a short circuit Sharp edged or pointed objects will damage the evaporator causing irreversible damage to the appliance Do not use sharp edged or pointed objects to remove frost and ic...

Page 11: ... risk of playing children accidentally locking themselves in and endangering their lives Splashes of coolant can damage the eyes Be careful not to damage any part of the pipework whilst awaiting disposal e g by puncturing the refrigerant channels in the condenser bending any pipework or scratching the surface coating Symbol on the compressor depending on model This information is only relevant for...

Page 12: ...function and safety These could be hazardous to human health and to the environment if disposed of with your domestic waste or if handled incorrectly Please do not therefore dispose of your old appliance with your household waste Please dispose of it at your local community waste collection recycling centre for electrical and electronic appliances or contact Miele You are also responsible for dele...

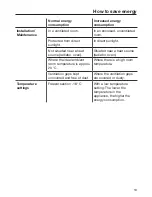
Page 13: ...d near a heat source radiator oven Situated near a heat source radiator oven Where the ideal ambient room temperature is approx 20 C Where there is a high room temperature Ventilation gaps kept uncovered and free of dust Where the ventilation gaps are covered or dusty Temperature settings Freezer section 18 C With a low temperature setting The lower the temperature in the appliance the higher the ...

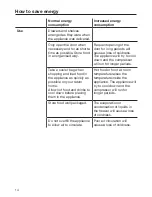
Page 14: ...ll run for longer periods Take a cooler bag when shopping and load food in the appliance as quickly as possible on your return home Allow hot food and drinks to cool down before placing them in the appliance Hot food or food at room temperature raises the temperature inside the appliance The appliance will try to cool down and the compressor will run for longer periods Store food well packaged The...

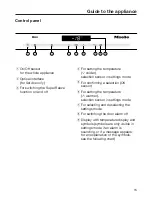
Page 15: ...n sensor in settings mode e For confirming a selection OK sensor f For setting the temperature warmer selection sensor in settings mode g For selecting and deselecting the settings mode h For switching the door alarm off i Display with temperature display and symbols symbols are only visible in settings mode if an alarm is sounding or if a message appears for an explanation of the symbols see the ...

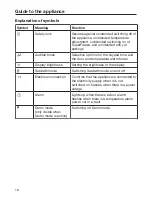
Page 16: ...e keypad tone and the door and temperature alarm tones Display brightness Setting the brightness of the display Sabbath mode Switching Sabbath mode on and off Electrical connection Confirms that the appliance is connected to the electricity supply when it is not switched on flashes when there is a power outage Alarm Lights up when there is a door alarm flashes when there is a temperature alarm pow...

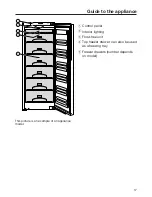
Page 17: ...appliance 17 This picture is an example of an appliance model a Control panel b Interior lighting c Frost free unit d Top freezer drawer can also be used as a freezing tray e Freezer drawers number depends on model ...

Page 18: ...e is connected to the electrical supply the mains connection symbol will appear in the display after a short while Touch the On Off sensor The appliance will start to cool The mains connection symbol goes out and the temperature appears in the display The temperature display and the alarm symbol will flash at the same time until the required temperature is reached If the current temperature inside...

Page 19: ...ss will be switched off When the appliance is switched back on again Sabbath mode is deactivated Switching off for longer periods of time If during a long absence the appliance is switched off but not cleaned out and the door is left shut there is a danger of mould building up inside the appliance It is essential to clean the appliance If the appliance is not going to be used for a longer period o...

Page 20: ...e temperature in the appliance will rise the more often the door is opened and the longer it is kept open the more food that is stored in it the warmer the food is which is being put into it the higher the ambient temperature surrounding the appliance The appliance is designed for use within specific ambient temperatures climate range Do not use in ambient temperatures for which it is not designed...

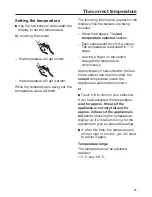
Page 21: ... 1 C steps Leaving a finger on the sensor changes the temperature continuously Approximately 5 seconds after the last time a sensor has been touched the current temperature inside the appliance is automatically shown or Touch OK to confirm your selection If you have adjusted the temperature wait for approx 6 hours if the appliance is not very full and for approx 24 hours if the appliance is full b...

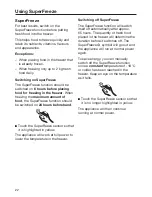
Page 22: ...rehand Touch the SuperFreeze sensor so that it is highlighted in yellow The appliance will work at full power to lower the temperature in the freezer Switching off SuperFreeze The SuperFreeze function will switch itself off automatically after approx 65 hours The quantity of fresh food placed in the freezer will determine the duration before it switches off The SuperFreeze symbol will go out and t...

Page 23: ...at determines the temperature the appliance recognises as being too warm The audio and visual signals are activated for example when the appliance is switched on and the temperature in the appliance differs greatly from the set temperature if a lot of room air enters the freezer when food is being loaded rearranged or taken out when freezing large amounts of food at once when you freeze fresh food...

Page 24: ...switched off see Further settings Audible tones The alarm will stop and the alarm symbol will go out as soon as the door is closed If the audible tone does not sound in the event of a door alarm then the audible tone has been switched off in settings mode see Further settings Audible tones Switching the door alarm off early If the noise of the alarm disturbs you you can switch the alarm off early ...

Page 25: ...other setting options are described below Safety lock The safety lock can be activated to prevent switching off temperature changes selection of the SuperFreeze function adjustment of settings only switching off the safety lock is possible The safety lock prevents the appliance being used without your knowledge by children for example Switching the safety lock on off Touch the settings sensor All ...

Page 26: ...e appliance has audible tones such as the keypad tone and the door and temperature alarms The keypad tone and door alarm warning tone can be switched on or off but the temperature alarm cannot be switched off You can choose from four setting options Option 3 is set at the factory This means that both the keypad tone and the door alarm are switched on Switching audible tones on off Touch the settin...

Page 27: ...cs will leave settings mode automatically after approx one minute Display brightness You can adjust the display brightness to suit the light conditions in the room The display brightness can be adjusted in steps from 1 to 3 The factory default setting is 3 maximum brightness Changing the display brightness Touch the settings sensor All selectable symbols appear in the display and the flashes Touch...

Page 28: ...door is opened all acoustic and visual signals the temperature display the SuperFreeze function if previously selected The following can be selected the settings sensor for switching off Sabbath mode and the On Off sensor The Sabbath mode will switch itself off automatically after approx 120 h Ensure that the door is properly closed as visual and audible alarms are switched off Risk of food poison...

Page 29: ... display and the symbol lights up By touching the or sensor you can now switch on Sabbath mode To do this select setting 1 Touch the OK sensor to confirm your selection The selected setting is applied the symbol lights up As soon as the symbol goes out in the display after 3 seconds Sabbath mode is switched on Switch off Sabbath mode after the Sabbath has passed Switching off Sabbath mode Touch th...

Page 30: ...ds and out Push the runners back in again to avoid injury or damage Be careful not to wash out the special lubricant in the telescopic runners during cleaning Wipe the telescopic runners with a well wrung out damp cloth to clean them To replace the drawer push the runners back in completely and then place the drawer on them Push the drawer into the appliance until it clicks into position Removing ...

Page 31: ...t during the defrosting process and very little water collects around the defrosted food Storing frozen food When buying frozen food to store in your freezer section check that the packaging is not damaged the use by date the temperature at which the frozen food is being stored in the shop The length of time it can be kept is reduced if it has been stored at a temperature warmer than 18 C Buy froz...

Page 32: ...eat with a sheet of plastic freezer film This prevents them from freezing together in a block Do not season fresh foods or blanched vegetables before freezing Only season cooked food lightly before freezing The taste or intensity of some spices alters when frozen Allow hot foods and drinks to cool down before placing them in the freezer Placing hot foods or drinks in the freezer causes food that i...

Page 33: ...Place the food in the lower freezer drawers Place the food flat in the bottom of the freezer drawer so that it freezes through to the core as quickly as possible When placing food on the glass shelf make sure that you do not block the ventilation slits in the back wall of the appliance They are important for trouble free operation of the appliance and normal energy consumption Freezing the maximum...

Page 34: ...ent ways in a microwave oven in an oven using Fan Heat or the Defrost setting at room temperature in the refrigerator section the cold given off by the frozen food helps to keep the other food cold in a steam oven Flat pieces of partially defrosted fish can be placed directly into a hot frying pan Thicker pieces of meat and fish e g minced beef chicken fish fillet should not come into contact with...

Page 35: ...nder running water Using the cool pack The cool pack prevents the temperature in the freezer from rising too quickly in the event of a power cut This helps to prolong the storage life Place the cool pack in the top drawer of the freezer The cool pack will be at its most effective after it has been in the freezer for approx 24 hours In the event of a power cut Place the frozen cool pack directly on...

Page 36: ...ts automatically The moisture generated in the appliance collects on the evaporator and is automatically defrosted and dissipated from time to time This automatic defrosting system enables the freezer to remain permanently ice free Food stored in the freezer will not defrost with this system ...

Page 37: ... and conditioning agents used inside the appliance must be food safe To avoid damaging the surfaces of your appliance do not use cleaning agents containing soda ammonia acids or chlorides cleaning agents containing descaling agents abrasive cleaning agents e g powder cleaners and cream cleaners solvent based cleaning agents stainless steel cleaning agents dishwasher cleaner oven sprays glass clean...

Page 38: ...aker Take any food out of the appliance and store it in a cool place Remove the shelves Lift them up at the front slightly and then pull them forward and out The telescopic runners on the shelves are not dishwasher safe Removing the telescopic runners To remove the telescopic runners 1 Push the catch upwards 2 Push the telescopic runner to the side 3 Then pull the telescopic runner off to the rear...

Page 39: ...helves Telescopic runners on the shelves Cool packs Clean these parts by hand The ice cube tray is dishwasher safe The maximum temperature of the dishwashing programme selected must not exceed 55 C Contact with natural dyes from carrots tomatoes and ketchup may discolour the plastic parts in the dishwasher This discolouration does not affect the stability of the parts Wipe the telescopic runners w...

Page 40: ...ild up of dust will increase the energy consumption of the appliance The ventilation gaps should be cleaned on a regular basis with a brush or vacuum cleaner you could use a Miele vacuum cleaner dusting brush for example A build up of dust will increase the energy consumption of the appliance After cleaning Slide all shelves back into the appliance Close the appliance door Reconnect to the mains a...

Page 41: ...ed on and the mains connection symbol is lit up in the display Switch the appliance on The plug is not correctly inserted into the socket or not switched on at the socket Insert the plug correctly into the socket and switch on The mains connection symbol appears in the display when the appliance is switched off Check whether the mains circuit breaker has tripped There could be a fault with the app...

Page 42: ...of fresh food has been placed inside and or frozen at the same time Only open the door when necessary and for as short a time as possible After a while the temperature will return to normal by itself The door is not properly closed A thick layer of ice may have formed in the freezer Close the door After a while the temperature will return to normal by itself If a thick layer of ice has formed it w...

Page 43: ...temperature again after 24 hours The food begins to defrost The room temperature is too low for this appliance If the room temperature is too low the compressor will run less frequently This may cause the freezer to become too warm See the information in Installation Location Increase the temperature of the room An LED indicator light is flashing at the back of the refrigerator at the bottom near ...

Page 44: ...m solving guide 44 Problem Possible cause and remedy The door seal is damaged and needs to be replaced No tools are required to change the door seal Change the door seal A replacement is available from Miele ...

Page 45: ...splay The temperature in the freezer has risen higher or fallen lower than the temperature which has been set This could be due to e g the appliance door being opened too often or being left open a large quantity of food was placed in the freezer section at once without switching on SuperFreeze the power was cut for a long time Remedy the alarm The alarm symbol will disappear and the audible tone ...

Page 46: ...too high because of a power cut or an interruption to the power supply The appliance will go back to the last temperature setting when the power is back on Touch the alarm off sensor The display of the warmest temperature recorded in the freezer will disappear The display will then revert to showing the current temperature in the freezer section Depending on the temperature displayed you should ch...

Page 47: ...f the door is left open If this is not the case there is a fault Danger of electric shock There are live electrical components under the lighting cover The LED lighting must only be repaired or replaced by a qualified technician Danger of injury from LED lighting The lighting covers must not be removed or damaged or be removed due to damage This could cause injury to your eyes Do not look into the...

Page 48: ...freezer Use a blunt instrument e g a spoon handle or plastic scraper to prise it apart carefully There is no audible alarm although the door has been open for a long time This is not a fault The alarm tone has been switched off in settings mode see Further settings Audible tones The symbol lights up in the display You cannot switch the appliance off The safety lock has been activated Deactivate th...

Page 49: ...nside the appliance Remember that the noise of the compressor and the coolant circulating in the system is unavoidable Noises Possible cause and remedy Rattling vibrating The appliance is uneven Realign the appliance using a spirit level by raising or lowering the screw feet underneath the appliance or place something underneath it The appliance is touching another appliance or piece of furniture ...

Page 50: ...t the end of this booklet Please quote the model and serial number of your appliance when contacting Miele This information can be found on the data plate The data plate is located inside the appliance Warranty The manufacturer s warranty for this appliance is 2 years For more information about country specific warranty terms and conditions please contact Miele ...

Page 51: ...ching on Demo mode Switch the appliance off using the On Off sensor If this does not work the safety lock is still activated The temperature display disappears and the mains connection symbol lights up Place your finger on the sensor and leave it there At the same time briefly touch the On Off sensor without letting go of the sensor Keep your finger on the sensor until the symbol appears in the di...

Page 52: ...hes in the display Touch the OK sensor to confirm your selection 1 flashes in the display Demo mode is active and the symbol is illuminated Touch the or sensor so that 0 appears in the display Demo mode is inactive Touch the OK sensor to confirm your selection The selected setting is saved and the symbol flashes Touch the settings sensor to leave settings mode Otherwise the electronics will leave ...

Page 53: ... mains connection cable must not come into contact with the back of the appliance as vibrations can cause damage to these components This in turn could result in a short circuit Nor should other appliances be plugged into a socket located directly behind this appliance Do not connect the appliance to the mains electricity supply by an extension lead Extension leads do not guarantee the required sa...

Page 54: ...d danger of damage This refrigeration appliance must not be installed underneath a cooktop Location This appliance should be installed in a dry well ventilated room When deciding where to install your refrigerator please bear in mind that it will use more energy if installed near a heater cooktop or other appliance that gives off heat Direct sunlight should also be avoided The higher the room temp...

Page 55: ...ese installation instructions Climate range This refrigeration appliance is designed for use within specific ambient temperatures climate range Do not use in ambient temperatures for which it is not designed A lower room temperature leads to the compressor switching off for longer periods This can cause the internal temperature in the appliance to rise with the risk of food deteriorating and going...

Page 56: ...ance and the air escapes at the top at the back of the housing unit A ventilation gap of at least 40 mm depth must be allowed for behind the appliance for air to circulate The ventilation gaps in the plinth housing unit and above the appliance must amount to a free airflow of at least 200 cm to ensure that air can circulate without hindrance If ventilation grilles are to be inserted into the venti...

Page 57: ... of the appliance and remove the packaging strap holding the door in place Do not remove the following from the rear of the appliance The spacers depending on model These ensure that the gap required between the back of the appliance and the wall is maintained The bags depending on model located inside the metal grille heat exchanger These are important for the correct functioning of the appliance...

Page 58: ...or can still be used Remove the old hinges from the housing unit They are no longer required because the furniture door will now be fitted to the appliance door All the necessary parts are supplied or can be ordered from Miele Stainless steel front depending on model If your old appliance had different hinging and you cannot or do not wish to use your old door you can use a stainless steel front i...

Page 59: ...e is fully functional in a 550 mm niche but the energy consumption will be slightly higher Before installation ensure the furniture unit dimensions are the correct size The required ventilation cross sections must be adhered to in order to ensure the correct functioning of the appliance Niche height mm A FNS 37402 i 1772 1788 ...

Page 60: ...on the hinge can be adjusted to accommodate this If the appliance door hits an adjacent wall when opened for example the opening angle can be limited to 90 The locking pins for limiting the door opening must be fitted before the appliance is installed Place the locking pins supplied for limiting the door opening into the hinges from above The door opening angle is now limited to 90 ...

Page 61: ...pplied with right hand hinging If left hand hinging is required the hinges must be changed To change the door hinging you will need the following tools Open the door Lift off covers and Slightly loosen the screws and on the hinges Push the door outwards take it off its hinges and place it to one side ...

Page 62: ... If you have put locking pins into the hinges to stop the door opening too far remove the locking pins from the top of the hinges Removing the soft close mechanism Warning The soft close mechanism snaps shut when dismantled Danger of injury Place the door with the outer side downwards on a stable surface Remove the soft close mechanism from the ball joint Unscrew the mounting and remove the soft c...

Page 63: ...rds hinges remain open Danger of injury Do not close the hinges Undo the screws Place each hinge on the diagonally opposite side Securing the soft close mechanism Now turn over the appliance door so that the outer side faces downwards Screw the mounting onto the hinge and tighten securely Open out the soft close mechanism and hook it onto the ball joint ...

Page 64: ...e door hinging 64 Hang the appliance door onto the pre fitted screws and and securely tighten the screws and Replace covers and Refit the locking pins in the top of the hinges to prevent the doors opening too far ...

Page 65: ...it against tipping Use a spirit level to align the housing unit The corners of the housing unit must be at a 90 angle to each other otherwise the furniture door will not align correctly with all 4 corners of the housing unit The required ventilation gaps must be adhered to see Installation advice Ventilation and Building in dimensions To install the appliance you will need the following tools ...

Page 66: ... Number depending on niche height max number for a niche height of 140 cm also contains additional installation parts for fitting large or divided furniture doors for mounting the appliance doors 8 4 Number depending on niche height Also contains additional installation parts for fitting large or divided furniture doors All fitting instructions given are for a right hand hinged appliance If you ha...

Page 67: ...andle area of the door Use the pre drilled holes in the appliance door Push the appliance about two thirds of the way into the building in niche When pushing the appliance into its niche make sure that the mains cable does not get trapped Useful tip To help you push it into position tie a piece of string around the plug to increase the length of the connection cable Then pull the cable by the end ...

Page 68: ...re the securing plate with the screws loosely into the top left hand side of the appliance Do not tighten the screws so that you can adjust the position of this part Fit the cover onto the fixing bracket Screw the fixing bracket loosely into the bottom of the appliance with the screws Do not tighten the screws so that you can adjust the position of this part ...

Page 69: ...ntire length Installing the appliance If the appliance is pushed too far into the niche the door may not close properly once the furniture panel has been fitted This can cause ice to build up condensate to accumulate and lead to faults in the appliance These can all lead to increased energy consumption Push the appliance into the building in niche making sure a gap of 42 mm is maintained all round...

Page 70: ...bottom hinges should be flush with the front edge of the housing unit side wall On furniture with door fittings e g stubs seals etc The dimension of these must be taken into account when making sure there is a gap all round of 42 mm Pull the appliance forwards by the appropriate dimension Check again to make sure there is a gap of 42 mm to the front edges of the door fittings Useful tip If possibl...

Page 71: ...e fitting fixing bracket against the side wall Screw the fixing bracket to the housing unit side wall with the screw Pre drill the hole in the housing unit if necessary Secure the fixing bracket to the housing unit side walls using the screws Drill holes in the housing unit side walls if necessary Important Push the protruding bracket using your thumb towards the housing unit wall whilst tightenin...

Page 72: ...e appliance in the unit push the rods supplied in underneath the appliance between it and the floor of the housing unit First secure the handle to one of the rods Use the handle to push the rod into the guide as far as it will go Remove the handle and fit it to the other rod and push this into its guide as far as it will go Important Keep the handle somewhere safe in case you ever need to fit the ...

Page 73: ...or If the appliance is being built into a run of units the height of the furniture door should be aligned with adjacent kitchen units The furniture door must be mounted plane and free of tension Fitting a door which is heavier than the maximum permitted could damage the hinges which could in turn affect the functioning of the appliance Before fitting a furniture door ensure that the weight of the ...

Page 74: ... up to the height of the furniture door the lower edge X of the fitting aids must be at the same height as the upper edge of the furniture door being fitted see in diagram Useful tip Push up the fitting aids with the furniture front until they are the same height as the doors of adjacent kitchen units Undo the nuts and take the fixing bracket off together with the fitting aids ...

Page 75: ... the fixing bracket centrally Secure the fixing bracket with 6 short chipboard screws on cassette doors only use 4 screws on either side of the bracket Pre drill the holes if necessary Pull the fitting aids upwards to remove them Turn them around and fit them into the middle slots on the fixing bracket for safe keeping Fit the side cover to the fixing bracket on the opposite side of the hinge Turn...

Page 76: ...he door and neighbouring furniture doors The distance should be the same Adjusting the position of the door Adjustment to the sides X Move the furniture door Height adjustment Y Use a screwdriver to adjust bolts The distance between the appliance door and the fixing bracket is set to 8 mm at the factory Adjust this distance only within the dimensions given in the diagram ...

Page 77: ...not protrude Drill fixing holes in the furniture door and screw in the screws Make sure the two metal edges are aligned Symbol Close the appliance door and the furniture door Adjusting the depth Z Loosen the screws at the top of the appliance door and the screw on the fixing bracket at the bottom By moving the furniture door create a gap of 2 mm between the furniture door and the front edge of the...

Page 78: ...e sure the appliance is correctly installed The door must close properly The door must not touch the housing unit The seal at the top edge of the handle side must fit properly To double check place a torch in the appliance and close the door Switch the lights off in the room If you can see any light shining out from the sides double check the installation ...

Page 79: ...aremont WA 6010 Miele Experience Centre and Office Adelaide Miele Australia Pty Ltd Miele New Zealand Limited Level 2 10 College Hill Freemans Bay Auckland 1011 Miele Experience Centre Auckland 8 College Hill Freemans Bay Auckland 1011 Telephone 0800 464 353 0800 4 MIELE www miele co nz Head Office IRD 98 463 631 ACN 005 635 398 ABN 96 005 635 398 Miele Experience Centre Gold Coast 131 Ferry Road ...

Page 80: ...M Nr 10 198 631 00 en AU NZ FNS 37402 i ...

Reviews: