background image

Operating and installation instructions
Oven

To prevent the risk of accidents or damage to the appliance, it is

essential

 to read these instructions before it is installed and used for

the first time.

en-AU, NZ

M.-Nr. 11 192 330

Summary of Contents for H 7464 BPX

Page 1: ...nd installation instructions Oven To prevent the risk of accidents or damage to the appliance it is essential to read these instructions before it is installed and used for the first time en AU NZ M Nr 11 192 330 ...

Page 2: ... Activating MobileStart 21 Features 22 Data plate 22 Items supplied 22 Accessories supplied and available to order 22 Baking tray universal tray and rack with non tip safety notches 23 Functions 28 Safety features 28 PerfectClean treated surfaces 29 Pyrolytic accessories 29 Before using for the first time 30 Miele home 30 Standard settings 31 Heating up the oven for the first time and rinsing the ...

Page 3: ...g tips 48 Operation 50 Changing values and settings for a cooking programme 50 Changing the temperature and the core temperature 51 Setting cooking durations 51 Changing the set cooking durations 52 Deleting the set cooking durations 52 Cancelling cooking 53 Pre heating the oven 54 Booster 55 Pre heat 56 Rapid cooling 57 Keeping warm 57 Crisp function 58 Moisture Plus 59 Starting the cooking progr...

Page 4: ... probe 82 Grilling 85 Tips for grilling 85 Notes on the cooking charts 86 Notes on the oven functions 87 Fan Grill 88 Grill 90 Cleaning and care 91 Unsuitable cleaning agents 91 Removing normal soiling 92 Removing stubborn soiling excluding the FlexiClip telescopic runners 93 Pyrolytic cleaning 94 Descale 97 Removing the door 101 Dismantling the door 102 Fitting the door 106 Removing the shelf run...

Page 5: ... Connections and ventilation 117 Installing the oven 118 Electrical connection 119 Cooking charts 120 Creamed mixture 120 Rubbed in mixture 121 Yeast dough 122 Quark dough 123 Whisked mixture 123 Choux pastry puff pastry meringue 124 Savoury snacks 125 Beef 126 Veal 127 Pork 128 Lamb game 129 Poultry fish 130 ...

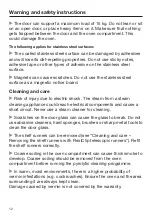
Page 6: ...e instructions Keep these instructions in a safe place and pass them on to any future owner Correct application This oven is designed for domestic use and for use in similar environments by guests in hotel or motel rooms bed breakfasts and other typical living quarters This does not include common shared facilities or commercial facilities within hotels motels or bed breakfasts The oven is not sui...

Page 7: ...e vicinity of the oven Never allow children to play with the oven Risk of suffocation from packaging material Whilst playing children may become entangled in packaging material such as plastic wrapping or pull it over their head with the risk of suffocation Keep packaging material away from children Risk of injury caused by hot surfaces Children s skin is far more sensitive to high temperatures th...

Page 8: ...f this oven can only be assured if it has been connected to the mains electricity supply The electrical safety of this appliance can only be guaranteed when continuity is complete between it and an effective earthing system It is essential that this basic safety requirement is present and tested regularly If in doubt the electrical installation should be checked by a qualified electrician The conn...

Page 9: ...al connection cable by a suitably qualified and competent person see Installation Electrical connection During installation maintenance and repair work the oven must be completely disconnected from the mains electricity supply To ensure this Switch off the mains circuit breaker or switch off at the wall socket and withdraw the plug To do this pull the plug and not the mains connection cable The ov...

Page 10: ...urations Certain foods dry out quickly and may catch fire due to high grilling temperatures Never use a grill function to finish baking bake off rolls or bread or to dry flowers or herbs Instead use the Fan Plus or Conventional Heat function and always ensure this type of procedure is supervised If using alcohol in your recipes please be aware that high temperatures can cause the alcohol to evapor...

Page 11: ...surfaces Never pour cold liquids directly onto hot surfaces Danger of injury caused by steam During cooking processes with moisture injection and during the residual moisture evaporation process steam is produced which can lead to severe scalding Never open the door when bursts of steam are being injected or during the evaporation of residual water It is important that the temperature in the food ...

Page 12: ... shock The steam from a steam cleaning appliance could reach electrical components and cause a short circuit Never use a steam cleaner for cleaning Scratches on the door glass can cause the glass to break Do not use abrasive cleaners hard sponges brushes or sharp metal tools to clean the door glass The shelf runners can be removed see Cleaning and care Removing the shelf runners with FlexiClip tel...

Page 13: ...safety notches As a general rule use shelf level 2 Only use the Miele food probe supplied with the appliance If it is faulty it must be replaced with a new original Miele food probe The plastic on the food probe can melt at very high temperatures Do not use the food probe when using the Grill functions Do not store the food probe in the oven compartment when it is not being used Accessories that a...

Page 14: ...lectrical and electronic appliances often contain valuable materials They also contain specific materials compounds and components which were essential for their correct function and safety These could be hazardous to human health and to the environment if disposed of with your domestic waste or if handled incorrectly Please do not therefore dispose of your old appliance with your household waste ...

Page 15: ...t openings e Water intake pipe for the steam injection system f Connection socket for the food probe g Air inlet for the fan with ring heating element behind it h Shelf runners with 5 shelf levels i Oven floor with bottom heat element underneath it j Front frame with data plate k Door ...

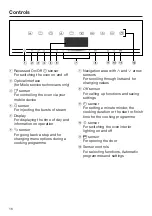
Page 16: ...For going back a step and for changing menu options during a cooking programme g Navigation area with and arrow sensors For scrolling through lists and for changing values h OK sensor For calling up functions and saving settings i sensor For setting a minute minder the cooking duration or the start or finish time for the cooking programme j sensor For switching the oven interior lighting on and of...

Page 17: ... sensor Select function will appear in the main menu Sensor controls The sensors react to touch Every touch on the sensors is confirmed by a keypad tone This keyapd tone can be switched off by selecting the Volume Keypad tone Off setting If you want the sensors to respond even when the oven is switched off select the Display QuickTouch On setting Sensor controls above the display For information o...

Page 18: ... can be released appears in the display while steam injection is in progress Depending on which menu you are in this sensor control will take you back a level or back to the main menu If a cooking programme is in progress at the same time use this sensor control to change values and settings such as the temperature or Booster function for the programme or to cancel the programme In the navigation ...

Page 19: ...or lighting on and off Depending on the setting selected the oven interior lighting switches off after 15 seconds or remains constantly switched on or off Use this sensor to open the door automatically To close it press against the door frame with your hand or with a suitable pot holder or oven glove until the door shuts Symbols The following symbols may appear in the display Symbol Meaning This s...

Page 20: ...th OK The setting is now saved This will take you back to the previous menu Changing the setting with a segment bar Some settings are represented by a bar with seven segments If all of the segments are illuminated the maximum value is selected If none or only one of the segments is illuminated the minimum value is selected or the setting is switched off altogether e g volume Touch the or arrow sen...

Page 21: ...til you release the arrow sensor Confirm with OK The changed number is now saved This will take you back to the previous menu Entering letters Letters are entered via the navigation area It is best to select short memorable names Touch the or arrow sensor or swipe to the right or left in the area until the desired character is highlighted The character you have selected will appear in the top line...

Page 22: ...ions Food probe Opener Screws for fixing the oven to the housing unit Descaling tablets and a plastic tube with suction cup for descaling the steam injection system Various accessories Accessories supplied and available to order Features will vary depending on model The shelf runners universal tray and wire rack or rack for short are supplied as standard with the oven Depending on the model your o...

Page 23: ...y HBB 71 Universal tray HUBB 71 Rack HBBR 72 Insert these accessories into the shelf runners between the two rails of a shelf level Always place the rack with the loading surface in the lower position and the non tip safety notches towards the back Non tip safety notches are located on accessories to prevent the trays being pulled out completely when you only wish to pull them out partially They a...

Page 24: ... of injury caused by hot surfaces The oven gets hot during operation You could burn yourself on the heating elements the oven compartment or accessories Allow the heating elements oven compartment and the accessories to cool down before fitting or removing the FlexiClip telescopic runners The FlexiClip telescopic runners are fitted in between the two rails that make up a shelf level The FlexiClip ...

Page 25: ... shelf level and out 2 Round baking trays The solid round baking tray HBF 27 1 is suitable for cooking pizzas flat cakes made with yeast or whisked mixtures sweet and savoury tarts baked desserts flat bread and can also be used for frozen cakes and pizzas The perforated round baking tray HBFP 27 1 has been specially developed for baked goods made from fresh yeast and quark dough and for baking bre...

Page 26: ... be used for the same things Baking stone HBS 60 The baking stone is ideal for items which need a well baked base such as pizza quiche bread bread rolls and savoury snacks The baking stone is made from heat retaining fireclay and is glazed A paddle made of untreated wood is supplied with the baking stone for placing food on it and taking it off Slide the rack in and place the baking stone on it Gr...

Page 27: ...0 22 HBD 60 35 Suitable for induction cooktops Food probe With the food probe you can monitor the temperature during cooking processes accurately see Roasting Food probe When using the food probe do not insert the FlexiClip telescopic runners on shelf level 4 otherwise this will block the socket Handle HEG The handle makes it easier to take the universal tray baking tray and rack out of the oven A...

Page 28: ...ted automatically if the oven has been operating for an unusually long period of time The period of time will depend on the particular oven function being used Ventilated door The oven door is made of glass panes that have a heat reflective coating on part of their surface When the oven is operating air is passed through the door to keep the outer pane cool The door can be removed and disassembled...

Page 29: ...ectClean surface Surfaces treated with PerfectClean enamel can be cleaned as you would clean glass Read the instructions in Cleaning and care so that the benefits of the non stick properties and easy cleaning are retained PerfectClean treated surfaces Universal tray Baking tray Grilling and roasting insert Gourmet perforated baking tray Round perforated baking tray Round baking tray Pyrolytic acce...

Page 30: ...nergy consumption even when the oven is switched off Make sure that the signal of your Wi Fi network is sufficiently strong in the place where your oven is installed Availability of the Wi Fi connection The Wi Fi connection shares a frequency range with other appliances including microwave ovens and remote control toys This may result in sporadic or even complete connection failures Therefore a co...

Page 31: ...as described in Settings Language Setting the country Select the country you want Setting up Miele home Set up Miele home appears in the display To set up Miele home immediately select Continue and confirm with OK To set it up at a later date select Skip and confirm with OK See Settings Miele home for information on setting up at a later date To set up Miele home immediately select the desired con...

Page 32: ...exiClip telescopic runners to the shelf runners and insert all trays and the rack Switch the oven on with the On Off sensor Select function appears in the display Select Moisture Plus Select Moisture Plus Fan Plus The recommended temperature will appear 160 C The oven heating lighting and cooling fan will switch on Set the maximum possible temperature 250 C Confirm with OK Select Automatic burst o...

Page 33: ...n Off sensor after at least on hour Cleaning the oven compartment after heating it up for the first time Risk of injury caused by hot surfaces The oven gets hot during operation You could burn yourself on the heating elements the oven compartment or accessories Allow the heating elements oven compartment and the accessories to cool before manual cleaning Take all accessories out of the oven and cl...

Page 34: ...te Lighting On On for 15 seconds Off Display Brightness QuickTouch On Off Volume Buzzer tones Melodies Solo tone Keypad tone Welcome melody On Off Units Temperature C F Booster On Off Rapid cooling On Off Keeping warm On Off Recommended temperatures Pyrolytic recommendation On Off Cooling fan run on Temperature controlled Time controlled Factory settings ...

Page 35: ...stem lock On Off Miele home Activate Deactivate Connection status Set up again Reset Set up Remote control On Off Remote update On Off Software version Showroom programme Demo mode On Off Factory default Appliance settings User programmes Recommended temps Factory settings ...

Page 36: ...time is always visible in the display If you also select the Display QuickTouch On setting all sensors react to touch as normal If you also select the Display QuickTouch Off setting the oven has to be switched on before it can be used Off The display is dark to save energy The oven has to be switched on before you can use it Night dimming To save energy the time is only visible in the display betw...

Page 37: ...me Show setting the sensors only respond when the oven is switched on as well as for a certain amount of time after switching it off Volume Buzzer tones If buzzers are switched on a buzzer will sound when the set temperature is reached and at the end of a set time If you want to open the door remotely using a voice based service make sure that nobody is in the area around the door when opening it ...

Page 38: ...ents for the selected oven function are used to pre heat the oven compartment Rapid cooling Using the Rapid cooling function you can quickly cool down food and the oven compartment once the cooking programme is finished This function is useful if for example you immediately want to start an Automatic programme for which the oven compartment needs to be cold Using the Keeping warm function you can ...

Page 39: ...atically in order to keep the food warm Off The Keeping warm function is switched off The door remains closed at the end of the cooking programme The cooling fan cools the food and the oven compartment Recommended temperatures If you frequently cook with different temperatures it makes sense to change the recommended temperatures After selecting this option a list of oven functions will appear in ...

Page 40: ...cooling fan to Time controlled Safety Sensor lock The sensor lock prevents the cooking programme being switched off by mistake or settings being changed Apart from the On Off sensor the activated sensor lock prevents the sensors and fields in the display from working a few seconds after a programme has been started On The sensor lock is switched on Touch the OK sensor for at least 6 seconds to dea...

Page 41: ...emains set up the Wi Fi function is switched off Connection status This setting is only visible if Miele home is activated The display shows information such as the Wi Fi reception quality network name and IP address Set up again This setting is only visible if a Wi Fi network has already been set up Reset the network settings and immediately set up a new network connection Reset This setting is o...

Page 42: ...Start as long as the sensor is lit up Remote update The Remote update menu option is only displayed and can only be selected if the requirements for using Miele home have been met see Before using for the first time Miele home or Settings The RemoteUpdate function is used for updating the software in your oven If an update is available for your oven it will automatically download it Updates will n...

Page 43: ...n only be carried out by a Miele service technician Software version The software version menu option is for use by Miele service technicians You do not need this information for domestic use Showroom programme This function enables the oven to be demonstrated in showrooms without heating up Do not activate this setting for domestic use Demo mode If you switch the oven on whilst it is in Demo mode...

Page 44: ...en on before setting the minute minder The minute minder can then be seen counting down in the display when the oven is switched off Select the sensor Select Minute minder if a cooking programme is in progress at the same time The prompt Set 00 00 min will appear Using the navigation area set 06 20 Confirm with OK The minute minder duration is now saved When the oven is switched off the minute min...

Page 45: ...elect Change Confirm with OK The minute minder time selected appears Change the time set for the minute minder Confirm with OK The altered minute minder time is now saved Cancelling the minute minder Select the sensor Select Minute minder if a cooking programme is in progress at the same time Select Delete Confirm with OK The minute minder is now cancelled ...

Page 46: ... C Auto Roast 160 C 100 230 C Intensive Bake 170 C 50 250 C Full Grill 240 C 200 300 C Fan Grill 200 C 100 260 C Moisture Plus Moisture Plus Auto Roast 160 C 130 230 C Moisture Plus Fan Plus 160 C 130 250 C Moisture Plus Intensive Bake 170 C 130 250 C Moisture Plus Conv Heat 180 C 130 280 C Pyrolytic Automatic programmes ...

Page 47: ...ther Bottom Heat 190 C 100 280 C Eco Fan Heat 190 C 100 250 C Defrost 25 C 25 50 C Drying 90 C 80 100 C Heat crockery 80 C 50 100 C Prove yeast dough Prove for 15 minutes Prove for 30 minutes Prove for 45 minutes Keeping warm 75 C 60 90 C Descale Settings ...

Page 48: ...Plus function can be used for cooking many types of food Because the fan distributes the heat in the oven compartment straight away it allows you to use a lower temperature than you would with Conventional Heat It also enables you to cook on several shelf levels at the same time Eco Fan Heat is an innovative function which is suitable for small amounts of food e g frozen pizzas bake off rolls bisc...

Page 49: ... the oven is sufficient to complete the cooking process It is best to start the pyrolytic cleaning programme immediately after a cooking programme The residual heat in the oven will help reduce the amount of energy required Customising settings Select the setting Display QuickTouch Off for the control elements in order to reduce energy consumption Select the Lighting Off or On for 15 seconds setti...

Page 50: ...ture is reached for the first time After cooking select the sensor for the selected function to end the cooking programme Take the food out of the oven Switch the oven off Changing values and settings for a cooking programme Depending on the function as soon as a cooking programme is in progress you can use the sensor to change the values or settings for this programme Select the sensor Depending ...

Page 51: ...mme will resume with the new target temperatures Setting cooking durations Cooking results can be adversely affected if there is a long delay between the food being placed in the oven and the start of cooking Fresh food can change colour and even spoil When baking the cake mixture or dough can dry out and the raising agents can lose their effectiveness Select as short a time as possible until the ...

Page 52: ...automatically at the time you have set Select the sensor Set the required times Confirm with OK Touch the sensor to return to the menu of the selected function Changing the set cooking durations Select the sensor Select the time Confirm with OK Select Change Change the set time Confirm with OK Touch the sensor to return to the menu of the selected function These settings will be deleted in the eve...

Page 53: ...gramme is finished and the cooling fan quickly cools the food and the oven compartment Touch the sensor for the selected function to return to the main menu Cancelling a cooking programme without a set cooking duration Touch the sensor for the selected function The main menu will appear Or select the sensor Select Cancel process Confirm with OK Cancelling a cooking programme with a set cooking dur...

Page 54: ...e It is only necessary to pre heat the oven in a few instances Most dishes can be placed in a cold oven They will then make use of the heat produced during the heating up phase Pre heat the oven for the following preparations and oven functions Dark bread dough and beef sirloin joints and fillet with the Fan Plus Moisture Plus and Conventional Heat functions Cakes and pastries with a short cooking...

Page 55: ...oo quickly on the top if the Booster function is used Switch off the Booster function for these items Switching Booster on or off for a cooking programme If you have selected the Booster On setting you can switch off the function separately for a cooking programme On the other hand you can also switch on the function separately for a cooking programme if you have selected the Booster Off setting E...

Page 56: ...ying the start time Switching on the Pre heat function The Pre heat function can be used with any oven function and has to be switched on separately for each cooking programme Example You have selected a function and the required settings such as the temperature You want to switch on the Pre heat function for this cooking programme Select the sensor Select Pre heat On Confirm with OK The following...

Page 57: ...irm this message with OK The Rapid cooling and Keeping warm functions are switched off The door remains closed at the end of the cooking programme The cooling fan cools the food and the oven compartment Keeping warm Using the Keeping warm function you can keep food warm after cooking without inadvertently cooking it further The food is kept warm at a preset temperature see Settings Recommended tem...

Page 58: ...g programme Select the sensor Select Keeping warm Off Confirm with OK The Keeping warm function is switched off The door remains closed at the end of the cooking programme The cooling fan cools the food and the oven compartment The setting for the Rapid cooling function remains unchanged Crisp function It is a good idea to use the Crisp function moisture reduction when cooking food which has a moi...

Page 59: ...ng with moisture injection The water is injected as bursts of steam into the oven compartment during the cooking programme The steam outlets are located in the rear left corner of the ceiling of the oven compartment Suitable food One burst of steam takes about 5 8 minutes The number of bursts of steam and when they are injected will depend on the type of food being cooked Yeast doughs will rise be...

Page 60: ...sts of steam or 3 bursts of steam Confirm with OK If you have selected multiple bursts of steam the selection display for releasing the bursts of steam will appear Select how you want the steam injections to be released Manual bursts of steam You release the bursts of steam yourself Time controlled bursts of steam You set the times for the bursts of steam The oven will inject 1 2 or 3 bursts of st...

Page 61: ...a small amount in the container You can interrupt and resume the intake process at any time by selecting OK Remove the water container after the water intake process and close the door The sound of the pump running can be heard again briefly Residual water in the water intake pipe is being drawn into the oven The oven heating and cooling fan will switch on The required and the actual temperature w...

Page 62: ...d to allow the steam to be distributed evenly by the warm air in the oven Useful tip Refer to the supplied recipe book or the Miele mobile App for tips on when to release the bursts of steam Use the Minute minder function to remind you to inject the steam Select the sensor The burst of steam will be released and Burst of steam active will appear in the display and the sensor will go out Proceed as...

Page 63: ...n Automatic programme with moisture injection is used Evaporate residual moisture will appear in the display It is best to start the evaporation of residual water straight away so that only fresh water is used during the next cooking programme Danger of injury caused by steam Steam can cause severe scalding Do not open the door during a burst of steam Depending on the amount of water the evaporati...

Page 64: ...ocess a buzzer will sound and Finished will appear A cooking programme with a function or an Automatic programme that uses moisture can now be run While the residual water is evaporating the moisture will condense on the door and in the oven interior This moisture needs to be wiped off after the oven has cooled down Skipping residual moisture evaporation Skipping the residual moisture evaporation ...

Page 65: ...s the recipes provided are designed as a guide only Other similar recipes including those using different quantities can be used for the Automatic programme in question After cooking allow the oven compartment to cool down to room temperature again before starting an Automatic programme Some Automatic programmes require a pre heating phase before food can be placed in the oven A prompt will appear...

Page 66: ...lla can cause life threatening food poisoning It is particularly important to observe food hygiene rules when defrosting fish and meat and in particular when defrosting poultry Do not use the liquid produced during defrosting Process the food as required as soon as it has been defrosted Useful tips Remove the packaging and place the frozen goods on the universal tray or in a suitable bowl or dish ...

Page 67: ...instructions in the display Turn the food for drying on the universal tray at regular intervals The drying times are longer for whole or halved food Food C h Fruit 60 70 2 8 Vegetables 55 65 4 12 Mushrooms 45 50 5 10 Herbs 30 35 4 8 Special application Function Special application Drying Oven function Fan Plus Temperature Drying time Reduce the temperature if condensation begins to form in the ove...

Page 68: ...ration You could burn yourself on the heating elements the oven compartment or accessories Droplets of water may have accumulated underneath the crockery Wear oven gloves when removing dishes from the oven Prove yeast dough This programme is designed specifically for proving yeast dough Select Other Select Prove yeast dough Select the proving time Follow the instructions in the display Keeping war...

Page 69: ...ctly hung and trimmed Bones should be removed before cooking For searing use a suitable cooking oil or fat that can withstand high temperatures e g clarified butter vegetable oil Do not cover meat during cooking The cooking duration takes approx 2 4 hours depending on the weight and size of the meat and how well you want it cooked As soon as the cooking programme has finished you can carve the mea...

Page 70: ...e Booster function Pre heat the oven together with the universal tray and rack for approx 15 minutes While the oven is pre heating sear the meat on all sides on the cooktop Risk of burning due to hot surfaces The oven gets hot during operation You could burn yourself on the heating elements the oven compartment or accessories Wear oven gloves when placing food in the oven or removing it and when a...

Page 71: ... pressure which can cause them to explode Do not use tins for preserving or heating food Preparing fruit and vegetables The instructions are for 6 jars with a capacity of 1 litre each Only use special jars for preserving preserving jars or jars with a screw cap Only use undamaged jars and rubber rings Rinse the jars with hot water before bottling and fill them up to a maximum of 2 cm below the rim...

Page 72: ...ature and time once bubbles are visible in the jars After warming temperature and time Removing the jars after bottling Risk of injury caused by hot surfaces The jars are very hot after bottling Wear oven gloves when removing the jars from the oven Take the jars out of the oven Cover the jars with a towel and leave for approx 24 hours in a draught free area After they have cooled down always rehea...

Page 73: ...s and similar items These frozen items can be cooked on the baking tray or universal tray Place baking paper on the tray so that they cook gently Use the lowest temperature recommended on the packaging Turn food several times during cooking Preparing frozen food ready meals Handling food carefully will help protect your health Cakes pizzas and chips should be cooked until golden not dark brown Sel...

Page 74: ...programmes Select Create programme You can now specify the settings for the first cooking stage Follow the instructions in the display Select and confirm the desired settings If you select the Pre heat function first complete the first cooking stage Use Add cooking stage to then add another cooking stage where you set a cooking duration Only then can you save or start the programme If required sel...

Page 75: ...diately Finish at Specify the time at which the programme should finish The oven heating will switch off automatically at the time you have set Start at Specify the time at which you want the programme to start The oven heating will switch on automatically at the time you have set Show cooking stages A summary of your settings will appear in the display Display actions The required actions e g pla...

Page 76: ...n the display confirming that the new name has been saved Confirm with OK The saved programme has been changed and you can start it immediately or delay the start Changing a name Select Other Select User programmes Select the programme you want to change Select Change name Change the programme name Select Once you have changed the programme name select Save A message will appear in the display con...

Page 77: ... with PerfectClean enamel generally do not need to be greased or covered with baking paper Use baking paper when baking lye pastries e g pretzels because the sodium hydroxide can damage the PerfectClean treated surface Use baking paper when baking sponge meringue macaroons or similar items These are more likely to stick due to their high egg white content Use baking paper when cooking frozen food ...

Page 78: ...or moist biscuits and cakes bake on a maximum of 2 shelf levels at once Using Moisture Plus Use this function with your preferred type of heating for cooking with moisture injection Place the food on shelf level 2 Using Intensive Bake Use this function for baking cakes with moist toppings Do not use this function for baking thin biscuits Place cakes on shelf level 1 or 2 Using Conventional Heat Da...

Page 79: ...ons on the packaging If you are using the rack or an open roasting dish for roasting you can add a little fat or oil to very lean meat or place a few strips of streaky bacon on the top Season the meat and place in the roasting dish Dot with butter or margarine or brush with oil or cooking fat if necessary For large lean cuts of meat 2 3 kg and fatty poultry add about 1 8 l of water to the dish Do ...

Page 80: ...Heat For cuts which weigh more than 3 kg select a temperature approx 10 C lower than that given in the roasting chart The roasting process will take longer but the meat will cook evenly through and the skin or crackling will not be too thick When roasting on the rack set a temperature approx 10 C lower than for roasting in a covered oven dish Selecting the cooking duration Unless otherwise stated ...

Page 81: ... is immediately distributed throughout the oven compartment With the Auto Roast function the oven compartment heats initially to a high searing temperature approx 230 C As soon as this temperature has been reached the oven automatically drops the temperature back down to the pre selected roasting temperature continued roasting Place the food on shelf level 2 Using Moisture Plus Use this function w...

Page 82: ...ing on whether you want your roast to be rare medium or well done The core temperature can be set up to 99 C Information on food and respective core temperatures can be found in the cooking charts at the end of this book The cooking duration will be similar when cooking with or without the food probe Options for use Some Automatic programmes and Special applications will prompt you to use the food...

Page 83: ... the foil bag into the centre of the food You can also place meat inside the bag or foil with the food probe already inserted Follow the roasting bag manufacturer s instructions Using the food probe Fully insert the metal tip of the food probe into the centre of the meat If you are cooking several pieces of meat at the same time insert the food probe into the largest piece of meat Place the food i...

Page 84: ...ooking process is above 140 C the estimated time left for the cooking process will appear in the display after a short while The time left is also displayed when using the Low temperature cooking Special application where cooking takes place at lower temperatures The time left is calculated from the cooking temperature selected the set core temperature and the progress of the core temperature as i...

Page 85: ...eat 10 15 minutes before cooking Add a little oil to lean meat if necessary Do not use other types of fat as they can easily burn and cause smoke Clean fish in the normal way To enhance the flavour season with a little salt Fish can also be drizzled with lemon juice Use the universal tray with the rack or the grilling and roasting insert if present placed in it The meat juices will collect in the ...

Page 86: ...level 1 or 2 Selecting the cooking duration Grill thinner cuts of meat slices of fish for approx 6 8 minutes per side It is best to grill food of a similar thickness at the same time so that the cooking durations do not vary too much As a general rule check whether the food is cooked after the shortest duration To test the food press down on the meat with a spoon This lets you determine how well t...

Page 87: ... not store the food probe in the oven compartment when it is not being used Using Full Grill Use this function to grill flat thin cuts in large quantities and for browning large baked dishes The entire top heat grill element will get hot and glow red Using Fan Grill This function is suitable for grilling thicker food such as chicken A temperature setting of 220 C is generally recommended for thinn...

Page 88: ...e Fan Grilling as this encourages a richer colour Ovens with the Crisp function Activate the Crisp function moisture reduction at the beginning of the Fan Grill function This is great for items that are moist on the inside and should be crispy on the outside All temperatures are approximations and must be varied according to the thickness and preparation of the meat The chart below is a suggested ...

Page 89: ...12 Lamb loin chops 190 4 12 16 Lamb back straps 220 5 8 10 Vegetables capsicum zucchini sweet potato eggplant 200 5 12 15 Potato wedges or small roast potatoes 220 3 20 25 Kebabs and satays red meat 200 5 12 15 Chicken satays 200 4 12 15 Shelf level Temperature Duration Fan Grill can be used for small roasts but is only recommended for lean tender cuts of meat e g lamb racks rump roasts and beef f...

Page 90: ...etta and bacon Pre heat the grill for at least 5 minutes at 200 220 C Select the appropriate shelf level for the thickness of the food The door must be closed when using the Grill function This is a suggested guide only Personal taste and size of serves will vary times and temperatures ...

Page 91: ...ces Remove all cleaning agent residues immediately Unsuitable cleaning agents To avoid damaging the surfaces of your appliance do not use cleaning agents containing soda alkalines ammonia acids or chlorides cleaning agents containing descaling agents on the front abrasive cleaning agents e g powder cleaners and cream cleaners solvent based cleaning agents stainless steel cleaning agents dishwasher...

Page 92: ... of the oven should be handled carefully Do not rub and scour it Ideally you should avoid cleaning it It is best to remove normal soiling immediately using a clean sponge and a solution of hot water and washing up liquid or a clean damp microfibre cloth Remove any residual cleaning agent thoroughly with clean water This is particularly important for any parts with a PerfectClean finish as cleaning...

Page 93: ...leaned using Miele Oven Cleaner This cleaner must only be applied to cold surfaces If the oven spray gets into gaps and openings a strong odour is generated during subsequent cooking programmes Do not spray the oven cleaner onto the roof of the oven compartment Do not spray the oven cleaner into the gaps and openings of the oven compartment walls and rear wall Follow the instructions on the packag...

Page 94: ...d depending on the degree of soiling in the oven compartment can be easily wiped away Preparing for pyrolytic cleaning Accessories that are not suitable for pyrolytic cleaning will be damaged by the high temperatures Remove all accessories that are not suitable for pyrolytic cleaning from the oven before starting the pyrolytic cleaning programme This also applies to non pyrolytic accessories purch...

Page 95: ...c cleaning The time left for the pyrolytic cleaning programme will start counting down in the display It cannot be changed You can use the minute minder at the same time as running the cleaning programme At the end of the minute minder time a buzzer will sound will start flashing and the time can be viewed counting up in the display When you touch the sensor the acoustic and optical signals will s...

Page 96: ...ment Add a few drops of heat resistant cooking oil to some paper towels and use this to lubricate the shelf runners Most residues can be removed with warm water a little washing up liquid and a clean sponge or a clean damp microfibre cloth Depending on the degree of soiling a visible deposit can build up on the glass on the inside of the oven door This can be removed with a dishwashing sponge a gl...

Page 97: ...le to run any function or Automatic programme that uses moisture These functions can only be used again after you have carried out the descaling process All other functions and Automatic programmes without moisture can still be used Descaling process sequence Once the descaling process has been started it must be completed through to the end It cannot be cancelled The descaling process takes appro...

Page 98: ... descaling result required cannot be guaranteed if the descaling solution does not have the appropriate concentration Fill the container with approx 600 ml of cold tap water and thoroughly dissolve one descaling tablet in it Starting the descaling process Select Other Select Descale If the functions and Automatic programmes that use moisture injection are already disabled the descaling process can...

Page 99: ...f the activation phase the steam injection system will need to be rinsed out to remove all traces of descaling solution Cleaning is carried out by flushing approx 1 litre of fresh tap water through the system three times The water is collected in the universal tray Take the universal tray with the collected descaling agent out of the oven and empty it Place the tray back in the oven again on the t...

Page 100: ...count down in the display During the evaporation process the duration may be adjusted by the system according to how much water is currently present Finalising the descaling process At the end of the evaporation process a message will appear in the display with advice on cleaning after running the descaling programme Confirm with OK A buzzer sounds and Finished appears Switch the oven off with the...

Page 101: ...released Open the door fully Release the locking clamps by turning them as far as they will go The oven could be damaged if you remove the door incorrectly Do not pull the door horizontally off its retainers as they will spring back against the oven Raise the door up till it rests partially open Hold the door on either side and pull it diagonally upwards from the hinge guides Make sure that the do...

Page 102: ...tools to clean the door glass When cleaning the door glass you must also follow the instructions that apply to the oven front The different sides of the door glass have different coatings The sides facing the oven compartment have heat reflecting properties The oven will be damaged if you fit the door glass the wrong way round Make sure that you place the door glass back in the right position afte...

Page 103: ...s remove the door before disassembling it Place the door with the outer glass pane on a soft surface e g a tea towel to prevent it getting scratched Flip the two glass pane retainers outwards to open them You can now remove the inner pane and the two middle panes one after the other Gently lift the inner pane up and out of the plastic strip Remove the seal ...

Page 104: ...with a soft cloth Then reassemble the door carefully The two middle panes are identical To help you put them back in correctly the material number is printed on the panes Refit the lower of the two middle panes in such a way that the material number is legible i e not reversed Flip the glass pane retainers inwards in such a way that they fit over the lower of the two middle panes Refit the upper o...

Page 105: ...05 Refit the seal Push the inner pane with the matte printed side facing downwards into the plastic strip and place it between the retainers Flip both glass pane retainers inwards to close them The door is now reassembled ...

Page 106: ...tainers Make sure that the door goes back on straight Open the door fully If the locking clamps are not locked the door could work loose resulting in damage Ensure that the locking clamps are locked after refitting the door To relock the locking clamps flip them back up into a horizontal position as far as they will go ...

Page 107: ...s Fitting and removing the FlexiClip telescopic runners Risk of injury caused by hot surfaces The oven gets hot during operation You could burn yourself on the heating elements the oven compartment or accessories Allow the heating elements oven compartment and the accessories to cool before removing the shelf runners Pull the shelf runners out of the holder 1 at the front of the oven and then pull...

Page 108: ...mel on the oven floor can be damaged by fastening nuts being dropped on it Place a cloth or similar item over the oven compartment floor to protect it Remove the shelf runners Unscrew the wing nut Use caution not to damage the top heat grill element Do not use force to lower the top heat grill element as this can cause it to break Carefully lower the top heat grill element You can now access the c...

Page 109: ...d the Time Show Off setting When the oven is switched off the display is dark As soon as the oven is switched on the main menu will appear If you want the time of day to be displayed constantly select the Time Show On setting There is no power to the oven Check if the circuit breaker has tripped Contact a qualified electrician or Miele The signal tone does not sound The buzzers are deactivated or ...

Page 110: ...u need to open the door for instance because there is still food in the oven compartment use the opener supplied to prise the door open To do so push the opener at an angle into the gap on the outside edge of the door at the top between the control panel and the door You can also pull the door open by grasping the sides of the door with both hands and pulling carefully until it opens The pyrolytic...

Page 111: ... oven is switched on The system lock has been switched on You can deactivate the system lock for a programme by touching the OK sensor for at least 6 seconds If you want to permanently deactivate the system lock select the Safety System lock Off setting Power cut process cancelled appears in the display There has been a brief power cut This has caused the current cooking programme to stop Switch t...

Page 112: ... mode by selecting Settings Showroom programme Demo mode Off The pump for the steam injection system is faulty Call Miele A noise can be heard after a cooking process The cooling fan remains switched on after a cooking programme see Settings Cooling fan run on The oven has switched itself off The oven will switch itself off automatically to save energy if no other action is taken within a certain ...

Page 113: ...ven after the pyrolytic cleaning programme you should start the programme again selecting a longer duration if necessary The accessories make noises when being pushed into or pulled out of the oven The pyrolytic resistant surface of the shelf runners creates friction when accessories are being pushed into or pulled out of the oven To reduce the friction add a few drops of heat resistant cooking oi...

Page 114: ... the end of this booklet Please quote the model and serial number of your appliance when contacting Miele This information can be found on the data plate The data plate is visible on the front frame of the oven with the door fully open Warranty The manufacturer s warranty for this appliance is 2 years For further information please refer to your warranty booklet ...

Page 115: ...mensions Dimensions are given in mm Installation in a tall or base unit When building the oven into a base unit underneath a cooktop please also observe the installation instructions for the cooktop as well as the building in height required for the cooktop ...

Page 116: ...Installation I N S T A L L A T I O N 116 Side view ...

Page 117: ...Installation I N S T A L L A T I O N 117 Connections and ventilation a Front view b Mains connection cable length 2 000 mm c No connections permitted in this area d Ventilation cut out min 150 cm ...

Page 118: ...e housing to lift the appliance Remove the door and the accessories before installing the appliance This makes the oven lighter when you push it into the housing unit To remove the door use the opener supplied to prise the door open at the top in the middle You can also pull the door open by grasping the sides of the door with both hands and pulling carefully until it opens Remove the door see Cle...

Page 119: ...poles The means of disconnection must be incorporated in the fixed wiring in accordance with the wiring rules When switched off there must be an all pole contact gap of 3 mm in the isolator switch including switch fuses and relays Connection data AC 230V 50 Hz The voltage and rated load are given on the data plate situated at the front of the oven frame visible with the oven door open Please ensur...

Page 120: ...e ring tin Gugelhupf cake tin 26 cm 150 160 2 55 65 150 160 2 60 70 Fresh fruit cake tray 150 160 2 40 50 155 165 1 40 50 Fresh fruit cake springform cake tin 26 cm 150 160 2 55 65 165 175 1 2 50 60 Flan base flan base tin 28 cm 150 160 2 25 35 170 180 1 2 15 25 Function Temperature Booster Shelf level Cooking duration CF Crisp function Fan Plus Conventional Heat On Off 1 Pre heat the oven before ...

Page 121: ...160 2 90 100 180 1 80 90 Apple pie springform cake tin 26 cm 180 190 1 2 60 70 160 170 2 60 70 Fresh fruit cake glazed springform cake tin 26 cm 170 180 2 60 70 150 160 2 55 65 Fresh fruit cake glazed tray 170 180 2 50 60 160 170 2 45 55 Swiss flan tray 210 220 1 1 45 55 190 200 2 40 50 Function Temperature Booster Shelf level Cooking duration CF Crisp function Fan Plus Eco Fan Heat Conventional H...

Page 122: ...190 2 55 65 200 210 1 2 55 65 5 6 Proving yeast dough 30 35 2 Function Temperature Booster Shelf level Cooking duration CF Crisp function Fan Plus Moisture Plus Fan Plus Moisture Plus Conventional Heat Conventional Heat On Off 1 Pre heat the oven before placing the food inside 2 Place the rack on the floor of the oven and stand the bowl with the dough on the rack Depending on the size of the dish ...

Page 123: ...of the oven early if the food has already browned sufficiently before the specified cooking duration has elapsed Whisked mixture Cakes Biscuits accessories C min CF Sponge cake base 2 eggs springform cake tin 26 cm 160 170 1 2 15 25 Sponge cake base 4 6 eggs springform cake tin 26 cm 150 160 1 2 30 40 Water sponge springform cake tin 26 cm 180 2 25 35 150 170 1 2 25 45 Swiss roll tray 180 190 1 1 ...

Page 124: ...ingues pavlovas 1 tray of 6 each 6 cm 80 100 2 120 150 Meringues pavlovas 2 trays of 6 each 6 cm 80 100 1 3 150 180 Function Temperature Booster Shelf level Cooking duration CF Crisp function Fan Plus Moisture Plus Fan Plus On Off 1 Release 1 burst of steam 8 minutes into the cooking programme 2 Switch on the Crisp function 15 minutes into the cooking process 3 Take the trays out of the oven early...

Page 125: ...shes Gratins e g toast 1 2 275 4 3 3 6 Grilled vegetables 1 2 275 4 4 5 10 5 250 4 3 5 10 5 Ratatouille universal tray 180 190 2 40 60 Function Temperature Booster Shelf level Cooking duration CF Crisp function Fan Plus Eco Fan Heat Conventional Heat Intensive Bake Full Grill Fan Grill On Off 1 Use the rack and the universal tray 2 Depending on the amount you can also use the Economy Grill functio...

Page 126: ... 95 4 2 110 120 60 65 Sirloin joint well done approx 1 kg 1 2 95 100 4 2 130 140 70 75 Function Temperature Booster Shelf level Cooking duration Core temperature Auto Roast Conventional Heat Eco Fan Heat Full Grill On Off 1 Use the rack and the universal tray 2 Sear the meat on the cooktop first 3 Pre heat the oven before placing the food inside 4 Pre heat the oven at 120 C for 15 minutes Reduce t...

Page 127: ...0 60 65 Fillet of veal well done approx 1 kg 1 2 95 100 4 2 90 100 70 75 Function Temperature Booster Shelf level Cooking duration Core temperature Auto Roast Conventional Heat On Off 1 Use the rack and the universal tray 2 Sear the meat on the cooktop first 3 Pre heat the oven before placing the food inside 4 Pre heat the oven at 120 C for 15 minutes Reduce the temperature when you place the food...

Page 128: ...Conventional Heat Eco Fan Heat Moisture Plus Fan Plus Full Grill On Off 1 Use the rack and the universal tray 2 Sear the meat on the cooktop first 3 Switch on the Crisp function Depending on the amount you can also use the Economy Grill function 4 Pre heat the oven at 120 C for 15 minutes Reduce the temperature when you place the food in the oven 5 Pre heat the oven for 5 minutes before placing th...

Page 129: ...oebuck saddle off the bone universal tray 1 140 150 2 2 25 35 60 81 Leg of wild boar off the bone approx 1 kg oven dish with lid 1 170 180 2 100 120 4 80 90 Function Temperature Booster Shelf level Cooking duration Core temperature Conventional Heat On Off 1 Sear the meat on the cooktop first 2 Pre heat the oven before placing the food inside 3 Pre heat the oven at 120 C for 15 minutes Reduce the ...

Page 130: ... 1 1 5 kg e g salmon trout universal tray 210 220 2 2 30 40 6 75 80 Fish fillet in foil 200 300 g universal tray 200 210 2 25 30 75 80 Function Temperature Booster Shelf level Cooking duration Core temperature Auto Roast Fan Grill Conventional Heat Moisture Plus Conventional Heat Eco Fan Heat On Off 1 Pre heat the oven for 5 minutes before placing the food inside 2 Pre heat the oven before placing...

Page 131: ...erth 83 85 Sir Donald Bradman Drive Hilton SA 5033 205 207 Stirling Highway Claremont WA 6010 Miele Experience Centre and Office Adelaide Miele Australia Pty Ltd Miele New Zealand Limited Level 2 10 College Hill Freemans Bay Auckland 1011 Miele Experience Centre Auckland 8 College Hill Freemans Bay Auckland 1011 Telephone 0800 464 353 0800 4 MIELE www miele co nz Miele Global Headquarters Germany ...

Page 132: ...M Nr 11 192 330 01 en AU NZ H 7464 BPX ...

Reviews: