background image

Råd

Motorsikring

Hvis motorviklingen er blitt for varm på grunn
av overbelastning, kobles valsemotoren auto-
matisk ut ved hjelp av en termostat, og stryke-
sålen frigjøres.  Etter avkjøling må rullen star-
tes på nytt med tasten "I".

Unngå at rullen kjøres uten tøy!

Husk å bruke hele valsebredden; små plagg
og tøystykker stikkes inn på forskjellige steder.
Ensidig belastning på valse og strykesåle
medfører også ensidig varmebelastning, og
beviklingen får ujevn slitasje.

Strømbrudd i løpet av rullingen

Med håndrattet på baksiden av den høyre
stolpen skilles den varme strykesålen fra den
stillestående valsen ved strømbrudd.  Rattet
følger strykesålen under rullingen og kan be-
tjenes hvis strømmen blir borte.  Rattet dreies
mot urviseren når strykesålen skal skilles fra
valsen.

79

M.-Nr. 05372840

Summary of Contents for HM 29-175

Page 1: ...manejo Planchadora Instruções de utilização Calandras Bruksanvisning Varmrulle HM 29 175 It is essential to read these operating instructions before QUVX installing or using the machine to avoid the risk of accident or damage to the machine M Nr 05 372 840 ...

Page 2: ...M Nr 05372840 2 ...

Page 3: ...t feed in 15 Cleaning and care 16 Waxing the heater plate 16 Aluminium heater plate 16 Pick off attachment 16 Ball bearings and gear box 16 Roller padding steel wool 17 Roller cloth cover removing replacing and washing 17 Leaf type roller padding 18 Symbols on the data plate 20 Installation 21 Removing the transit fitting 21 Electrical connection 22 Gas connection 23 Exhaust ducting 23 The rotary ...

Page 4: ...ty is complete between the appliance and an ef fective earthing system which complies with local and national regulations It is most impor tant that this basic safety requirement is regu larly tested by a qualified electrician The manufacturer can not be held respon sible for the consequences of an inade quate earthing system The machine is only completely isolated from the electricity supply eith...

Page 5: ...rk Smooth out folds as far away as possible from the feed in on the feed in table Feed pillow cases and duvet covers into the ironer with the open part first Do not take hold of the corners from the inside Do not take hold of undershirt and apron straps from the inside Always check the proper setting of safety devices This way you will avoid the danger of burns squashed fingers and even loss of ha...

Page 6: ...d all gas pipework from the manual isolating valve to the burner nozzles must be checked for gas soundness Pay special attention to the test points on the multifunction control the connection pressure monitor and the burner setting pressure The tests must be carried out with the burner switched on and switched off All personnel working with this machine must be fully trained in all aspects of its ...

Page 7: ...operation indicator light 8 Temperature selector HM 29 175 1 2 3 4 5 6 7 8 yx Pick off band Roller Finger guard Control panel Reset button Feed in table Out tabling Emergency stop switch Emergency stop switch Laundry collector box Exhaust extraction Hand wheel Exhaust pipe Fixing brackets 4 Adjustable feet 4 Foot control bar only with gas heated rotary ironers 7 M Nr 05372840 ...

Page 8: ...the roller will only run in reverse as long as this button is pushed in The indicator lights In operation indicator light I The in operation indicator light I comes on when the I button is pressed in Temperature indicator light C The temperature indicator light comes on while the machine is heating up and it goes out once the required temperature has been reached Gas heated rotary ironers Indicato...

Page 9: ...hrough the roller covering can be reduced The air volume is highest at the initial position of the adjusting screw see drawing and can be reduced by turning it through 90 The ideal throttle setting is when the roller dries adequately with the lowest air flow vol ume and no water spots appear on the roller covering or on the items being ironed If the air throughput at the vapour exhaust is too high...

Page 10: ...thdrawn downwards The finger guard does not work if the roller is running in reverse If the finger guard has been activated the ma chine can only be restarted by pushing in button I The finger guard is a safety feature which must be checked daily for proper fun ctioning before the machine is used Hand wheel at the rear of the right hand column The hand wheel is used to release the heater plate fro...

Page 11: ...again Starched laundry should be ironed last to pre vent any starch residues on the heater plate from affecting other items of laundry Items with buttons should be passed through the ironer with the buttons facing into the rol ler padding If they face upwards there is a danger of them being damaged or torn off when the item is passed through the ironer A cloth should be placed over zips metal but ...

Page 12: ... button I The in operation I indicator light and the temperature indicator light C come on and the heater plate starts to heat up As soon as the desired temperature has been achieved the temperature indicator light C goes out Press button I once more The heater plate moves up to the roller and the roller rotates Allow the roller to rotate for approx 5 minutes so that the tempera ture of the heater...

Page 13: ... heater plate and reduce the temperature Pick off attachment The pick off attachment is used for picking laundry off the roller Laundry no longer needs to be removed manually from the roller If one of the pick off spring lifters is dislocated by a piece of laundry it should be manually pushed back into position After ironing After ironing use the residual heat on the hea ter plate to iron out the ...

Page 14: ...re is nothing wrong with the exhaust sy stem call the Service department Safety feature for insufficient gas supply When the gas stopcock is turned off or the gas supply pressure is low the rotary iron can not be switched on If the gas supply pressure is reduced during operation the machine swit ches off automatically and the heater plate is withdrawn When the gas supply pressure has been re estab...

Page 15: ...rd If laundry is to be fed to the ironing table at the rear allow adequate space for installation Fold the laundry guide back on to the laundry table before starting Then position the laundry return feed to direct laundry to the rear Laundry is guided to the ironer table If the ironing cloth cover is to be changed or the roller needs more padding the lifter springs need to be individually taken of...

Page 16: ...heater plate using a sui table proprietary cleaning agent Do not use abrasive cleaning agents or abrasive cleaning cloths Pick off attachment If you want to clean the lifter springs or the rol ler covering re cover the roller or to iron for a short period without using the pick off attachment this attachment can be raised upright The tips of the pick off lifter springs need to be cleaned occasiona...

Page 17: ... steel wool covering dimensions should be maintained HM 29 175 max 928 mm circumference without cloth Remove any particles of steel wool that may have fallen on the heater plate Replacing the ironing cloth roller cover Do not wash the new cloth roller cover before use Heat the roller up and in the pressed on positi on lay the new cloth on to the roller following the direction of the arrow on the s...

Page 18: ... will restore the ironing cover to a sof ter and more elastic condition which absorbs moisture better and clear the wax deposits It should however be washed as infrequently as possible in a Cottons 95 C programme The cover should be completely alkali free after the last rinse Do not treat with solvent or spin too strongly to avoid the dan ger of creasing Removing the ironing cover on rollers with ...

Page 19: ...peed setting until it lies smooth and flat This is to ensure that the heater plate does not get damaged by the grip pers on the leaf type padding Switch the machine off and turn the hand wheel in a clockwise direction about 4 times to raise the heater plate Switch the machine on and the heater plate will raise up completely Let the roller rotate slowly The ironing cloth cover must have no creases ...

Page 20: ...ater 22 Field for CE test symbol Product ID No Gas does not apply to this machine In the event of any faults please contact your Miele authorised Service Dealer or the nea rest Miele Service Department When contacting the Service Department please quote the Model and Serial number Fabr N of your machine both of which are shown on the data plate When ordering spare parts from the Spare Parts Depart...

Page 21: ...e rear of the ma chine This is not applicable to gas heated rot ary ironers Levelling and securing the ironer The machine must be level both lengthwise and widthwise Use a spirit level and adjust the feet if necessary use a SW 19 mm spanner When adjusting the feet loosen the locking nuts on the fixing bracket make the adjust ment then tighten the locking nuts back against the casing The ironer sho...

Page 22: ...ressing button I After connecting the machine to the electricity supply any removable outer pa nels must be back in place and all moving or electrical parts shielded before the machine is switched on Exhaust ducting Refer to calculation of air outlet air inlet and ventilation cross sections The exhaust ducting to be installed on site must not be piped into any chimney which is used by gas solid fu...

Page 23: ...t pipe with no ignition taking place in the first safety period In this case the ignition fault light comes on and the Reset button must be pressed in This renewed start procedure can be repea ted several times until the air has been bled and the burner flame burns Note If no flame signal appears during the safety period the valve shuts and the ignition is swit ched off malfunction cut out with lo...

Page 24: ...arral 20 Tfno 91 623 20 00 Telefax 91 6 62 02 66 internet http www miele es United Kingdom Miele Co Ltd Fairacres Marcham Road Abingdon Oxon OX14 1TW Tel Abingdon 01235 554455 Telefax 01235 554477 Service Office Abingdon 01235 554466 Telephone calls may be monitored and recorded to improve our service Salvo modificações 49 01 Salvo modificaciones Alteration rights reserved Rett til endringer forbe...

Page 25: ...iente durante el planchado 36 Dotación especial bajo pedido Módulo guía de retorno 37 Limpieza y mantenimiento 38 Aplicación de cera a la teja 38 Instrucciones para el rebobinado con lana de acero 39 Bobinado elástico laminar 40 Símbolos de la placa de características 42 Para el técnico 43 Emplazamiento de la máquina 43 Retirar el seguro de transporte 43 Montaje de la mesa 43 Conexión eléctrica 44...

Page 26: ...por una toma de tie rra debidamente instalada La comprobación de este detalle por un técnico autorizado es de suma importancia Al fabricante no podrán reclamarse daños y perjuicios que sean con secuencia de la falta de una toma de tierra o de su estado defectuoso La planchadora sólo quedará desconectada de la red eléctrica cuando se haya extraído la clavija de la base de enchufe o desactivado el f...

Page 27: ...funcionamiento de marcha atrás hay que cerciorarse que nadie corra peligro En caso de calefacción a gas ha de procu rarse la buena ventilación del lugar de tra bajo Lubricar la máquina sólo cuando esté parada Medidas de seguridad en caso de olor a gas Exclusivamente para planchadoras con calefacción a gas Apagar las llamas inmediatamente Abrir ventanas y puertas Seguidamente cerrar el paso de gas ...

Page 28: ...re duce el aumento de residuos Por tanto dichos materiales no deberán tirarse a la basura sino entregarse en un punto de recogida específica Infórmese al respecto en su Ayuntamiento Desestimación de un aparato inservible Cualquier aparato inservible lleva componentes aprovechables que no tienen desperdicio y de ningún modo deberán parar en el vertedero Infórmese en su Ayuntamiento y en un esta ble...

Page 29: ...ionamiento I 8 Selector de temperatura 12 3 4 5 6 7 8 Desprendedor de ropa Rodillo Listón protector de dedos Panel de mandos Tecla de anulación Mesa entrada de ropa Tabla auxiliar Parada de emergencia Parada de emergencia Cajón recogida de ropa Manivela Volante Tubo de salida de gases de combustión Sujeción anclaje al suelo 4 Patas regulables 4 Pedal de funcionamiento Sólo planchadoras con calefac...

Page 30: ...atrás mientras que se mantenga la tecla pulsada Pilotos de control Piloto de control de funcionamiento I Se enciende después de pulsar la tecla I Piloto de control de temperatura C Se enciende durante el calentamiento y se apaga cuando se haya alcanzado la tempera tura seleccionada Planchadoras con calefacción a gas Piloto de control y x Fallo de encendido Se enciende en caso de anomalía en el en ...

Page 31: ... reducir el caudal de aire que pasa por el re vestimiento del rodillo El máximo caudal de aire se da en la posición inicial del tornillo de ajuste véase fig y se irá reduciendo a medida que se vaya girando ha cia la posición de 90 La posición óptima de la trampilla se habrá conseguido cuando el rodillo se seque con un caudal mínimo no quedando manchas de agua ni en el revestimiento ni en la ropa p...

Page 32: ...llo gira al contrario del planchado el listón protector no tiene función Tras el accionamiento del protector de dedos la máquina sólo podrá ponerse en marcha pulsando la tecla I de nuevo El listón protector de dedos es un disposi tivo de seguridad cuya eficacia ha de com probarse a diario y con anterioridad a cada uso de la planchadora Volante en el lado posterior de la columna derecha Sirve para ...

Page 33: ... Zona Si fuera necesario bajar a un nivel de tempe ratura inferior tendrá que esperarse a que se encienda el piloto Temperatura C La ropa almidonada se planchará al final para evitar que las partículas de almidón adheridas en la teja no perjudiquen las demás prendas Las piezas con botones se colocan con el botón mirando hacia el rodillo De lo contrario correrían el riesgo de ser arrancados o des t...

Page 34: ...áquina pulsando la tecla I Los pilotos de control para funcionamiento I y temperatura C se encienden y la teja se calienta Al apagarse el piloto C se ha al canzado el nivel de temperatura seleccio nado Pulsar la tecla I de nuevo La teja se junta con el rodillo que gira De jar girar el rodillo durante aprox 5 min para conseguir el reparto homogéneo de la temperatura en teja y rodillo Ajustar la vel...

Page 35: ...opa sale expulsada del planchado el desprendedor se encarga de separarla del rodillo No es necesario hacerlo a mano Si alguna prenda provocara que se suelte un resorte del desprendedor se le devolverá a su posición correcta presionando con la mano Después del planchado Una vez terminado el planchado y con objeto de eliminar la humedad del revesti miento del rodillo deberá seguirse plan chando unos...

Page 36: ...i no se puede detectar ninguna anomalía en la conducción de salida de gases de combus tión se debe informar al Servicio Post venta Protección contra la falta de gas En caso de que la llave de gas esté cerrada o la presión de la red de gas sea excesivamente baja no se puede conectar la planchadora Si durante el funcionamiento la presión de la red de gas bajase a unos valores inadmisibles la plancha...

Page 37: ... ropa sea llevada a la tabla receptora de la parte posterior se coloca la chapa guía rebatible hacia atrás mirando a la tabla receptora Seguidamente se dobla el módulo guía hacia atrás La ropa planchada será llevada a la tabla receptora Para cambiar el paño de planchado o rebobinar el rodillo se deben extraer las láminas elásticas del desprendor de ropa una por una Cintas introductoras Las cintas ...

Page 38: ...cal o almidón podrán eliminarse con productos limpiadores comunes No utilizar productos abrasivos o paños especiales con papel de lija incorporado Desprendedor de ropa Siempre que se proceda a la limpieza de las chapas elásticas de los desprendedores o del paño de planchado al rebobinado del rodillo o se quiera prescindir del servicio de los des prendedores durante un tiempo breve se los colocará ...

Page 39: ...Servicio Post venta Para este trabajo conviene ponerse guantes protectores Riesgo de lesionarse Para el bobinado con lana de acero ha de atenerse a la medida correspondiente HM 29 175 Perímetro máx 928 mm sin paño Quitar los restos de lana de acero que hayan caído en la teja Colocación del paño de planchado No lavar un paño de planchado a estre nar Colocar el paño con la máquina caliente y la teja...

Page 40: ...se perfectamente a la teja Lavado del paño de planchado Con el proceso de lavado se elimina la cera que se ha quedado en el paño de planchado y se devuelve a éste su característica elastici dad y capacidad hidroabsorbente No obstante lavarlo con un programa de ropa blanca a 95 C o darle la vuelta lo menos posible Después del último aclarado tienen que haberse eliminado todos los residuos alcalinos...

Page 41: ...ción del bobina do elástico laminar no deterioran la teja Desconectar la máquina y juntar la teja con el rodillo realizando con el volante 4 giros completos en sentido de las agujas de reloj Conectar la máquina La teja termina de juntarse totalmente con el rodillo Dejar girar el rodillo despacio El paño tiene que quedar bien ajustado sin formar pliegues A continuación dejar girar el rodillo duran ...

Page 42: ...recto 19 Calefacción a gas 20 Fecha de puesta en servicio 21 Homologaciones DVGW agua 22 Espacio para homologaciones CE Nº de identificación de producto Gas no procede en caso de este modelo de planchadora En caso de anomalía en el funcionamiento de la máquina deberá dirigirse al Servicio Post venta de Miele El Servicio Post venta precisa la indicación del modelo y nº de máquina Fabr Nº Ambos dato...

Page 43: ...ansporte Retirar los elementos del seguro de transpor te de la parte posterior de la máquina Nivelación y sujeción de la planchadora Nivelar la maquina frontal y lateralmente con un nivel de burbuja llave SW 19 Para el ajuste es preciso aflojar los tornillos de las escuadras de sujeción Una vez realizado el ajuste fijar los tornillos reguladores de las patas mediante contratuercas Anclar la máquin...

Page 44: ... conectar el interruptor principal de la casa Después de alcanzar la temperatura básica juntar la teja con el rodillo pulsando la tecla I Después de emplazar y conectar la máquina volver a montar ineludiblemente todas las piezas del revestimiento exterior Conducción de salida de aire Véanse diámetros para conducciones de sa lida de aire y sistemas de ventilación La conducción de salida de aire ins...

Page 45: ...e aire en la conducción y el encendido no se produzca durante el tiempo de seguridad En tal supuesto se encenderá el piloto y x Anomalía Pulsar la tecla y x Anulación Esta maniobra podrá repetirse va rias veces hasta que se haya eliminado el aire y se encienda la llama del quemador Si durante el tiempo de seguridad no apare ciera el símbolo de llama la válvula se cerra ría desactivando el encendid...

Page 46: ...rid Carretera de Fuencarral 20 Tfno 91 623 20 00 Telefax 91 6 62 02 66 internet http www miele es Salvo modificaciones 49 01 Este papel está fabricado al 100 de celulosa blanqueada sin cloro de acuerdo con las exigencias ecológicas ...

Page 47: ...ctrica durante o funcionamento 58 Equipamento e variantes 59 Limpeza e manutenção 60 Encerar o berço 60 Enrolamento do rolo com molas palha de aço 61 Enrolamento do rolo com molas em lamelas 62 Significado dos símbolos na placa de características 64 Nota para o instalador 65 Instalação da calandra 65 Retirar a segurança de transporte 65 Montagem da mesa 65 Ligação eléctrica 66 Ligação ao gás 66 Tu...

Page 48: ... A segurança eléctrica deste aparelho só está garantida se estiver ligado a uma to mada com protecção à terra É muito impor tante que estas regras base de segurança sejam analisadas e no caso de dúvida deverá mandar rever a instalação por um técnico O fabricante não pode ser responsabilizado por danos provenientes da falta ou interrup ção do fio de terra A calandra só está desligada da corrente se...

Page 49: ...alandra No caso de aquecimento a gás o local onde a máquina está instalada deve ser bem arejado A máquina só deve ser lubrificada quando estiver parada por completo Precauções no caso de fugas de gás válido só para calandras com aquecimen to a gás Apagar de imediato todas as chamas Abrir imediatamente portas e janelas Fechar as torneiras de segurança existen tes junto ao contador do gás ou à torne...

Page 50: ... ponto de vista ecológico e por isso reciclável Aparelhos Aparelhos que por motivos de avaria ou subs tituição deixam de ser utilizados não devem ser deixados junto do contentor do lixo Infor me se junto da sua Câmara Municipal sobre as possibilidades de recolha e reciclagem As sim contribui para despoluição do meio Am biente M Nr 05372840 50 ...

Page 51: ...atura 4 Lâmpada indicadora I Ligado 8 Selector de temperatura HM 29 175 yx 1 2 3 4 5 6 7 8 Pás de alisamento Rolo Protecção de dedos Comandos Tecla Eliminar avarias Mesa Mesa Botão de emergência Botão de emergência Caixa para roupa Sáida de vapores Manivela Sáida de vapores Ângulo de fixação 4 Pés 4 Pedal de accionamento só em máquinas por aquecimento a gás 51 M Nr 05372840 ...

Page 52: ...esenrolar O rolo roda enquanto a tecla estiver a ser pressionada Lâmpadas de controle de funcionamento I Lâmpada de controle acesa Após accionar a tecla I a lâmpada de contro le I acende C Lâmpada de controle da temperatura Na fase de aquecimento acende a lâmpada de controle da temperatura logo que a tempe ratura seja alcançada a lâmpada apaga se Máquinas por aquecimento a gás y x Lâmpada indicado...

Page 53: ...erar a quantidade de ar que passa pelo revestimen to do rolo A carga de ar formada é maior se o parafuso regulador estiver na posição original ver cro quis e vai reduzindo se rodar o parafuso até 90 A posição mais favorável é alcançada quan do com pouca carga de ar formada o rolo seca o suficiente e não se formam manchas de água no revestimento ou na roupa já pas sada No caso de carga de ar elevad...

Page 54: ...otecção de dedos não tem qualquer função quando o rolo roda ao contrário Para voltar a ligar a máquina basta carregar na tecla I A protecção de dedos é um dispositivo de segurança que deve ser testado antes do arranque da máquina Manivela nas costas do lateral direito Esta manivela permite separar o berço quen te do rolo quando faltar a energia eléctrica Rodando no sentido inverso aos ponteiros do...

Page 55: ...te ao grau de temperatura seleccionado acen der é que essa temperatura está alcançada Roupa que foi tratada com goma deve ser passada em último lugar para que eventuais restos de goma que se agarrem ao berço não vão influenciar a passagem de outras pe ças de roupa Peças com botões devem ser colocados na máquina com os botões voltados para o rolo Se os botões ficarem voltados para cima exis te peri...

Page 56: ...vada Ligar a calandra carregando na tecla I A lâmpada de controle de funcionamento I e a lâmpada de controle da temperatura C acendem Quando a lâmpada de controle da tempera tura se apagar C significa que a tempe ratura seleccionada foi alcançada Carregue de novo na tecla I O berço ajusta se ao rolo e o rolo começa a rodar Deixe rodar durante 5 minutos para que a temperatura seja uniforme entre o ...

Page 57: ... reduzir a temperatura do rolo Pás de alisamento As pás de alisamento separam a roupa do rolo Assim não é necessário retirar a roupa junto ao rolo Se alguma mola de alisamento sair da sua po sição é facílimo voltar a coloca la no respecti vo lugar No final de passar a roupa Desligar o aquecimento e deixar o rolo ro dar durante alguns minutos com o berço ajustado para que o revestimento seque Desli...

Page 58: ...de combustão estão obstruí dos Se não encontrar qualquer avaria contac te o serviço de assistência técnica Protecção de falta de gás No caso da torneira de segurança estar fecha da ou existir baixa pressão de ligação a calan dra não liga Se a pressão baixar durante o funcionamento para valores inadmissíveis a calandra desliga automaticamente e o berço baixa Carregan do na tecla I a calandra volta ...

Page 59: ...ua si tuada por cima da protecção de dedos Se pretender que a roupa caia sobre uma mesa deve deixar descair a chapa condutora da roupa para trás sobre a mesa Depois abra o retorno da roupa para que a roupa caia sobre a mesa Se pretender substituir o pano ou o revesti mento do rolo deve retirar as molas das pás de alisamento uma a uma Cintas condutoras As cintas condutoras facilitam a introdução da...

Page 60: ...landras Limpeza do berço em alumínio Se resíduos de calcário ou restos de goma fi carem agarrados ao berço utilize um deter gente de limpeza normal para os eliminar Pás de alisamento Se pretender limpar as molas ou o pano re vestir o rolo ou passar roupa durante um cur to espaço de tempo sem as pás de alisamen to então pode levantar as pás de alisamento Após algum tempo de funcionamento da ca land...

Page 61: ...ara enrolar a palha de aço HM 29 175 Perímetro máx 928 mm sem pano No final limpe o berço eliminando restos de palha de aço que eventualmente tenha caído Revestir o rolo com o pano O pano não deve ser lavado antes de ser utilizado Colocar o pano sobre o rolo quente e com o berço ajustado no sentido da seta Setas na palha de aço Escovar a ponta do pano com uma escova de arame e deixar o pano enrola...

Page 62: ...ano Após a lavagem o pano fica macio com elas ticidade isento de cera e é um bom absorven te de humidade A lavagem é feita a 95 C no programa Roupa branca cor e não deve ser feita com frequência Após a última enxagua gem o pano deve estar totalmente isento de calcário Não deve ser centrifugado com rotações ele vadas para evitar rugas e vincos Retirar o pano Se for colocado um pano novo deverá ser ...

Page 63: ...teja colocado sem dobras Assim evita que o berço fique danificado pelos fixadores das lamelas Desligar a calandra e rodar a manivela 4 vezes no sentido dos ponteiros do relógio para ajustar o berço Ligar a calandra para que o berço se ajus te totalmente Deixar o rolo rodar lentamen te O pano deve estar sem dobras No final deixar o rolo rodar durante 5 minutos Escurecimento do pano de passar a ferr...

Page 64: ...16 Fusíveis pelo utilizador 17 Aquecimento a vapor indirecto 18 Aquecimento a vapor directo 19 Aquecimento a gás 20 Data do arranque 21 Certificados atribuídos Água 22 Campo para certificados atribuídos CE Não tem validade para este tipo de calandra Em caso de avaria contacte o serviço de as sistência técnica indicando o modelo no de fabrico da calandra Fabr No e o tipo de ava ria No caso de subst...

Page 65: ...orte A segurança de transporte situada no lateral da calandra deve ser retirada No caso de má quinas que funcionem a gás não existe Nivelar e fixar Instalar a calandra nivelada utilizando para isso um nível de água os pés podem ser ajustados com uma chave de 19 mm Ao nivelar os pés os parafusos dos ângulos de fixação têm de estar desaparafusados De pois da calandra estar nivelada deve fixar os pés...

Page 66: ...re gue na tecla I para que o berço se ajuste Após instalar e ligar a calandra deverá montar todas as peças do revestimento desmontadas Evacuação do ar Consulte também o calculação do diâmetro para os tubos de saída admissão de ar e sis tema de ventilação Os tubos de evacuação do ar não podem ser conduzidos para a mesma chaminé por onde sejam evacuados gases fumos etc Se exis tir um secador o tubo ...

Page 67: ...rranque da calandra poderá haver ar nas condutas e por isso a ignição du rante o tempo de segurança não se efectua Neste caso a lâmpada avisadora yx Avaria acende devendo carregar na tecla yx Elimi nar avarias O Start pode ser repetido várias vezes até que o ar saia e a chama acenda Se durante o tempo de segurança não hou ver sinal de chama a válvula fecha e a igni ção desliga Avaria com bloqueio ...

Page 68: ...gal Miele Portuguesa Lda Av do Forte 5 2795 504 Carnaxide Tel 01 4248 100 Fax 01 4248 109 Salvo modificações 49 01 Salvo modificaciones Alteration rights reserved Papel branqueado com total isenção de cloro ...

Page 69: ...ømbrudd i løpet av rullingen 79 Utstyrsvarianter Tilbakeføring Innføringsbånd 80 Rengjøring og stell 81 Voksing av strykesålen 81 Valsen med stålullbeviklingen 82 Elastopress bevikling 83 Symbolene på typeskiltet 85 Montering 86 Transportsikring 86 Elektrotilkobling 87 Ventilasjonskanal 87 Bare Mieles servicetekniker eller fagfolk godkjent av Miele skal installere denne varmrulle 69 M Nr 05372840 ...

Page 70: ...Den elektriske sikkerheten kan bare ga ranteres når maskinen er tilkoblet forskrift smessig installert jordingssystem Det er meget viktig at jordingsforholdene er kontrollert og funnet i orden sørg eventuelt for at hele det elektriske anlegget blir sjekket Maskinprodusenten kan ikke gjøres ansvarlig for skader som skyldes manglende eller brutt jordforbindelse Rullen er skilt fra det elektriske anl...

Page 71: ...ss på at ingen kan utsettes for fare Rullen smøres når den står stille Oppbevar bruksanvisningen på et lett til gjengelig sted Emballasjen Emballasjen beskytter maskinen mot trans portskader Emballasjematerialet er valgt med henblikk på miljøvern og avfallsbehand ling og kan derfor gjenvinnes Bølgepappen består for det meste av resirkulert papir Trerammene er lagd av restmaterialer og er ubehandle...

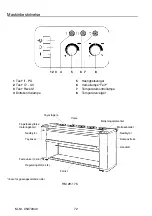
Page 72: ...ntrollampe 4 Driftskontrollampe 8 Temperaturvelger Tøyavtagere Valse Betjeningselementer Fingerbeskyttelse Innføringsbord Mottaksbordet Nødbryter Nødbryter Tøykasse Dampavtrekk Håndratt Festevinkel 4 stk Reguleringsfot 4 stk Fotlist bare for gassoppvarmede ruller HM 29 175 1 2 3 4 5 6 7 8 y x M Nr 05372840 72 ...

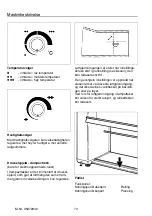
Page 73: ...trykeså len an mot valsen som starter Tast Ö Revers velges bare når De skal ta av rullekle det eller når beviklingen skal skiftes ut Koble ut maskinen strykesålen skilles fra val sen Trykk på Ö Revers tasten Valsen reverserer så lenge tasten Revers holdes inne Driftskontrollampe I Etter at tasten I er trykket inn lyser kontrollampen I opp Temperaturkontrollampe C I oppvarmingsfasen lyser temperatu...

Page 74: ...ld som gjør at luftmengden som strøm mer gjennom valsebeviklingen kan reguleres Luftgjennomgangen er størst når innstillings skruen står i grunnstilling se skissen den kan reduseres til 90 Den gunstigste innstillingen er oppnådd når valsen tørker ved laveste luftgjennomgang og det ikke dannes vannflekker på beviklin gen eller på tøyet Ved for stor luftgjennomgang i damputtaket blir valsen for ster...

Page 75: ... Ved reverseringen har fingerbeskyttelsen in gen funksjon Rullen startes om igjen ved at tasten I tryk kes inn Fingerbeskyttelsen er en sikkerhets innretning som skal kontrolleres hver dag før rullearbeidet begynner Håndratt For å skille den varme strykesålen fra den stil lestående valsen ved strømbrudd benyttes håndrattet Mot urviserretningen strykesålen skilles fra valsen I urviserretningen stry...

Page 76: ...emperaturen er sunket til ønsket verdi Stivetøy skal rulles til slutt for at eventuelle stivelsesrester på strykesålen ikke skal påvir ke rullingen av det andre tøyet Rulletøy med knapper skal føres inn slik at knappene peker mot valsen Hvis ikke er det fare for at knappene blir ødelagt eller revet av Legg et klede over glidelåser metallknapper og metallkroker for å beskytte strykesålen Spenner av...

Page 77: ...temperatur Koble inn rullen ved å trykke på tast I Kontrollampen for drift I og for temperatur C lyser opp Når lampen for temperatur C er sloknet er den valgte temperaturen oppnådd Trykk inn tast I på nytt Strykesålen legges an mot valsen og val sen roterer La den rotere ca 5 min slik at temperaturen i strykesålen og i valsen kan bli mest mulig den samme Still inn på ønsket valsehastighet Kontroll...

Page 78: ...skytte hendene Skille strykesålen fra valsen i rullepausene og redusere temperaturen på strykesålen Tøyavtagere Tøyet skilles fra strykevalsen ved hjelp av tøy avtagerne det skal ikke fjernes fra valsen med hendene Hvis en fjær skulle løsne er det bare å trykke den på plass igjen for hånd Når rullingen er avsluttet For at beviklingen skal få tørke er det viktig at valsen får gå et par minutter ett...

Page 79: ... plagg og tøystykker stikkes inn på forskjellige steder Ensidig belastning på valse og strykesåle medfører også ensidig varmebelastning og beviklingen får ujevn slitasje Strømbrudd i løpet av rullingen Med håndrattet på baksiden av den høyre stolpen skilles den varme strykesålen fra den stillestående valsen ved strømbrudd Rattet følger strykesålen under rullingen og kan be tjenes hvis strømmen bli...

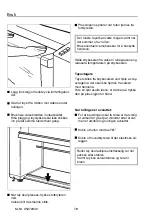
Page 80: ...oppsamlingsbord over fingerbeskyttelses listen Hvis tøyet skal ledes til mottaksbordet løftes først tøyplaten bakover på mottaksbordet Til slutt legges tilbakeføringen bakover nå le des tøyet til mottaksbordet Når rullekledet skal skiftes eller valsen omvik les trekkes tøyavtagerfjærene ganske enkelt ut Innføringsbånd Innføringsbåndet letter tøyinnleggingen Legg tøyet på innføringsbåndet parallelt...

Page 81: ...leiringer eller stivelsesrester på strykesålen fjernes disse med et vanlig oppvask eller pussemiddel Bruk ikke grov kornet skuremiddel eller rengjøringskluter som har innsatt slipepapir Tøyavtagere Hvis man ønsker å rengjøre fjærene eller rul lekledet å vikle om strykevalsen eller rulle uten tøyavtagere skal tøyavtagerne løftes slik at de står opp fra strykevalsen Når rullen har vært i bruk en tid...

Page 82: ...en blir korrekt iht føl gende mål HM 29 175 Omfang maks 928 mm uten klede Fjern stålullrester på strykesålen Påsetting av rullekledet Det nye rullekledet skal ikke vaskes før bruk Rullekledet legges på i pilens retning når maskinen er oppvarmet og strykesålen er presset mot valsen Se pilene på stålull beviklingen Kjem forkanten av kledet med en stålbørste og før det inn La rullen gå 5 10 min deret...

Page 83: ...ykk over hele og må ligge tett inntil strykesålen hele veien Vasking av Elastopress kledet Rullekledet blir igjen mykt elastisk og voksfritt og tar godt opp fuktighet etter at det er vask et Vask det i et kokevaskprogram ved 95 C ikke for ofte Etter siste skylling skal duken være fullstendig alkaliefri Bruk ikke syre Sentrifuger ikke kledet for len ge det skal ikke bli krøllet Avtaging av Elastopr...

Page 84: ... ligger glatt og uten bretter Dermed blir strykesålen ikke skadet av lamellholderne Koble ut rullen og vri rattet 4 omdreininger i urviserretningen Koble inn rullen igjen slik at valsen går langsomt rundt Rullekledet skal ligge glatt uten bretter La valsen gå i 5 minutter Mørkfarging av rullekledet En lett til sterk brunfarging av rullekledet er normalt Sortfarging kan reduseres ved å utnytte hele...

Page 85: ...ng indirekte 18 Dampoppvarming direkte 19 Gassoppvarming gjelder ikke Norge 20 Startdato 21 Vannregistrering DVGW 22 Felt for godkjenninger CE Produkt ID nummer gass gjelder ikke denne rulletypen Ved feil kontakt Mieles serviceavdeling Vennligst oppgi type og maskinnummer Fabr No Disse opplysningene finnes på typeskiltet Ved utskifting skal det bare brukes origi nale reservedeler Type og maskinnum...

Page 86: ...atene fra siden Fjerning av transportsikringen Transportsikringen på baksiden skal fjernes Justering og feste av rullen Ved hjelp av et vater og reguleringsføttene stilles maskinen slik at den står vannrett Bruk en 19 mm nøkkel på reguleringsføttene Før justeringen må skruene for festevinkelen løsnes Etter justeringen sikres skruene for reguleringsføttene med kontramutteren Maskinen festes til und...

Page 87: ... håndrattet og skru på hovedbryteren på ste det Når grunntemperaturen er oppnådd startes strykesålen med tasten I Etter oppstilling og tilkobling av maskinen monter alle demonterte utvendige plater Ventilasjonskanal Se beregning av utluftnings og luftinntaks rør samt ventilasjonstverrsnitt Ventilasjonskanalen på stedet må ikke være forbundet med et ventilasjonssystem som står i forbindelse med ild...

Page 88: ...M Nr 05372840 88 ...

Page 89: ...89 M Nr 05372840 ...

Page 90: ...rral 20 Tfno 91 623 20 00 Telefax 91 6 62 02 66 internet http www miele es United Kingdom Miele Co Ltd Fairacres Marcham Road Abingdon Oxon OX14 1TW Tel Abingdon 01235 554455 Telefax 01235 554477 Service Office Abingdon 01235 554466 Telephone calls may be monitored and recorded to improve our service Rett til endringer forbeholdes 49 01 Salvo modificações Salvo modificaciones Alteration rights res...

Reviews: