background image

Converting to another gas type

*
I
N
S
T
A
L
L
A
T
I
O
N
*

59

Risk of explosion due to an in-

correct conversion.
If the conversion to another type of
gas is carried out incorrectly, it may
result in gas leakage.
Conversion from one type of gas to
another must only be undertaken by
an approved and registered gas in-
staller in strict accordance with cur-
rent local and national safety and
building regulations (GasSafe in the
UK). The installer is responsible for
ensuring that the appliance functions
correctly when installed.

When converting to another type of
gas, both the main 

and

 small jets

need to be changed.

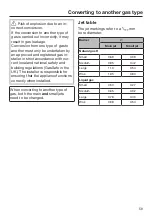
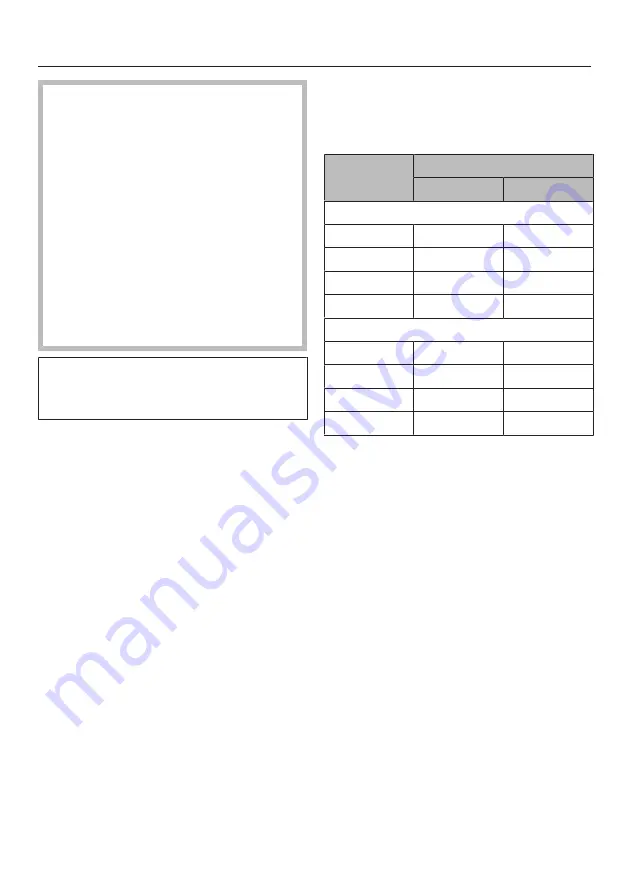
Jet table

The jet markings refer to a ¹/₁₀₀ mm
bore diameter.

Burner

Main jet

Small jet

Natural gas H

Small

0.69

0.39

Medium

0.95

0.42

Large

1.10

0.54

Wok

1.35

0.80

Liquid gas

Small

0.50

0.27

Medium

0.65

0.32

Large

0.78

0.40

Wok

0.98

0.54

Summary of Contents for KM 2030

Page 1: ...and installation instructions Gas hobs To avoid the risk of accidents or damage to the appliance it is essential to read these instructions before it is installed and used for the first time en GB M Nr 07 181 150 ...

Page 2: ...ating and installation instructions It is however set up for connection to the gas and electricity supplies in the countries specified For trouble free operation of the appliance it is best to use it in the countries spe cified for use For use in other countries please contact Miele in your country ...

Page 3: ...t cigarette lighters or matches Do not operate electrical lights or switches i e do not switch them On or Off Open all doors and windows to ventilate the area If the smell of gas persists evacuate the building In the UK you must now Call the Gas Emergency Contact Centre Tel 0 800 111 999 For any gas work in the UK always use a Gas Safe registered engineer In other countries please follow relevant ...

Page 4: ...me 25 Cleaning the hob for the first time 25 Switching on the hob for the first time 25 Pans 26 Tips on saving energy 28 Operation 29 Switching on 29 Adjusting the flame 30 Switching off 30 Safety features 31 Thermo electric flame failure monitor 31 Cleaning and care 32 Stainless steel trough 33 Pan supports 34 Control knobs 34 Burner 34 Problem solving guide 37 Optional accessories 39 Burner rati...

Page 5: ...ing in dimensions 48 KM 2010 KM 2011 KM 2012 KM 2013 48 KM 2030 49 KM 2032 KM 2033 50 KM 2050 KM 2051 51 Installation 52 Gas connection 54 Electrical connection 57 Converting to another gas type 59 Jet table 59 Changing the jets 60 Changing the main jets 60 Changing the small jets 61 Functional check 62 Product data sheets 63 ...

Page 6: ...nformation on safety in stallation use and maintenance This prevents both personal injury and damage to the hob In accordance with standard IEC 60335 1 Miele expressly and strongly advises that you read and follow the instructions in the chapter on installing the hob as well as the safety instructions and warnings Miele cannot be held liable for injury or damage caused by non compliance with these...

Page 7: ... supported by the manufacturer and could be dangerous This hob is not intended for use by people with reduced physical sensory or mental capabilities or lack of experience and knowledge unless they have been given supervision and instruction concerning its use by a person responsible for their safety They may only use the hob unsupervised if they have been shown how to use it in a safe way They mu...

Page 8: ... The hob gets hot when in use and remains hot for a while after be ing switched off Keep children well away from the hob until it has cooled down and there is no danger of burning Danger of burning Do not store anything which might arouse a child s interest in storage areas above or behind the hob Otherwise they could be tempted into climbing onto the appliance with the risk of burning themselves ...

Page 9: ...ified electrician To avoid the risk of damage to the hob make sure that the con nection data on the data plate voltage and frequency match the mains electricity supply before connecting it to the mains Consult a qualified electrician if in doubt Do not connect the hob to the mains electrical supply by a multi socket adapter or extension lead These are a fire hazard and do not guarantee the require...

Page 10: ...e mains connection cable is damaged it must be replaced with a special mains connection cable by a qualified electrician see Electrical connection in the Installation chapter During installation maintenance and repair work the hob must be disconnected from the mains electricity supply The gas supply must also be shut off Depending on country this is done in one of several different ways the mains ...

Page 11: ...behind a cabinet door do not close the door while the hob is in use Heat and moisture can build up behind the closed door This can result in damage to the hob the housing unit and the floor Leave the furniture door open until the hob has cooled down completely ...

Page 12: ...ase filters of a cooker hood on fire Do not flambé under a cooker hood Spray canisters aerosols and other inflammable substances can ignite when heated Therefore do not store such items or substances in a drawer under the hob Cutlery inserts must be heat resistant Do not heat an empty pan Do not heat up food in closed containers e g tins or sealed jars on the hob as pressure can build up in the co...

Page 13: ...containers on the hob When a control knob is pressed down a spark is generated on the ignitor Do not press down the control knob while you are cleaning or touching the hob or a burner in the vicinity of an ignitor If a cooker hood is installed above the hob ensure that the burn ers are always covered with a pan when in use Otherwise flames could reach the cooker hood parts of which could then be d...

Page 14: ...ids do get on the hob they should be re moved as soon as possible to avoid the risk of corrosion Using the hob will cause a build up of heat and moisture in the room in which it is installed Ensure that the room has sufficient nat ural or mechanical means of ventilation e g a cooker hood If the hob is used for very long periods of time additional ventila tion of the room may be necessary e g by op...

Page 15: ...Warning and Safety instructions 15 Cleaning and care Do not use a steam cleaning appliance to clean this hob The steam could reach electrical components and cause a short cir cuit ...

Page 16: ...terials They also contain specific materials com pounds and components which were essential for their correct function and safety These could be hazardous to hu man health and to the environment if disposed of with your domestic waste or if handled incorrectly Please do not therefore dispose of your old appliance with your household waste Please dispose of it at your local com munity waste collect...

Page 17: ...Guide to the appliance 17 Hob KM 2010 KM 2011 a Large burner b Small burner c Medium burner d Medium burner Control knobs for the cooking zones e Front right f Rear right g Rear left h Front left ...

Page 18: ...Guide to the appliance 18 KM 2012 KM 2013 a Wok burner b Small burner c Medium burner d Medium burner Control knobs for the cooking zones e Front right f Rear right g Rear left h Front left ...

Page 19: ...Guide to the appliance 19 KM 2030 a Wok burner b Small burner c Medium burner d Medium burner Control knobs for the cooking zones e Front right f Rear right g Rear left h Front left ...

Page 20: ...to the appliance 20 KM 2032 KM 2033 a Large burner b Small burner c Medium burner d Medium burner e Wok burner Control knobs for the cooking zones f Front right g Rear right h Middle i Rear left j Front left ...

Page 21: ...to the appliance 21 KM 2050 KM 2051 a Wok burner b Small burner c Large burner d Medium burner e Medium burner Control knobs for the cooking zones f Front right g Rear right h Middle i Rear left j Front left ...

Page 22: ...Guide to the appliance 22 Control knobs Symbol Description Burner off the gas supply is turned off Largest flame Smallest flame ...

Page 23: ...Guide to the appliance 23 Burner Wok burner Small medium and large burners a Burner ring wok burner b Burner cap c Burner head d Burner base e Thermocouple f Ignitor ...

Page 24: ...The accessories supplied with your ap pliance as well as a range of optional ones are available to order from Miele see Optional accessories Wok ring The wok ring supplied gives additional stability to the wok especially to woks with a rounded base ...

Page 25: ...then wipe dry Clean all removable parts of the burn ers with a solution of warm water and a small amount of washing up liquid applied with a soft sponge Dry all parts thoroughly after cleaning and then reassemble the burners see Cleaning and care Switching on the hob for the first time The metal components have a protect ive coating which when heated for the first time will give off a slight smell...

Page 26: ... dangerous and should not be used In contrast to pans for use on electric hobs the bases of pans for use on gas hobs do not need to be flat to achieve good results Remember when purchasing new pans that manufacturers usually refer to the diameter at the top of the pan in their documentation and not to the base diameter You can use any cookware that is heat resistant Cookware with a thick base is p...

Page 27: ...ly to woks with a rounded base Place the wok ring on the pan sup port so that it sits securely in position and cannot move see diagram The wok is unique among cookware in that it has a small base diameter and a large rim diameter usually 35 40 cm Wok pans are ideal for use on the wok burner ...

Page 28: ...heat loss Wide shallow pans are preferable to tall narrow ones They will heat up faster Cook with as little water as possible Reduce the size of the flame once the water has come to the boil or the oil is hot enough to fry in Use a pressure cooker to reduce cooking times ...

Page 29: ...go If the burner does not ignite turn the rotary control to the position Ventil ate the room or wait for at least 1 minute before trying again When making another ignition attempt it may be necessary to hold the rotary control for longer If the burner does not ignite the second time turn the rotary control back to the position and see Prob lem solving guide Switching on during a power outage If th...

Page 30: ...of the flames should stay beneath the pan base Flame tips which extend beyond the sides of the pan merely warm up the air in the room and can also dam age pan handles and increase the danger of injury Adjust the flame so that it does not spread out beyond the sides of the pan Switching off Turn the rotary control clockwise to the position The gas supply is cut off and the flame goes out ...

Page 31: ...e g by food boil ing over or by a draught the gas supply is switched off This prevents the re lease of gas If you turn the rotary con trol to the position the burner is ready for use again The thermo electric flame failure mon itor operates independently from the electricity supply This means that it will still work if the hob is used during a power cut ...

Page 32: ... oration of the burner components Remove any soiling and salt and sugar splashes immediately When a control knob is pressed down a spark is generated on the ig nitor Do not press down the control knob while you are cleaning or touching the hob or a burner in the vicinity of an ignitor Unsuitable cleaning agents To avoid damaging the surfaces of the appliance do not use cleaning agents containing s...

Page 33: ...Soiling particularly salty food or li quid and olive oil can cause damage if left on the printed surfaces for a long time Remove such soiling immediately Damage caused by incorrect cleaning Stainless steel cleaning agents rub off the printed symbols Do not use stainless steel cleaning agents on printed symbols Clean stainless steel surfaces using a solution of warm water and a little washing up li...

Page 34: ... of the burner cap will be come duller with time This is com pletely normal and does not indicate material deterioration The burner should be dismantled and then cleaned by hand using a solu tion of warm water and a little wash ing up liquid applied with a soft sponge Clean any soiling from the flame openings Danger of explosion Blocked flame openings can cause a dangerous build up of gas in the b...

Page 35: ...l medium and large burners Place the burner head onto the burner base so that the thermo couple the ignitor and the re taining pins fit into their respective holes in the burner head Position the burner cap onto the burner head so that the retaining pins fit into their respective recesses Gently twist the burner cap clockwise or anti clockwise until it locks into position When correctly positioned...

Page 36: ...rner Place the burner head on to the burner base so that the thermo couple and the ignitor extend through their respective holes in the burner head Replace the burner ring Replace the burner cap Ensure parts are reassembled in the correct order ...

Page 37: ...interrupt the power supply to the hob for a few seconds The burner is not correctly assembled Assemble the burner correctly The gas shut off device has not been opened Open the gas shut off device The burner is wet and or dirty Clean and dry the burner The flame openings are blocked and or wet Clean and dry the flame openings The gas flame goes out after ignition The flames do not touch the thermo...

Page 38: ... device on the burner is not working The mains fuse has tripped If necessary contact a qualified electrician or Miele Service for assistance There is food residue stuck between the ignitor and the burner cap The thermocouple is dirty Remove any soiling See Cleaning and care ...

Page 39: ... appliances These products can be ordered through the Miele Webshop They can also be ordered from Miele see end of this booklet for contact de tails or from your Miele dealer Ceramic and stainless steel hob cleaner 250 ml Removes heavy soiling limescale de posits and aluminium residues Microfibre cloth Removes finger marks and light soiling ...

Page 40: ... 35 0 35 Large burner Natural gas H Liquid gas 2 6 2 6 189 0 5 0 6 Total Natural gas H Liquid gas 7 1 7 1 517 Nominal ratings for KM 2012 KM 2013 KM 2030 Burner Gas type Highest setting Lowest set ting kW g h kW Small burner Natural gas H Liquid gas 1 0 1 0 73 0 25 0 25 Medium burner Natural gas H Liquid gas 1 75 1 75 127 0 35 0 35 Wok Natural gas H Liquid gas 3 8 3 8 277 1 10 1 10 Total Natural g...

Page 41: ... Lowest set ting kW g h kW Small burner Natural gas H Liquid gas 1 0 1 0 73 0 25 0 25 Medium burner Natural gas H Liquid gas 1 75 1 75 127 0 35 0 35 Large burner Natural gas H Liquid gas 2 6 2 6 189 0 5 0 6 Wok Natural gas H Liquid gas 3 8 3 8 277 1 10 1 10 Total Natural gas H Liquid gas 10 9 10 9 793 ...

Page 42: ...d as described in this booklet Please quote the model and serial number of your appliance when contacting Miele This information can be found on the data plate Data plate Stick the extra data plate supplied with the appliance here Make sure that the model number matches the one specified on the back cover of this document Warranty For information on the appliance warranty specific to your country ...

Page 43: ...heat resistant material The hob must not be installed over a fridge fridge freezer freezer dishwasher washing machine washer dryer or tumble dryer A gas hob must not be installed directly next to a deep fat fryer as the gas flames could ignite the fat in the fryer It is essential to main tain a distance of at least 300 mm between these two appliances When installing the hob make sure that the gas ...

Page 44: ... instructions for details If the manufacturer s instructions are not available for the cooker hood or if any flammable objects e g utensil rails wall units etc are installed above the hob a minimum safety distance of at least 760 mm must be maintained between them and the appliance below When two or more appliances which have different safety distances are installed together below a cooker hood yo...

Page 45: ...unit or wall on one side right or left see illus trations Minimum distance between the back of the worktop cut out and the rear edge of the worktop 50 mm Minimum distance between the worktop cut out and a wall or tall unit to the right of it 100 mm Minimum distance between the worktop cut out and a wall or tall unit to the left of it 100 mm Not allowed Highly recommended Not recommended Not recomm...

Page 46: ... between the cut out and the cladding If the niche cladding is made from a non combustible material e g metal natural stone ceramic tiles the minimum safety distance between the cut out and the cladding will be 50 mm less the thickness of the cladding Example 15 mm niche cladding 50 mm 15 mm minimum safety distance of 35 mm Flush fitted hobs Hob with frame or bevelled edge a Masonry b Niche claddi...

Page 47: ... needs to be removed for servicing Do not use sealant between the hob and the worktop The sealing strip under the edge of the hob provides a sufficient seal for the worktop Tiled worktops Grout lines and the hatched area un derneath the hob frame must be smooth and even If they are not the hob will not sit flush with the worktop and the sealing strip underneath the hob will not provide a good seal...

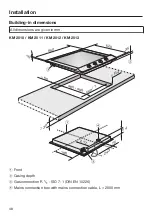
Page 48: ...ons All dimensions are given in mm KM 2010 KM 2011 KM 2012 KM 2013 520 35 650 c b 243 75 54 196 c 0 50 0 30 560 480 490 1 d a 217 ß R4 15 a Front b Casing depth c Gas connection R ISO 7 1 DIN EN 10226 d Mains connection box with mains connection cable L 2000 mm ...

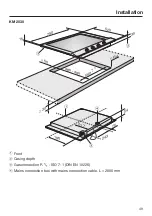
Page 49: ... A L L A T I O N 49 KM 2030 520 35 750 b 0 50 560 480 490 1 c ß R4 15 243 75 54 196 d a 217 c 0 30 a Front b Casing depth c Gas connection R ISO 7 1 DIN EN 10226 d Mains connection box with mains connection cable L 2000 mm ...

Page 50: ... L A T I O N 50 KM 2032 KM 2033 520 35 750 b 0 50 560 480 490 1 c ß R4 15 243 75 54 196 d a 217 c 0 30 a Front b Casing depth c Gas connection R ISO 7 1 DIN EN 10226 d Mains connection box with mains connection cable L 2000 mm ...

Page 51: ... L A T I O N 51 KM 2050 KM 2051 c 0 50 ß R4 860 480 490 35 900 b 520 0 30 393 25 54 196 c d a 217 15 1 a Front b Casing depth c Gas connection R ISO 7 1 DIN EN 10226 d Mains connection box with mains connection cable L 2000 mm ...

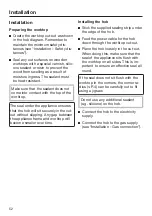
Page 52: ... securely in the cut out without slipping Any gap between the appliance frame and worktop will become smaller over time Installing the hob Stick the supplied sealing strip under the edge of the hob Feed the power cable for the hob down through the worktop cut out Place the hob loosely in the cut out When doing this make sure that the seal of the appliance sits flush with the worktop on all sides T...

Page 53: ...unctional check After installing the hob ignite all burners to check that they are operat ing correctly The flame must not go out on the lowest setting or when the control is turned quickly from the highest to the lowest setting On the highest setting the flame must have a distinctive and visible core ...

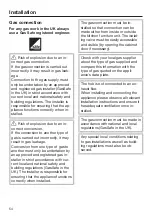
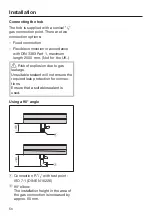
Page 54: ...in staller in strict accordance with cur rent local and national safety and building regulations GasSafe in the UK The installer is responsible for ensuring that the appliance functions correctly when installed The gas connection must be in stalled so that connection can be made either from inside or outside the kitchen furniture unit The isolat ing valve must be easily accessible and visible by o...

Page 55: ...arts e g a drawer and are not ex posed to mechanical stress Connect the hob to the gas supply in accordance with national and local regulations Check the gas connec tion for any leaks This hob is a class 3 appliance and is suitable for use with natural gas or li quid gas Category in acc with EN 30 United Kingdom Ireland II2H3 20 28 30 37 mbar Depending on country of destination this appliance is s...

Page 56: ...cordance with DIN 3383 Part 1 maximum length 2000 mm Not for the UK Risk of explosion due to gas leakage Unsuitable sealant will not ensure the required leak protection for connec tions Ensure that a suitable sealant is used Using a 90 angle a Connection R with test point ISO 7 1 DIN EN 10226 b 90 elbow The installation height in the area of the gas connection is increased by approx 60 mm ...

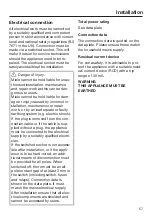
Page 57: ... the con nection cable or if the cable is sup plied without a plug the appliance must be connected to the electrical supply by a suitably qualified electri cian If the switched socket is not access ible after installation or if the appli ance is to be hard wired an addi tional means of disconnection must be provided for all poles When switched off there must be an all pole contact gap of at least ...

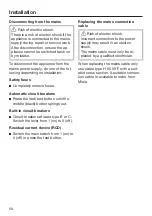
Page 58: ...atic circuit breakers Press the red test button until the middle black button springs out Built in circuit breakers Circuit breakers at least type B or C Switch the lever from 1 on to 0 off Residual current device RCD Switch the main switch from 1 on to 0 off or press the test button Replacing the mains connection cable Risk of electric shock Incorrect connection to the power supply may result in ...

Page 59: ...in strict accordance with cur rent local and national safety and building regulations GasSafe in the UK The installer is responsible for ensuring that the appliance functions correctly when installed When converting to another type of gas both the main and small jets need to be changed Jet table The jet markings refer to a mm bore diameter Burner Main jet Small jet Natural gas H Small 0 69 0 39 Me...

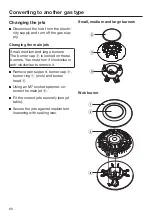
Page 60: ...medium and large burners The burner cap is locked on these burners You must turn it clockwise or anti clockwise to remove it Remove pan support burner cap burner ring wok and burner head Using an M7 socket spanner un screw the main jet Fit the correct jets securely see jet table Secure the jets against inadvertent loosening with sealing wax Small medium and large burners Wok burner ...

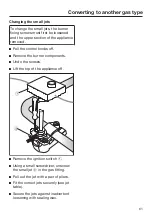
Page 61: ...n of the appliance removed Pull the control knobs off Remove the burner components Undo the screws Lift the top of the appliance off a b Remove the ignition switch Using a small screwdriver unscrew the small jet in the gas fitting Pull out the jet with a pair of pliers Fit the correct jets securely see jet table Secure the jets against inadvertent loosening with sealing wax ...

Page 62: ...ite all burners to check that they are operating correctly The flame must not go out on the lowest setting or when the control is turned quickly from the highest to the lowest setting On the highest setting the flame must have a distinctive and visible core Adhere the label supplied with the jets stating the type of gas being used ...

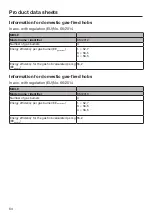
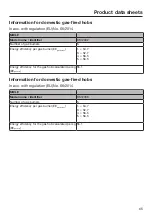
Page 63: ...0 Number of gas burners 4 Energy efficiency per gas burner EEgas burner 1 54 7 3 56 5 4 56 5 Energy efficiency for the gas hob calculated per kg EEgas hob 55 9 Information for domestic gas fired hobs In acc with regulation EU No 66 2014 MIELE Model name identifier KM 2011 Number of gas burners 4 Energy efficiency per gas burner EEgas burner 1 54 7 3 56 5 4 56 5 Energy efficiency for the gas hob ca...

Page 64: ... gas burner EEgas burner 1 52 7 3 56 5 4 56 5 Energy efficiency for the gas hob calculated per kg EEgas hob 55 2 Information for domestic gas fired hobs In acc with regulation EU No 66 2014 MIELE Model name identifier KM 2013 Number of gas burners 4 Energy efficiency per gas burner EEgas burner 1 52 7 3 56 5 4 56 5 Energy efficiency for the gas hob calculated per kg EEgas hob 55 2 ...

Page 65: ...rner EEgas burner 1 54 7 3 52 7 4 56 5 5 56 5 Energy efficiency for the gas hob calculated per kg EEgas hob 55 1 Information for domestic gas fired hobs In acc with regulation EU No 66 2014 MIELE Model name identifier KM 2033 Number of gas burners 5 Energy efficiency per gas burner EEgas burner 1 54 7 3 52 7 4 56 5 5 56 5 Energy efficiency for the gas hob calculated per kg EEgas hob 55 1 ...

Page 66: ......

Page 67: ... Sapura Kencana Petroleum Solaris Dutamas No 1 Jalan Dutamas 1 50480 Kuala Lumpur Malaysia Phone 603 6209 0288 Fax 603 6205 3768 Miele New Zealand Limited IRD 98 463 631 Level 2 10 College Hill Freemans Bay Auckland 1011 New Zealand Tel 0800 464 353 Internet www miele co nz New Zealand Miele Pte Ltd 163 Penang Road 04 03 Winsland House II Singapore 238463 Tel 65 6735 1191 Fax 65 6735 1161 E Mail i...

Page 68: ...M Nr 07 181 150 11 en GB KM 2010 KM 2011 KM 2012 KM 2013 KM 2030 KM 2032 KM 2033 KM 2050 KM 2051 ...

Reviews: