background image

Operating and installation instructions
Ceramic cooktops with induction

To prevent the risk of accidents or damage to the appliance, it is

essential

 to read these instructions before it is installed and used for

the first time.

en-AU, NZ

M.-Nr. 10 032 890

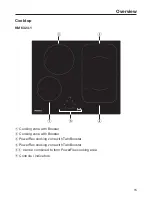
Summary of Contents for KM 6324-1

Page 1: ...on instructions Ceramic cooktops with induction To prevent the risk of accidents or damage to the appliance it is essential to read these instructions before it is installed and used for the first time en AU NZ M Nr 10 032 890 ...

Page 2: ...on 22 The induction principle 22 Noises 23 Pans 24 Tips on saving energy 25 Power level range 26 Operation 27 Operating principles 27 Switching on 28 Selecting Changing the power setting 28 Switching off 28 Residual heat indicator 29 PowerFlex cooking area 30 Auto heat up 31 Booster 32 Keeping warm 34 Timer 35 Minute minder 35 Switching off a cooking zone automatically 36 Using both timer function...

Page 3: ...nal accessories 47 Con ctivity 48 Safety instructions for installation 49 Safety distances 50 Installation notes 52 Building in dimensions 53 KM 6324 1 53 KM 6345 1 54 KM 6349 1 55 Installation 56 Electrical connection 58 Disconnecting devices 58 Service 60 Contact in case of fault 60 Data plate 60 Warranty 60 ...

Page 4: ... accidents and damage to the appliance please read these instructions carefully before using it for the first time They contain important notes on installation safety use and maintenance Miele cannot be held liable for non compliance with these instructions Keep these instructions in a safe place and ensure that new users are familiar with the contents Pass them on to any future owner ...

Page 5: ... use It is intended only to cook food and keep it warm Any other use is not supported by Miele and could be dangerous This cooktop is not intended for use by people including children with reduced physical sensory or mental capabilities or lack of experience and knowledge unless they have been given supervision and instruction concerning its use by a person responsible for their safety They may on...

Page 6: ...m the cooktop until it has cooled down and there is no danger of burning Danger of burning Do not store anything which might arouse a child s interest in storage areas above or behind the cooktop Otherwise children could be tempted to climb onto the cooktop Danger of burning and scalding Turn the handles of pots and pans on the cooking zone to the side or the rear so that children cannot pull them...

Page 7: ...afety requirement is present and tested regularly and where there is any doubt the household wiring system should be inspected by a qualified electrician Before connecting the appliance to the mains supply ensure that the connection data on the data plate voltage and frequency matches the mains electricity supply This data must correspond in order to avoid the risk of damage to the appliance Do no...

Page 8: ...maintenance and repair work the appliance must be disconnected from the mains electricity supply It is only completely isolated from the electricity supply when the mains circuit breaker is switched off or it is switched off at the wall socket and the plug is withdrawn from the socket Do not pull the mains connection cable but the mains plug to disconnect your appliance from the mains electricity ...

Page 9: ...subject to infestation by cockroaches or other vermin pay particular attention to keeping the appliance and its surroundings clean at all times Any damage caused by cockroaches or other vermin will not be covered by the warranty DO NOT MODIFY THIS APPLIANCE ...

Page 10: ...r under the cooktop Cutlery inserts must be heat resistant Do not heat an empty pan Do not heat up food in closed containers e g tins or sealed jars on the cooktop as pressure can build up in the containers causing them to explode Do not cover the cooktop e g with a cooktop cover a cloth or protective foil The material could catch fire shatter or melt if the cooktop is switched on by mistake or if...

Page 11: ...stances Do not drop anything on the ceramic surface Placing hot pans on the sensors and indicators could damage the electronics underneath Do not place hot pans on the sensors or indicators Do not allow solid or liquid sugar or pieces of plastic or aluminium foil to get onto the cooktop when it is hot as they can damage the ceramic surface when it cools down If this should occur switch off the app...

Page 12: ... do not leave them in the immediate vicinity of the cooktop Metal utensils stored in a drawer under the cooktop can become hot if the appliance is used intensively for a long time Do not store any metal items or utensils in a drawer under the cooktop The cooktop is fitted with a cooling fan If a drawer is fitted directly underneath the cooktop ensure that there is sufficient space between the draw...

Page 13: ...ppliance The steam could reach the electrical components and cause a short circuit If the cooktop is built in over a pyrolytic oven the cooktop should not be used whilst the pyrolytic process is being carried out as this could trigger the overheating protection mechanism on the cooktop see relevant section ...

Page 14: ...lectrical and electronic appliances often contain valuable materials They also contain specific materials compounds and components which were essential for their correct function and safety These could be hazardous to human health and to the environment if disposed of with your domestic waste or if handled incorrectly Please do not therefore dispose of your old appliance with your household waste ...

Page 15: ...KM 6324 1 a Cooking zone with Booster b Cooking zone with Booster c PowerFlex cooking zone with TwinBooster d PowerFlex cooking zone with TwinBooster cd can be combined to form PowerFlex cooking area e Controls Indicators ...

Page 16: ... KM 6349 1 a Cooking zone with Booster b Cooking zone with Booster c PowerFlex cooking zone with TwinBooster d PowerFlex cooking zone with TwinBooster cd can be combined to form PowerFlex cooking area e Controls Indicators ...

Page 17: ... a For switching the cooktop on off b Number sensors For setting the power level For setting the time c For switching the PowerFlex cooking area on off d For activating deactivating Stop Go cd For activating deactivating the system lock safety lock ...

Page 18: ... level 2 PowerFlex cooking area activated No pan on cooking zone or pan unsuitable see Induction Residual heat Auto heat up f Timer selection and indicators to Duration in minutes System lock Safety lock activated Indicator lights g PowerFlex cooking area activated h Stop Go activated i For cooking zone selection e g rear right burner j Minute minder ...

Page 19: ... TwinBooster level 1 TwinBooster level 2 2100 3000 3650 15 23 Normal TwinBooster level 1 TwinBooster level 2 2100 3000 3650 22 23 15 x 23 23 x 39 Normal TwinBooster level 1 TwinBooster level 2 3400 4800 7300 Total 7300 Cookware of any diameter may be used within the specified range The wattage quoted may vary depending on the size and material of the pans used ...

Page 20: ...00 15 23 Normal TwinBooster level 1 TwinBooster level 2 2100 3000 3650 15 23 Normal TwinBooster level 1 TwinBooster level 2 2100 3000 3650 22 23 15 x 23 23 x 39 Normal TwinBooster level 1 TwinBooster level 2 3400 4800 7300 Total 7300 Cookware of any diameter may be used within the specified range The wattage quoted may vary depending on the size and material of the pans used ...

Page 21: ...an the cooktop with a damp cloth only and then wipe dry Switching on the cooktop for the first time The metal components have a protective coating which may give off a slight smell when heated up for the first time The induction coils may also give off a slight smell for the first few hours of operation This smell will be less noticeable with each subsequent use before dissipating completely The s...

Page 22: ...ithout a pan in place or if the pan is unsuitable non magnetic base if the diameter of the base of the pan is too small if the pan is taken off the cooking zone when it is switched on If a suitable pan is placed on the cooking zone within 3 minutes will go out and you can continue as normal If no pan or an unsuitable pan is placed on the cooking zone the cooking zone will switch off automatically ...

Page 23: ...aterials e g in a sandwiched base it might emit a cracking sound Whistling might occur if linked zones see Operation Booster are being used at the same time and the pans also have bases made of layers of different materials You might hear a clicking sound from the electronic switches especially on lower power levels You might hear a whirring sound when the cooling fan switches on It switches on to...

Page 24: ...oose pans with diameters larger than the innermost markings but smaller than the outermost markings see Cooking zone data If the diameter of the pan is smaller than the innermost marking the pan will not be recognised and will flash alternately with the power setting selected Do not use pots and pans with bases with pronounced edges or ridges These could scratch or scour the cooktop surface perman...

Page 25: ...when cooking small quantities A smaller pan uses less energy than a larger pan with very little in it Cook with as little water as possible Once food has come to the boil or the oil in the pan is hot enough for frying reduce the heat to a lower setting Use a pressure cooker to reduce cooking times ...

Page 26: ...es of food to the boil e g casseroles Thickening custard and sauces e g hollandaise 6 7 Gentle braising without overheating the fat of fish schnitzel and sausages 6 7 Frying pancakes potato fritters etc 7 Braising for stews 8 Boiling large quantities of water Bringing to the boil 9 These settings should only be taken as a guide The power of the induction coils will vary depending on the size and m...

Page 27: ...ate a cooking zone or the timer touch the sensor for selecting the relevant cooking zone or timer The relevant cooking zone or timer display will begin to flash when touched Exception If only one of the cooking zones is in operation you can alter the power setting without activating the cooking zone Malfunction due to dirty and or covered sensor controls If the sensor controls are dirty or covered...

Page 28: ...e the cooktop will switch itself off after a few seconds for safety reasons Selecting Changing the power setting Briefly touch the sensor for the required cooking zone will flash alternately with the selected power setting in the cooking zone display Touch the appropriate number sensor for the power setting you want The power setting selected flashes in the display for a few seconds to start with ...

Page 29: ...her as the cooking zone cools down The last horizontal line only goes out when the cooking zone is safe to touch The residual heat indicators will flash in the event of a power cut either during operation or whilst there is still danger from residual heat Risk of burning on hot cooking zones The cooking zones will be hot after use Do not touch the cooking zones while the residual heat indicators a...

Page 30: ...the cooking area are controlled by the rear or left PowerFlex cooking zone Switching on Touch the sensor will flash in the display for the rear or left cooking zone will appear in the display for the front or right cooking zone Set the power level you want by touching the appropriate number sensor for the rear or left cooking zone Switching off Touch the sensor ...

Page 31: ...inued cooking setting you want until a tone sounds and lights up in the cooking zone display lights up in the cooking zone display during the heat up time see chart Changing the continued cooking setting while the cooking zone is heating up deactivates Auto heat up Deactivating Briefly touch the sensor for the required cooking zone Touch the continued cooking setting you have set until the goes ou...

Page 32: ...evert automatically to setting 9 at the end of the Booster time or if the Booster function is switched off before this a setting has been selected the cooking zone will revert automatically to the setting selected at the end of the Booster time or if the Booster function is switched off before this Cooking zones are networked in pairs to supply the power for the Booster function When the Booster f...

Page 33: ...1 Touch the sensor for the required cooking zone Touch the 9 sensor twice will appear in the cooking zone display Switching on the TwinBooster level 2 Touch the sensor for the required cooking zone Touch the 9 sensor three times will appear in the cooking zone display Switching off the Booster TwinBooster Touch the sensor for the required cooking zone Select a different power setting ...

Page 34: ...an with a lid Stir firm or viscous food mashed potatoes stew occasionally Nutrients are lost when food is cooked and continue to diminish when food is kept warm The longer food is kept warm for the greater the loss of nutrients Try to keep food warm for as short a time as possible Setting the keeping warm function Touch the sensor for the required cooking zone Touch the area between the 0 and 1 se...

Page 35: ...ndicator light for the minute minder will start to flash First the tens digit is set then the units digit Touch the number sensor which corresponds to the tens position 1 in this case The timer display will change and will start flashing on the right hand side Touch the number sensor which corresponds to the units position 5 in this case The timer display will change The moves to the left and appe...

Page 36: ...ont left Set the required time If you want to set another cooking zone to switch off automatically follow the same steps as described above If more than one switch off time is programmed the shortest time remaining will be displayed and the corresponding indicator light will flash The other indicator lights will light up constantly If you want to show the time remaining for another zone which is c...

Page 37: ...to programme in one or more switch off times as well Touch the timer display repeatedly until the indicator light for the zone you require flashes Set the time as described above Shortly after the last entry the timer display switches to the function with the shortest remaining time If you want to show the times remaining which are counting down in the background Touch the timer display repeatedly...

Page 38: ...the power setting previously selected and the Booster time Auto heat up and automatic switch off times will resume running If the function is not deactivated within 1 hour the cooktop will switch off Activation Deactivation Touch the sensor Use this function when the sensors need to be cleaned quickly or there is a risk of boiling over Recall If the cooktop is switched off in error during operatio...

Page 39: ...y lock is set when the cooktop is switched on When the safety lock is activated The power settings for the cooking zones and the timer settings cannot be changed The cooking zones entire cooktop and the timer can be switched off but once switched off cannot be switched on again If an unavailable sensor is touched whilst the system lock or safety lock is activated will appear in the timer display f...

Page 40: ...dual heat indicator appears If you switch the cooking zone on and off again it is ready for operation again Safety switch off if the sensors are covered Your cooktop will switch off automatically if one or several sensors remain covered for more than about 10 seconds for example by finger contact food boiling over or an object will flash in the cooking zone display and a tone will sound will go ou...

Page 41: ...ction in operation will be switched off The set power level will be reduced The cooking zone will switch off automatically will flash in the display The overheating protection mechanism can be triggered by Heating up an empty pan Fat or oil being heated on a high power setting Insufficient ventilation to the underside of the cooktop A hot cooking zone being switched on after an interruption to the...

Page 42: ...aning agent immediately Never use abrasive sponges or cleaning agents Clean the cooktop after every use Dry the cooktop thoroughly after every cleaning to avoid limescale residue Unsuitable cleaning agents To avoid damaging the surfaces of the appliance do not use washing up liquid cleaning agents containing soda alkalines ammonia acids or chlorides cleaning agents containing descaling agents stai...

Page 43: ...n cloth Do not apply the cleaner while the cooktop is still hot as this can result in marking Please follow the cleaning agent manufacturer s instructions Finally wipe the cooktop with a damp cloth and dry it with a soft dry cloth Residues can burn onto the cooktop the next time it is used and cause damage to the glass ceramic surface Ensure that all cleaner residues are removed Spots caused by li...

Page 44: ...e To do this switch off at the wall socket and withdraw the plug or switch off at the residual current device If after switching the circuit breaker or residual current device back on the appliance will still not switch on contact a qualified electrician or Miele A smell and vapours are given off when the new appliance is being used The metal components have a protective coating When the appliance...

Page 45: ...features Overheating protection The cooking zone is not working in the usual way on the power level selected The overheating protection mechanism has been activated See Safety features Overheating protection Power level 9 is automatically reduced if you select power level 9 on two linked cooking zones or extended zones at the same time Operating both zones at power level 9 would exceed the permitt...

Page 46: ...verheating protection mechanism has been activated See Overheating protection One or several of the sensors are covered for example by finger contact food boiling over or by an object such as an oven glove or tea towel Remove the obstruction and or clean the cooktop or and other numbers There is an electronic unit fault Interrupt the power supply to the cooktop for approx 1 minute If the problem p...

Page 47: ...pans and frying pans Miele offers a wide range of pans which are perfect for Miele cooktops Please refer to the Miele website for more details on individual products Pans in various sizes Frying pan with lid Non stick pan Wok Gourmet oven dishes Cleaning and care products Original Miele ceramic and stainless steel cooktop cleaner 250 ml Removes heavy soiling limescale deposits and aluminium residu...

Page 48: ...s electricity supply Connect the dongle to the cooktop see the installation instructions for the dongle Reconnect the cooktop to the mains electricity supply The signing on procedure must be carried out within 10 minutes after reconnecting the electricity supply Start signing on the rangehood see the operating and installation instructions for the rangehood Remove any pots or pans from the cooktop...

Page 49: ...adjacent kitchen units must be treated with 100 C heat resistant adhesive which will not dissolve or distort Any splashbacks must be of heat resistant material as well The cooktop must not be installed over a fridge fridge freezer freezer dishwasher washing machine washer dryer or tumble dryer This cooktop must not be installed above ovens unless these have a built in cooling fan After installatio...

Page 50: ...cturer s instructions are not available for the rangehood a minimum safety distance of 600 mm must be maintained For any flammable objects e g utensil rails wall units etc a minimum safety distance of 600 mm must be maintained between these objects and the highest part of the cooktop below When two or more appliances which have different safety distances are installed together below a rangehood yo...

Page 51: ...ce from the right edge of the cooktop to a combustible surface 50 mm Minimum horizontal distance from the left edge of the cooktop to a combustible surface 50 mm Minimum safety distances underneath the cooktop To ensure sufficient ventilation to the cooktop a certain gap must be left between the underside of the cooktop and any oven interim shelf or drawer The minimum gap between the underside of ...

Page 52: ...it must be at least as wide as the internal cut out width for the cooktop see Building in dimensions This is to ensure that the casing can be easily removed for maintenance If the underside of the cooktop is not freely accessible after installation any sealant used to plug the gaps around the appliance must be removed to enable the cooktop to be lifted out of the cut out should this be necessary T...

Page 53: ...0 206 b 18 b b a b 35 13 d 7 e a Front b Building in depth c Mains connection box d Stepped cut out for natural stone worktops e Con ctivity connection The mains connection cable 1 440 mm long is supplied separately with the cooktop Cut out dimensions for granite or marble worktops Please take careful note of the inset diagram ...

Page 54: ...730 496 470 756 1 1 1 1 0 29 1 1 13 d R11 7 e a Front b Building in depth c Mains connection box d Stepped cut out e Con ctivity connection The mains connection cable 1 440 mm long is supplied separately with the cooktop Cut out dimensions for granite or marble worktops Please take careful note of the inset diagram ...

Page 55: ...ng in depth c Mains connection box d Stepped cut out e Con ctivity connection The mains connection cable 1 440 mm long is supplied separately with the cooktop Cut out dimensions for granite or marble worktops Please take careful note of the inset diagram ...

Page 56: ... worktops a Worktop b Cooktop c Gap As the ceramic glass and the worktop cut out have a certain dimensional tolerance the size of gap can vary min 1 mm KM 6324 1 d Stepped cut out KM 6345 1 d Stepped cut out KM 6349 1 d Stepped cut out ...

Page 57: ... the appliance The mains connection cable must be connected by a suitably qualified and competent electrician in accordance with current local and national safety regulations Follow the instructions in the wiring diagram see Electrical connection Wiring diagram Installing the cooktop Feed the mains connection cable down through the cut out Centre the cooktop in the cut out Connect the cooktop to t...

Page 58: ...ure these match the household mains supply Connection must be made via a suitable isolator switch which provides disconnection on all poles and which complies with national and local safety regulations When switched off there must be an all pole contact gap of at least 3 mm in the isolator switch The isolator switch must be easily accessible after the appliance has been built in Please see the wir...

Page 59: ...he mains connection cable must only be replaced by a suitably qualified and competent person in accordance with current local and national safety regulations The earth lead must be connected to the point marked If the mains connection cable needs to be replaced it must be replaced with a special connection cable type H 05 VV F PVC insulated available from Miele in order to avoid a hazard The conne...

Page 60: ...nd serial number of your appliance when contacting Miele This information can be found on the data plate Data plate Adhere the extra data plate supplied with the appliance in the space below Make sure that the model number matches the one specified on the back cover of this document Warranty The manufacturer s warranty for this appliance is 2 years For further information please refer to your warr...

Page 61: ......

Page 62: ......

Page 63: ...erth 83 85 Sir Donald Bradman Drive Hilton SA 5033 205 207 Stirling Highway Claremont WA 6010 Miele Experience Centre and Office Adelaide Miele Australia Pty Ltd Miele New Zealand Limited Level 2 10 College Hill Freemans Bay Auckland 1011 Miele Experience Centre Auckland 8 College Hill Freemans Bay Auckland 1011 Telephone 0800 464 353 0800 4 MIELE www miele co nz Miele Global Headquarters Germany ...

Page 64: ...M Nr 10 032 890 03 en AU NZ KM 6324 1 KM 6345 1 KM 6349 1 ...

Reviews: