Operation
38
Opening the door
Press the door release to open the
door.
If the microwave oven is in use, opening
the door will interrupt the cooking
process.
Placing the dish in the oven
Ideally the dish should be placed in the
middle of the oven.
Turntable
If the appliance is built-in or installed
at a height of 900 mm or higher above
floor level, please make sure the
turntable does not slip when removing
dishes from the cabinet.
The turntable helps the food to cook,
reheat or defrost evenly.
Do not operate the microwave
without the turntable in place.
The turntable starts turning
automatically when the appliance is
operated.
Do not cook, reheat or defrost food
directly on the turntable. Check that the
dish is not larger in size than the
turntable.
Turn or stir food during cooking, or turn
the dish so that it heats up evenly.
Closing the door
Push the door shut.
Press the Start button again to resume
an interrupted cooking programme.
The appliance will not start again if
the door has not been closed
properly.
Starting a programme
Select a microwave power level by
pressing the corresponding sensor
control.
Touch the sensor control for the
power level you want.
and the microwave power level will
light up in the display.
Use the arrow buttons to set the
cooking duration you want (minutes
first) and confirm your selection with
OK
.
Then set the seconds and confirm
again with
OK
.
Press the
button.
The cooking programme starts.
You can choose between 7 power
levels.
The higher the power level, the more
microwaves reach the food.
When heating up food which cannot be
stirred or turned during cooking, as with
a plated meal, it is best to use a lower
microwave power level.
This ensures the heat is distributed
evenly. Heat for long enough to cook
the food properly.
The duration can be selected up to
90 minutes. Exception: If the maximum
microwave power level has been
selected, a maximum cooking duration
of 15 minutes can be set. If you then
continue to use the appliance at full
Summary of Contents for M 2230 SC
Page 17: ...Installation 17 Tall unit side view 372 6 22 ...
Page 18: ...Installation 18 Wall unit side view 372 16 22 ...
Page 21: ...Installation 21 View from above 90 22 480 595 min 2 5 ...
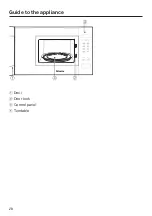
Page 28: ...Guide to the appliance 28 a Door b Door lock c Control panel d Turntable ...
Page 64: ......
Page 65: ......
Page 66: ......


