background image

Operating and Installation
Instructions

Oven
H 4780 B

To prevent accidents
and machine damage,
read these instructions

before

installation or use.

UV

M.-Nr. 06 795 120

Summary of Contents for MasterChef H 4780 B

Page 1: ...Operating and Installation Instructions Oven H 4780 B To prevent accidents and machine damage read these instructions before installation or use UV M Nr 06 795 120 ...

Page 2: ... oven display 12 SETTINGS 13 Language J 14 Clock 14 Temperatures 15 Oven Light 16 Temperature F C 16 Tone Options 17 Display 18 Reset 19 System lock 19 Before using the oven 20 Using the oven 22 Selecting a function 22 Adjusting the oven temperature 22 Preheating 23 Delay Start 23 Duration 23 Start time 24 End time 24 Canceling a process 25 Turning off the oven 25 At the end of cooking 25 Setting ...

Page 3: ...en door 56 Removing the runners 58 Removing the back panel 59 Lowering the upper heating element 59 Catalytic liners 60 Changing the light bulb 61 Frequently asked questions 62 Technical Service 63 Optional accessories 64 Installation instructions 67 Caring for the environment 68 Disposal of the packing materials 68 Disposal of an old appliance 68 Electrical connection 69 Appliance and Cut out Dim...

Page 4: ...properly installed and grounded by a qualified technician To guarantee the electrical safety of this appliance continuity must exist between the appliance and an effective grounding system It is imperative that this basic safety requirement be met If there is any doubt have the electrical system of the house checked by a qualified electrician The manufacturer cannot be held responsible for damages...

Page 5: ... they are not glowing During and after use do not let clothing or other flammable materials come in contact with heating elements or interior surfaces of the oven until they have had sufficient time to cool External parts of the oven such as the door glass vents and the control panel can become hot Do not block any vent openings Do not let metal objects aluminum foil metal pans or the meat probe c...

Page 6: ...e an oven Children climbing on the oven to reach these items could be injured Do not leave the oven unattended when cooking with oils or fats they are a fire hazard if overheated Do not use water on grease fires Smother the fire with a properly rated dry chemical or foam fire extinguisher Be aware of loose fitting or hanging garments while operating the cooktop they present a fire hazard Do not us...

Page 7: ...per heating element dRotisserie motors eRoast probe socket fConvection fan gNon tip four level runners hData plate iOven door This switch shuts off the heating element and convection fan when the door is opened during use Guide to the oven 7 ...

Page 8: ... c On touch control to turn the oven on d Off touch control to turn the oven off eDisplay shows the time or the functions f Timer touch control to set a timer independent of an oven function g Clear touch control to delete the last entry or to clear menu items Guide to the display 8 ...

Page 9: ...g pan and wire racks are coated with PerfectClean and can be easily cleaned with a sponge and dish soap Non tip safety notches Wire racks and roasting pan are equipped with non tip safety notches see arrows which prevent them from being pulled out completely while the oven is in use When inserting a rack or pan always check that the safety notches are at the rear of the oven Once inserted into the...

Page 10: ...s the core temperature of meat and poultry during a roasting function The long pointed end of the probe is inserted into the thickest portion of the meat while the short end of the probe is inserted into the roast probe socket Slide opener The slide opener is used to remove the light cover when changing a light bulb The flat end of the slide opener is wedged beneath the light cover to pry it off O...

Page 11: ...h control next to Accept and confirm by touching OK Touch the Off control is displayed at the right side of the display To deactivate the system lock Call up the submenu SYSTEM LOCK Select the touch control next to Do not accept and confirm by touching OK Using the system lock Select the touch control next to and confirm on The oven cannot be operated now The symbol indicates that the lock has bee...

Page 12: ...corresponding control Touch the On control to activate the display Additional functions are displayed by touching the more control The previous display can be recalled by touching the back control Dots after a function indicate a submenu The submenu will appear when the function is selected BAKE BROIL ROAST FAVORITES MASTER CHEF more back PROOF SABBATH DEFROST DEHYDRATE more back SETTINGS F Using ...

Page 13: ...unction you can customize the oven to suit your preferences Settings may be adjusted by touching the appropriate touch control Available settings SETTINGS LANGUAGE J OVEN LIGHT CLOCK TEMPERATURE F TEMPERATURES more SETTINGS back RESET TONE OPTIONS SYSTEM LOCK DISPLAY SETTINGS 13 ...

Page 14: ...y Enter the current time using the keypad Different settings can be selected by touching the control next to the option the size of the clock display Size Normal Size Large the time format 12 hour 24 hour whether or not the time is displayed Clock Display On Clock Display Off Touch the OK control to confirm the entries If power to the oven is cut off for more than 4 days the clock will have to be ...

Page 15: ...90 C 100 260 C Convection Bake 325 F 125 500 F 160 C 50 260 C Surround Bake 375 F 125 550 F 190 C 50 290 C Browning 375 F 200 500 F 190 C 100 260 C Intensive 325 F 200 500 F 160 C 100 260 C Auto Roast 325 F 200 425 F 160 C 100 210 C Convection Roast 325 F 125 500 F 160 C 50 260 C Surround Roast 400 F 175 550 F 200 C 80 290 C Broil no default 400 575 F no default 200 300 C Maxi Broil no default 400...

Page 16: ...ght remains lit during a function The selected setting will appear in the display Touch the OK control to confirm the selection Temperature F C All oven temperatures can be displayed in either Fahrenheit or Celsius degrees Touch the TEMPERATURE control to toggle between F and C OVEN LIGHT On during use Off after 1 minute On during use OK SETTINGS LANGUAGE J OVEN LIGHT CLOCK TEMPERATURE F TEMPERATU...

Page 17: ...ry touch of the respective control another tone will sound and the display will show the tone number Select the tone for each timer Keypad tone The keypad can be set to make a sound with every touch of a control Touch the Keypad tone control to toggle between the on and off settings Volume This control adjusts the volume of the tone options Touch the Volume control until you hear the desired volum...

Page 18: ... signal or the oven timer sounds Touch the Tone control to toggle between the short and long setting Touch the OK control to confirm the TONE OPTIONS settings When the tone sounds to indicate an oven signal or the timer touch any number on the keypad to turn off the tone Display The brightness and contrast of the oven display can be adjusted by touching the controls next to Brightness and Contrast...

Page 19: ...Settings If the request is confirmed with yes all changed settings will be restored to the factory default Reset Favorites If the request is confirmed with yes all favorite entries will be deleted Once deleted these entries cannot be restored System lock See chapter Locking the oven RESET TEMPERATURE SETTINGS FAVORITES RESET TEMPERATURES Are you sure yes no RESET SETTINGS Are you sure yes no RESET...

Page 20: ...floor any cork spacers from the ceiling of the interior foil from the appliance front Make sure the room is well ventilated during this process Remove all accessories from the oven Touch the On control Select the BAKE function Select CONVECTION BAKE Select Temperature BAKE BROIL ROAST FAVORITES MASTER CHEF more BAKE FUNCTIONS BAKE BROWNING CONVECTION BAKE INTENSIVE SURROUND CONVECTION BAKE 325 F 1...

Page 21: ... run for 2 hours and the count down will appear in the display CONVECTION BAKE 325 F 12 23 Range 125 F 500 F Temperature Delay Start Add to favorites CONVECTION BAKE 500 F 12 23 Temperature Delay Start Add to favorites Delay Start Please select 12 23 Start time hh mm Duration hh mm End time hh mm OK CONVECTION BAKE 500 F 12 23 Preheating 60 F Remaining time 02 00 Temperature End time 02 23 Add to ...

Page 22: ...l be displayed next to the function name Adjusting the oven temperature This oven has been factory tested for the optimum operating temperature of each function This temperature can be adjusted if needed Touch the Temperature control The temperature will be highlighted in the display Enter the new temperature using the keypad The oven will heat to the adjusted temperature BAKE BROIL ROAST FAVORITE...

Page 23: ...ically off or on and off Duration To enter the cooking time After this time has elapsed the oven turns off automatically The maximum duration time which can be entered is 11 hours 59 minutes Touch the Delay Start control Touch the Duration control and enter the cooking time Confirm the entries by touching the OK control or cancel by touching Clear For example enter 00 50 and the function will run ...

Page 24: ... or cancel by touching Clear The end time will automatically be calculated End time The desired end time allows you to set the actual time you would like cooking to complete This time is limited to 24 from the current time Touch the Delay Start control Touch the End time control and enter the desired end time For example enter 02 15 and the oven will to finish cooking at 2 15 Touch the Duration co...

Page 25: ... canceled Select the option you wish to cancel Turning off the oven Touch the Off control The oven will turn off and the time of day will appear in the display At the end of cooking a tone will sound Ready will appear in the display under the function name and the oven will shut off automatically CONVECTION BAKE 325 F 12 23 Ready Temperature Delay Start Add to favorites Using the oven 25 ...

Page 26: ...d seconds The second timer can be set in the same way as the first The count down of Timer 1 and 2 is shown in the lower area of the display At the end of the timed period a tone will sound Touch Clear to cancel the timer tone To cancel the timer Touch the Clear control Touch the control for the timer to be canceled or to cancel both timers and a running function touch ALL FUNCTIONS Touch OK Timer...

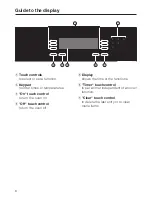
Page 27: ...Guide to the functions ...

Page 28: ...28 ...

Page 29: ...ries If the filter is not removed increase the baking time The roasting pan does not need to be greased or covered with baking parchment The PerfectClean enamel finish prevents spillovers from baking onto and into the surface Baked food can be easily removed Use parchment paper only for dough with a high egg white content i e for biscuit meringue or macaroons BAKE 29 ...

Page 30: ...KE function works by heating food from below This is similar to the bake mode of a conventional oven Use this function for boxed cake mixes baked apples frozen dinners The recommended positions are the 1st or 2nd runners from the bottom BAKE 30 ...

Page 31: ... convection function several runner levels can be used at the same time The recommended positions are 1 tray 1st runner from the bottom 2 trays 1st and 3rd runners from the bottom 3 trays 1st 2nd and 4th runners from the bottom When baking 3 trays of cookies or small cakes at the same time remove the respective tray when the desired browning is reached As a general rule the temperature of a recipe...

Page 32: ...ringues angel food cakes cream puffs cookies cakes cheesecakes pies quiche baked potatoes The recommended positions are the 1st or 2nd runners from the bottom BROWNING Default temperature 375 F 190 C In the BROWNING function food is heated from above Use this function for browning meringue melting a cheese topping carmaelizing a sugar topping as in creme brulee The recommended position is the 3rd ...

Page 33: ...create a brick oven convection environment Use this function for pizza focaccia stromboli Use the 1st runner from the bottom Should the bottom of the food burn raise the rack to a higher runner When using INTENSIVE recipe temperatures should be lowered by 25 F 15 C Intensive is not recommended for roasting or shallow baking Do not bake on the oven floor BAKE 33 ...

Page 34: ...g moisture and tenderness Once the oven cavity temperature has exceeded the set temperature Searing will appear in the display Once the meat is seared the function returns to the selected temperature Use this function for poultry whole birds roasts e g prime rib pork loin beef tenderloin leg of lamb etc The recommended position is the 1st runner from the bottom The oven should not be preheated whe...

Page 35: ...on fan to actively circulate heated air throughout the oven This function does not spike the oven temperature for searing Use this function for chicken pieces small cuts of meat fish salmon lobster tails meat loaf The recommended position is the 1st runner from the bottom ROAST 35 ...

Page 36: ...efault temperature 400 F 200 C SURROUND ROAST is a conventional roasting program for traditional recipes Use this function for pot roast brisket stew The recommended position is the 2nd runner from the bottom ROAST 36 ...

Page 37: ... a covered pot increase the recipe temperature by 70 F 20 C Season the meat and place it in the pot Add some butter margarine or a little oil and about cup of water when roasting a large piece of meat or roasting poultry with a high fat content Roasting on the rack Use the rack with the roasting pan inserted below it Add a little oil to very lean meat or place a few strips of bacon on top to help ...

Page 38: ...OAST CONVECTION ROAST SURROUND ROAST CONVECTION BROIL Using the roast probe Prepare the meat as usual in a pot or on the rack Roasting bags or aluminum foil may be used but only when left open at the end Insert the probe into the meat or poultry through the opened end of the foil or bag Insert the probe into the middle of the meat Make sure that the probe does not touch any bones and is not locate...

Page 39: ...lace to insert the probe is in the thickest part of the bird between the thigh and body Put the meat into the oven Insert the short end of the roast probe into the socket on the right side of the oven so it clicks into place ROAST 39 ...

Page 40: ...ing Clear ROAST AUTO ROAST CONVECTION ROAST SURROUND ROAST AUTO ROAST 325 F 12 23 Probe Temperature 90 F Probe Temperature Delay Start Add to favorites AUTO ROAST 325 F 12 23 Range 75 225 F Probe 175 F Temperature Delay Start Add to favorites AUTO ROAST 325 F 12 23 Searing Probe 200 F Temperature Delay Start Add to favorites AUTO ROAST 325 F 12 23 Wait for Start Probe 200 F Temperature Start time ...

Page 41: ...rol to the left of Turkey Touch the control that corresponds to the weight of the turkey 10 15 lb Insert the roast probe into the turkey and into the roast probe socket as prompted The remaining cooking time can be monitored in the display To view the settings of a MASTER CHEF function touch the control for Cooking Mode BAKE BROIL ROAST FAVORITES MASTER CHEF more MASTER CHEF POULTRY PIZZA MEAT REH...

Page 42: ...ol to room temperature before using it again for an automatic program When cooking poultry like goose or turkey set the weight of the unstuffed poultry When cooking more than one chicken at once set the weight of the heavier chicken not the total weight During some programs the oven must be preheated before inserting the food into the oven The respective info and time indication will show in the d...

Page 43: ...Roast Steaks London Broil Pork Loin Roast Blade Roast Crown Roast Cooked Ham Natural Ham Chops Veal Rolled Roast Loin Roast Rib Roast Chops Lamb Leg Rack Half Shank Half Sirloin FISH Steaks Fillets Whole Lobster Tails Paella Shrimp PIZZA Fresh Frozen Self Rising Stromboli Calzone REHEAT Pizza Banquet Pan Casserole BAKED GOODS Fruit Pies Layer Cakes Cookies Soufflé Sponge Cake Muffins POTATOES Bake...

Page 44: ...Only the inner part of the upper heating element is used for a smaller area of intense heat from above This function is excellent for broiling or searing small quantities Use this function for chops ribs small quantities of meat browning small dishes The recommended position is the 3rd runner from the bottom BROIL 44 ...

Page 45: ...ing element is used for intense heating from above This function gives excellent browning and searing results Use this function for chops ribs large quantities of meat browning large dishes The recommended position is the 3rd runner from the bottom BROIL 45 ...

Page 46: ...tion broil to monitor the meat s core temperature Refer to ROAST Using the roast probe for more information Instead of Convection Broil the function Rotisserie can be used It requires a rotisserie kit which can be purchased from Miele See Optional accessories Rotisserie for more information A separate operating manual is included with the rotisserie kit Use the Rotisserie function for poultry whol...

Page 47: ...s at the same time Most items should be turned halfway through broiling To determine how far through a thick piece of meat has been cooked press down on its surface with a spoon If the surface presses down easily and with little resistance to the spoon it is rare If there is some resistance it is medium If there is great resistance it is well done BROIL 47 ...

Page 48: ...he name by touching the controls left and right of the alpha numeric list Confirm each character entry by touching the Select control Touch the OK control when naming is complete to save the favorite to memory Your favorite can now be recalled from the FAVORITES list When selected the oven will automatically use the saved settings Touch Clear to cancel the running function if you are not cooking C...

Page 49: ...old mode until the oven door is reopened Open the oven door Place the food in the oven Close the oven door After a 5 minute delay the oven will start heating until the set temperature is reached This temperature will be held constant for 72 hours Once the Sabbath function has started the settings cannot be changed The oven can only be turned off with the Off control At the end of Sabbath After 72 ...

Page 50: ...erbs A consistent low temperature and the fan maintain the ideal conditions for the long dehydration process For best results blot food with a paper towel before dehydrating Foods to be dehydrated should be placed directly on the oven racks or on a drying screen not supplied with oven DEHYDRATE 50 ...

Page 51: ...the proof function will allow you to effectively proof dough This function maintains a low temperature perfect for yeast to rise Place the dough in a large bowl on the oven rack positioned at the lowest runner level Keep the oven door closed during this process PROOF 51 ...

Page 52: ...frozen Defrosting tips Remove the frozen food from the packaging and place it in the roasting pan or into an appropriate dish Meat and poultry should be fully thawed before cooking Do not use the liquids from defrosting Fish does not need to be fully defrosted before cooking Defrost so that the surface is soft enough to absorb herbs and seasoning Cook all food immediately after defrosting DEFROST ...

Page 53: ...lso be used Apply sparingly with even pressure Accessories Roast probe Wash with soapy water and a sponge Rinse under running water Do not submerge the roast probe in water Do not clean the roast probe in the dishwasher Grease filter Clean with liquid dish soap and hot water or in the dishwasher Depending on the detergent cleaning the grease filter in a dishwasher may cause permanent discoloration...

Page 54: ...f hot water and liquid dish soap Do not use abrasive cleaners ceramic cleaners metal scourers or oven cleaners on PerfectClean surfaces After cleaning rinse thoroughly with water The water should run off the surface easily any residue will hinder this effect Stubborn baked on grease may need to be soaked first to loosen deposits Clean spills on PerfectClean surfaces as soon as possible to prevent ...

Page 55: ...ve the back panel lower the upper heating element Clean the oven surfaces with a solution of hot water liquid dish soap and a sponge or soft nylon brush Do not use abrasive cleaning agents hard brushes metal scouring pads steel wool knives or other abrasive materials Do not use oven sprays on any part of this oven Dry surfaces before reassembly Cleaning 55 ...

Page 56: ...heavy It should be gripped firmly at the sides when being removed or refitted Open the door fully Flip up the locking clamps on each door hinge Slowly shut the door until the protruding clamps stop the movement Pull the door upward See illustration Cleaning 56 ...

Page 57: ...hinges and open the door completely Flip the locking clamps down Be sure that the locking clamps are flipped down when the door is reinstalled Otherwise on closing the door the hinges could work loose from the guide holes and cause damage Cleaning 57 ...

Page 58: ...e runners Pull the runner out of the front fixing to release it Remove the runners by pulling them out of the rear of the oven Reassemble in the reverse order ensuring all parts are correctly in place Cleaning 58 ...

Page 59: ... This could lead to injuries Reassemble in the reverse order ensuring all parts are correctly in place Lowering the upper heating element First remove the runners Loosen the wing nut Gently lower the upper heating element Do not use force to lower it as this could cause damage Reassemble in the reverse order ensuring all parts are correctly in place Cleaning 59 ...

Page 60: ...rt control Select Duration and set the duration for 1 hour More time may be needed if the oven is heavily soiled Touch OK If the catalytic liner is damaged a replacement may be purchased from your local Miele dealer or from Miele BAKE BROIL ROAST FAVORITES MASTER CHEF more BAKE FUNCTIONS BAKE BROWNING CONVECTION BAKE INTENSIVE SURROUND CONVECTION BAKE 325 F 12 23 Range 125 F 500 F Temperature Dela...

Page 61: ...ied slide opener to pry the lamp out of the side panel Replace the halogen bulb Only use the following light bulb 12 V 10 W 572 F 300 C heat resistant socket G4 type 64418 made by Osram Do not touch the new light bulb with your fingers touching the bulb will reduce its life Follow the bulb manufacturer s instructions Press the lamp back into the sidewall of the oven and reinsert the cover Reassemb...

Page 62: ... turned off Turn the display on Turn the oven on Select Settings Clock Display on What if the time of day cannot be entered after a power failure Possible fault Fix The system lock is activated Deactivate the system lock What if cakes and cookies are not cooked enough Possible fault Fix The grease filter was not removed If the grease filter is not removed increase baking by 10 to 15 minutes Why is...

Page 63: ...stry that guarantees repairs by a Miele Authorized Service Provider using genuine Miele parts Only genuine Miele parts installed by factory trained professionals can guarantee the safety reliability and longevity of your Miele appliance Please note that unless expressly approved in writing by Miele s Service department Extended Service Contracts offered by other providers for Miele products will n...

Page 64: ...h or frozen pizzas flat cakes tarts and baked desserts Pizza stone The pizza stone is ideal for baking dishes with a crisp bottom like pizza and bread Gourmet Casserole The Gourmet Casserole will be set on the wire rack The casserole has a special non stick coating and is available in two sizes A lid is also available separately Optional accessories 64 ...

Page 65: ... with PerfectClean enamel and can be easily cleaned with a sponge and dish soap Rotisserie The rotisserie evenly broils and adds a finishing touch to items such as stuffed meat tied roasts poultry and kabobs by gently turning the skewer during the broiling function The skewers are inserted into the rotisserie motors in the back panel Optional accessories 65 ...

Page 66: ...66 ...

Page 67: ...Installation Instructions ...

Page 68: ...of children Danger of suffocation Disposal of an old appliance Old appliances may contain materials that can be recycled Please contact your local recycling authority about the possibility of recycling these materials Ensure the appliance presents no danger to children while being stored for disposal Before discarding an old appliance unplug it from the outlet and cut off its power cord Remove any...

Page 69: ... with the household electrical supply This data must correspond to prevent machine damage Consult an electrician if in doubt Only operate the appliance after it has been installed into cabinetry The plug must be plugged into an appropriate outlet that is installed and grounded in accordance with all local codes and ordinances Data plate The silver data plate is located along the front side of the ...

Page 70: ...Vent cut out min 24 2 150 cm2 possible at rear of cabinet bCut out for power cord min 4 2 10 cm2 cPower cord For the most current specifications see the Miele website Appliance and Cut out Dimensions 70 ...

Page 71: ...dition the oven vent at the bottom of the door bottom of the lower door in a double oven must not be obstructed Connect the oven to the electrical supply The oven must be supported from underneath Place the oven into the cabinet as far as the oven trim and align Open the oven door and locate the two mounting screw holes in the oven frame Mark and drill 6 mm pilot holes Secure the oven to the cabin...

Page 72: ...Set the time Enter Time hh mm will appear in the display once the oven is connected to electricity Set the current time using the keypad Save the time by touching the OK control Installing the oven 72 ...

Page 73: ...73 ...

Page 74: ...74 ...

Page 75: ...75 ...

Page 76: ...Alteration rights reserved 5106 H 4780 B For the most current information see the Miele website M Nr 06 795 120 06 ...

Reviews: