background image

14

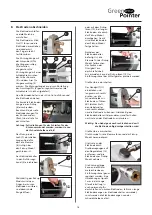
8.  Mount and tighten the torx screws and the two 

bolts.

9.  Carefully check the dust collector before mounting 

and top up with new grinding fluid.

10. Reset the service counter by turning on the grinder 

and pressing and holding the pushbutton for 5 
seconds.

Clean the Green Pointer Pro Cut thoroughly each time 
the grinding disc is replaced, when the dust collector 
is full, or earlier if necessary. Perform cleaning as 
mentioned above.
Clean the Cutter module on the inside when changing 
the cutting disc. (See section 11).
Please ensure that the person cleaning the Green 
Pointer Pro Cut wears the appropriate safety gear e.g. 
rubber gloves and protection glasses.
It can be difficult to remove the grinding dust from 
the aluminum parts without damaging the parts; 
boiling hot water is an effective way to dissolve the 
grinding dust. 
Do not use chemicals, solvents or high pressure 
cleaning.
Check the main cable regularly. Only qualified 
personnel must replace it. If necessary, contact 
Migatronic A/S or your local distributer for service.

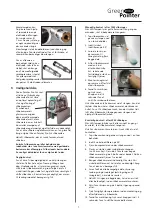
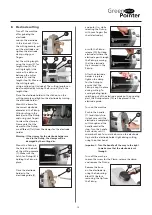
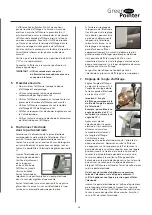
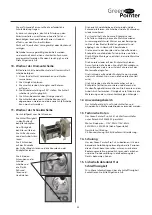
10. Replacement of the grinding disc 

Please follow the procedure below when 
disassembling the machine:
1.  The power to the Green Pointer Pro Cut must be 

turned off – pull out the plug.

2.  Tap of the grinding liquid from the grinding 

chamber.

3.  Remove the two screws, the cover frame and the 

plastic inspection cover.

4.  Set the grinding angle at 90º. The disc is now 

assessable.

5.  Unlock the center screw (Note: Left-hand screw).
6.  Remove the U-wheel and the Grinding disc and 

mount a new grinding disc.

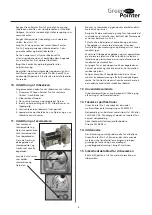
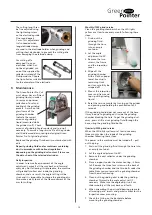
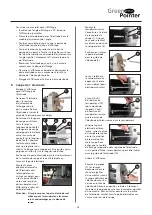
11. Replacement of the cutting disc

Empty the liquid 
from the chamber 
and remove the dust 
collector.
Loosen the cutter 
module from the 
working table
Remove the three 
screws from the back 
of the cutting house, 
and pull the house away from the back plate

Remove the four small 
screws that holds 
the cutting disc 
and remove the 
cutting disc.
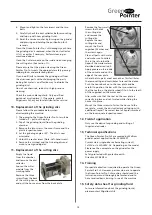
Replace the new 
cutting disc and 
mount the Plastic 
cogwheel, Washer and 
the screws again. 
Clean all parts with water 
and make sure to collect 
this in the return bottle. 
Deposit the wastewater as 
described under section 9. 
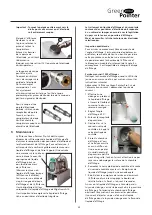
Apply grease on the inside 
of the console and on the 
edge of the rear plate 
where the two parts meet each other. This facilitates 
the remounting and contributes to reseal the device.
Push the house back on to the rear plate and be 
careful to position the bar with the two wheels so 
that the teeth on the plastic wheels fit on to the teeth 
of the cogwheel on the motor axel..
Also, make sure that the seal on the rear plate is 
correctly in place and not twisted while sliding the 
house into place. 
Mount the three screws to fasten the house to the 
rear plate, mount the dust collector and top up with 
additional liquid. The correct level of liquid is marked 
on the lover square inspection cover.

12. Field of application

Only use the devise for grinding and cutting of 
tungsten electrodes.

13. Technical specifications

The Green Pointer Pro Cut are covered by Wolfram 
grinder patent application No. 95942059.7
Current class: (single-phase alternating current) 
1x120V or 1x220-240V AC. Depending on the model. 
Please see the nameplate on the grinder for the 
power supply.
Safety protected with protective earth.  
Directive 2014/35/EU.

14. Training

No special education is required to operate the Green 
Pointer Pro Cut. However, persons who are to operate 
the Green Pointer Pro Cut machine should read the 
instruction manual thoroughly beforehand and to 
have received basic training in use of the machine.

15. Safety data sheet for grinding fluid

For more information about the grinding liquid, 
please contact Migatronic A/S.

Summary of Contents for GREEN POINTER PRO CUT

Page 1: ...Brugsvejledning User guide Betriebsanleitung Guide de l utilisateur 50119028 B Valid from 2020 week 20 GREEN POINTER PRO CUT...

Page 2: ...2 Dansk 3 English 9 Deutsch 15 Fran ais 21...

Page 3: ...gt og tilbeh r 28 32 BORTSKAFFELSE If lge EU direktiv 2012 19 EU skal udtjent elektrisk udstyr indsamles separat og afleveres til genindvinding Bortskaf produktet i overensstemmelse med g ldende regle...

Page 4: ...amlere med slibev ske 2 x 250 ml flasker med slibev ske Wolfram elektrodeholder Pickup Pickup l sner Klemt nger til 1 6 2 4 og 3 2 mm elektroder Klemt nger til cut 1 6 2 4 og 3 2 mm elektroder 2 x spi...

Page 5: ...etaldr ber af elektroden f r slibning Metaldr berne smelter ikke sammen med elektroden og vil blive fjernet under slibning 7 Indstilling af slibevinklen Juster slibevinklen ved at placere mark ren 1 i...

Page 6: ...i hullet p bagsiden af sk rekonsollen 7 S rg for at palen for pickup 8 holder pickup p plads Elektrodeholderen placeres i indf ringskanalen 9 p sk rekonsollen og skubbes ind mens pickup udl ses ved a...

Page 7: ...mpen lyser gult eller mindst n gang om m neden skal slibekammeret reng res 1 Tap slibev sken ud gennem slangen ned i en tom beholder 2 Indstil vinkel indstilleren p 90 3 L sn de to skruer p rammen til...

Page 8: ...fjern den Monter ny sk reskive og genmonter plastiktandhjul metalskive og skruer Reng r alle dele med vand og s rg for at opsamle det snavsede vand i returflasken Bortskaf det forurenede vand som bes...

Page 9: ...e parts overview and Accessories 28 32 DISPOSAL Worn out electrical equipment must be separately collected and handed over for reuse according to EU directive 2012 19 EU Dispose of the product accordi...

Page 10: ...collectors with liquid 2 x 250 ml bottles off grinding cutting liquid Tungsten electrode holder Pickup Pickup release Electrode clamps for 1 6 2 4 and 3 2 mm Clamps for cutting 1 6 2 4 and 3 2 mm 2 x...

Page 11: ...etal drops do not melt together with the electrode the grinding process will remove them 7 Setting the grinding angle Adjust the grinding angle by placing the cursor 1 at the desired grinding angle Ti...

Page 12: ...console 7 Make sure the Catch for Pickup 8 is holding the Pickup in place Place the electrode holder in the electrode guide 9 and push it in while releasing the Pickup with your fingers for short ele...

Page 13: ...rm for cutting Monthly 1000 grind service Clean the grinding chamber when the LED lights yellow or at least once every month following these steps 1 Drain out the grinding fluid through the hose into...

Page 14: ...from the back of the cutting house and pull the house away from the back plate Remove the four small screws that holds the cutting disc and remove the cutting disc Replace the new cutting disc and mo...

Page 15: ...h r 28 32 ENTSORGUNG Gem ss EU Direktive 2012 19 EU m ssen ausgediente elektrischen Ausr stungen separat eingesammelt und f r Wiedergewinnung abgeliefert werden Entsorgen Sie das Produkt gem den rtlic...

Page 16: ...cheibe 2 St ck Staubfangbeh lter mit Schleiffl ssigkeit 2 Flaschen Schleiffl ssigkeit 250 ml Wolframelektrodenhalter Pickup Pickupl ser Elektrodenspannzangen f r 1 6 2 4 und 3 2 mm Elektroden Elektrod...

Page 17: ...schliffen werden kann 7 Einstellung des Schleifwinkels und Schleifen Der Schleifwinkel wird mit der Markierung an der Einf hrung 1 f r den Elektrodenhalter auf dem gew nschten Grad eingestellt und mit...

Page 18: ...ickup l sen 10 bei langen Elektroden die durch das Pickup Modul durchgehen Damit wird die Elektrode in dem Pickup Modul festgehalten Nachdem der Elektrodenhalter befestigt ist die Klemme f r das Picku...

Page 19: ...nt werden 5 Das Schauglas und Rahmen wieder montieren und Schleiffl ssigkeit wieder auff llen 6 Das Ger t einschalten und den Reset Knopf 3 Sekunden gedr ckt halten um den Service Z hler zur ckzusetze...

Page 20: ...die Konsole R ckplatte und alle Teile zu s ubern bevor die Maschine wieder zusammengesetzt wird Wasser aus der Reinigung sollte auf der R cklaufbeh lter gesammelt und abgelegt wie in Abschnitt 9 besch...

Page 21: ...s et Accessoires 28 32 DISPOSAL Les quipements lectriques en fin de vie doivent tre collect s et recycl s conform ment la directive europ enne 2012 19 EU Veillez respecter les normes et r glementation...

Page 22: ...et de 90 20 C L aff teuse a t test e conform ment au standard de protection IP21 INSTRUCTION DE SECURITE IMPORTANTE Il est important de suivre les r gles de s curit expliqu e dans ce manuel concernant...

Page 23: ...Il suffit de tourner celui ci dans le sens inverse des aiguilles d une montre Ensuite il vous suffit de retirer l lectrode L aff teuse Green Pointer Pro Cut ne contient pas de liquide d aff tage la l...

Page 24: ...urnez ce module jusqu ce que la pointe de l lectrode touche le disque d aff tage Tournez le module en serrant vers le bas Le passage d un point l autre sur le pallier en laiton de la partie sup rieure...

Page 25: ...liquide d aff tage ne s coule pas du tuyau de vidange c est certainement d la poussi re d aff tage l int rieur de la chambre d aff tage obstruant l vacuation Pour vacuer les poussi res il convient d...

Page 26: ...uctions suivantes D branchez l aff teuse Green Pointer Pro Cut de l alimentation courant d branchez la prise de courant 1 Effectuez une vidange en pr levant le liquide d aff tage travers le flexible e...

Page 27: ...ns techniques L aff teuse Green Pointer Pro Cut est prot g par le brevet aff teuse Tungst ne n 95942059 7 Classe actuelle courant alternatif monophas 1x120V ou 1x220 240V AC Selon le mod le Veuillez c...

Page 28: ...des pi ces de rechange 2a 2b 2c 2d 3 1 4 5 6 6a 7 7a 8 9 10 11 12 13 14 15 16 17 18 19 20 21 22 23 24 25 26 27 28 29 30 31a 31c 31f 31d 31b 31e 32g 32a 32b 32f 32c 32d 32e 33 34 35 36 37 38 39 40 41...

Page 29: ...x42 Spring f stick out Feder f r Stick out 8x42 ressort f mollette 13 Gradskala Degree scale Gradskala chelle degr 14 B sning til skive Bush for wheel Buchse f r Schleifscheibe Disque 15 Sp ndeskive M...

Page 30: ...rue M6x10 Pointed screw M6x10 Pinolschraube M6x10 Vis pointu M4x10 32f Maskinskrue Torx M4x12 Torx screw M4x12 3 pcs Torx M4x12 3 Stck Vis Torx M4x12 3 pcs 32g Styreskrue til arm Guide screw for arm F...

Page 31: ...Klemtang cut 1 6 Clamp Cut 1 6 Elektrodenzange Cut 1 6 Pince Coupe 1 6 48 4 Klemtang cut 2 0 Clamp Cut 2 0 Elektrodenzange Cut 2 0 Pince coupe 2 0 48 5 Klemtang cut 2 4 Clamp Cut 2 4 Elektrodenzange...

Page 32: ...korte elektroder Electrode clamp 3 2 mm short electrodes Spannh lse 3 2 mm kurze Elektroden Pince lectrode 3 2 mm lectrodes courtes 2 6 Elektrodetang 3 0 mm korte elektroder Electrode clamp 3 0 mm sho...

Page 33: ......
Page 34: ...411 135 600 www migatronic cz Hungary MIGATRONIC KERESKEDELMI KFT Szent Mikl s u 17 a H 6000 Kecskem t Hungary Tel 36 76 505 969 www migatronic hu MIGATRONIC ASIA China SUZHOU MIGATRONIC WELDING TECHN...
Reviews: