background image

12

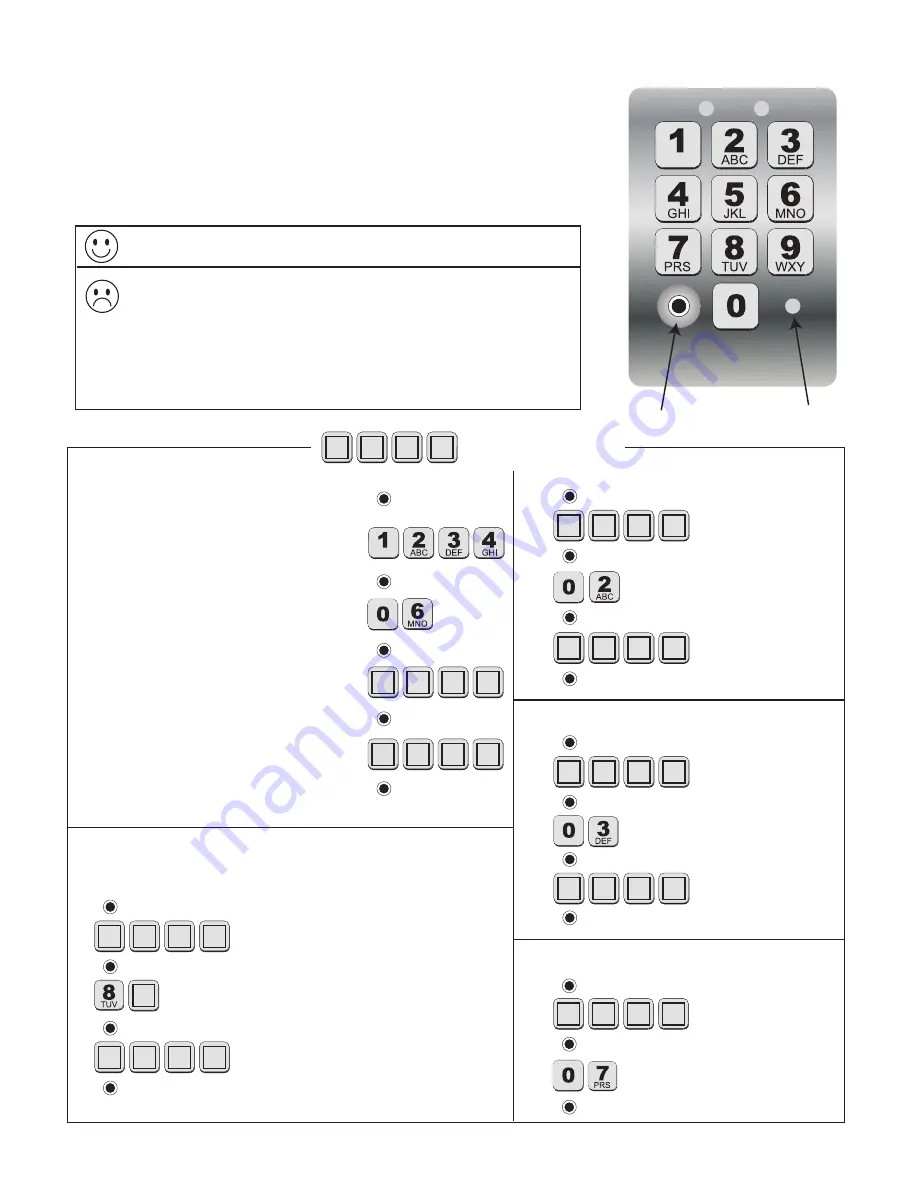
Programming the Keypad

Program New Master Code

1. Press and Release Program Button:

2. Enter current Master Code: 

     (example: the factory default Master Code)

3. Press and Release Program Button:

4. Enter the Function Code:

5. Press and Release Program Button:

6. Enter the 

new

 Master Code:

7. Press and Release Program Button:

8. Enter the 

new

 Master Code again:

9. Press and Release Program Button:

Program Button

Status Light

Your

 4-digit code.

  •  A Master Code is needed to add, remove, or program Entry Codes.
  •  Factory default Master Code is “1234.”
   •  Keypad can only enter “program” mode from “idle” mode. 


•  Keypad will beep three times before going into “idle” mode (more 

than 10 seconds between key presses).

Add New Entry Code

1.  

2.  

Master Code

3.  

4. 

Function Code

5. 

6.  

New Entry Code

7. 

Delete Entry Code

1.  

2.  

Master Code

3.  

4. 

Function Code

5. 

6.  

Code to be deleted

7. 

Delete All Entry Codes

1.  

2.  

Master Code

3.  

4. 

Function Code

5. 

Add Temporary Entry Code

*In step 4, you will need to enter a number from 1 through 7

 to indicate the number of days until the Entry Code expires.
1.  

2.  

Master Code

3.  

4. 

Function Code & # of days Code will be active*

5. 

6.  

Temporary Entry Code

7. 

Programming Confirmed:  

Keypad will beep 3 times

.

Error Message:


Status light will flash rapidly, error tone will sound for

1 second and keypad will return to “idle” mode (changes not saved)

.


• Entry Code is not 4 digits. 


• New Master Codes don’t match “

Program New Master Code

”.


• Memory is full (already 25 codes).         


• No matching code is found “

Delete Entry Code

”.

Summary of Contents for FM137

Page 1: ...FM137 25 Code FM137 Digital Keypad Instructions for Wired and Wireless Installations FM137 only ...

Page 2: ...Automatic Gate Opener 6 Learning an FM137 to an MM271 or MM272 Automatic Gate Opener A dip switch type transmitter may be required 6 Wireless Installation of the Keypad 7 Learn Transmitter Code for wireless installations 8 Wired Installation of the Keypad 9 Control Board Connection Examples 11 Programming the Keypad 12 Normal Keypad Operation 13 Notes 14 FCC Warning 16 Limited One Year Warranty 16...

Page 3: ...istance between the gate and keypad is 10 ft Keypad Features Keypad The keypad illuminates and beeps at the press of any key When a valid code is entered the STATUS light will blink rapidly The keypad remains active for 40 seconds after entering a valid code pressing any key on the keypad while the gate is in motion will stop the gate pressing any key while the gate is stopped will cause the gate ...

Page 4: ...ure to keep all receipts for proof of purchase Refer to this information when calling NSC for service or assistance with your keypad DATE OF PURCHASE PLACE OF PURCHASE FOR YOUR RECORDS 1 2 3 4 Factory Code Your Master Code Additional Codes Up to 25 ...

Page 5: ... for 5 seconds then 3 beeps in a row Release the button after the 3 beeps at the end All codes are deleted Default master code is 1234 5 Battery Holder Use 4 AA batteries if hard wired power supply is not used If external power source is used the 4 AA batteries will provide a back up power source 6 Installing Batteries NOTE 3 AA batteries are required to power the keypad Step 1 Remove the two scre...

Page 6: ...pe transmitter may be required 1 Use the On Off switch on the control box to power the system down 2 Enter the master code or an entry code but continue pressing the last digit Any programmed code will work a Example Press 1 2 3 and then hold down 4 3 While still holding the last digit of the code power the system on with the on off switch 4 After the startup beep there will be a long silence for ...

Page 7: ...er using the screws provided Step 2 Slide the keypad into the cover and secure with the small screws provided NOTE If you have not changed your opener s transmitter code from the factory setting see the Setting Your Personal Transmitter Code section in the gate opener s manual then Learn the transmitter code into the keypad See Learn Transmitter Code section below 1 2 ABC 3 DEF 4 GHI 5 JKL 6 MNO 7...

Page 8: ...ansmitter button at this time EXAMPLE Learn transmitter code with Master Code of 1234 Then press and hold transmitter button until you hear 3 beeps The round black dot is the PROGRAM button Go to Programming the keypad to change the master code if desired 1 2 3 4 0 5 Turn the gate opener back on and confirm that the keypad operates the gate using the master code 1 2 ABC 3 DEF 4 GHI 5 JKL 6 MNO 7 P...

Page 9: ...gure 6 Step 2 Strip the wires back 3 16 and attach the wires to the terminal block marked OUT COM on the keypad control board as shown in Figure 7 making sure to keep track of polarity Connect the other end to the opener s control board as shown in Control Board Connections section below NOTE For a hard wired application the 318 MHz RF transmitter is automatically disabled Knock out OUT COM Hard w...

Page 10: ...e batteries back into the keypad Figure 2 Test the keypad by entering 1 2 3 4 to open gate Step 6 Program new Personal Master Code and any additional entry codes for a total of 25 entry codes if desired See Program the Keypad on page 5 Step 7 Slide the keypad into the cover and secure with the small screws provided Figure 8 1 2 ABC 3 DEF 4 GHI 5 JKL 6 MNO 7 PRS 8 TUV 9 WXY 0 Figure 8 ...

Page 11: ...LAY OUTPUT terminals on the keypad to CYCLE terminal on the gate opener control board Connect 2 wire from the RELAY OUTPUT terminals on the keypad to the COMMMON terminal on the gate opener control board 1 2 RECEIVER ALM RCVR COM GRN BLK RED CYCLE SAFETY EXIT SHADOW OPEN EDGE COM CONTROL INPUTS CLOSE EDGE Connect 1 wire from the RELAY OUTPUT terminals on the keypad to CYCLE terminal on the gate op...

Page 12: ... mode more than 10 seconds between key presses Add New Entry Code 1 2 Master Code 3 4 Function Code 5 6 New Entry Code 7 Delete Entry Code 1 2 Master Code 3 4 Function Code 5 6 Code to be deleted 7 Delete All Entry Codes 1 2 Master Code 3 4 Function Code 5 Add Temporary Entry Code In step 4 you will need to enter a number from 1 through 7 to indicate the number of days until the Entry Code expires...

Page 13: ...mal operation otherwise it remains in this lock down mode Once the user enters a matched code any subsequent key press within the next 40 seconds will cause the keypad to send command to gate opener Keying Indication Summary Keying Error Alert Indication Keying accepted confirmation Indication Master Code Setting Speaker continuous Beep for 2 seconds STATUS light rapid flashing Speaker Beep Beep B...

Page 14: ...14 Notes ...

Page 15: ...15 Notes ...

Page 16: ...This warranty is in lieu of all other warranties expressed or implied NOTE Verification of the warranty period requires copies of receipts or other proof of purchase Please retain these for your records FCC Warning Changes or modifications to this unit not expressly approved by the party responsible for compliance could void the user s authority to operate the equipment NOTE This equipment has been ...

Reviews: