background image

Page 36

Operating Manual Sintering Oven HT-2/M/Zirkon-120

Version 4.2.4 - 09/2017

RS-232 interface

3. 

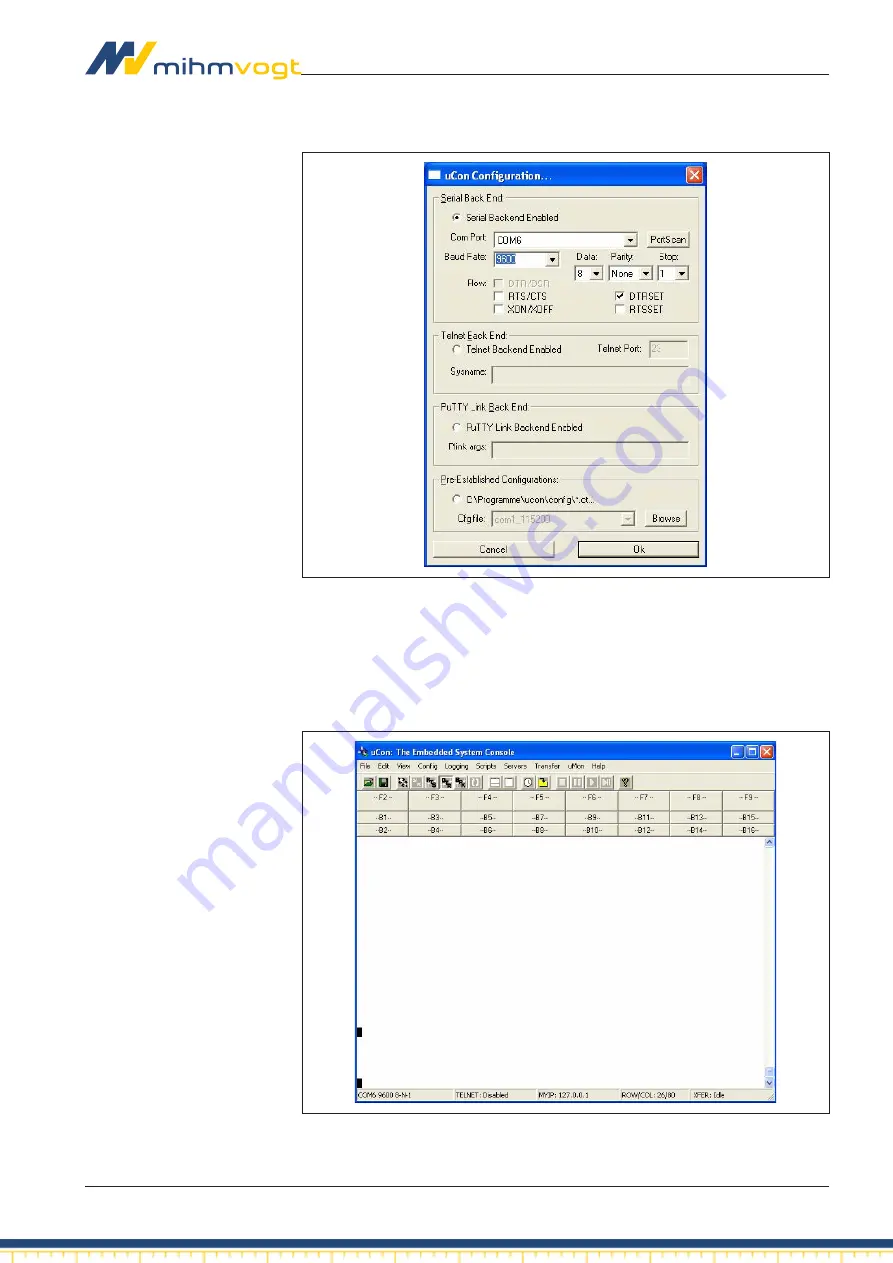
Set the configuration shown.

4. 

If the “Com Port” is not known, select a suitable one with “Portscan”. 

5. 

Confirm your entry with “OK”.

6. 

Save your port configuration in the “File” menu and “Save As...”.

Summary of Contents for HT-2/M/Zirkon-120

Page 1: ...Original Operating Manual HT 2 M Zirkon 120 Version 4 2 4 09 2017 Friedrich List Stra e 8 D 76297 Stutensee Blankenloch Tel 49 0 7244 70871 0 www mihm vogt de EN...

Page 2: ...ion 15 Installation location 15 Installation conditions 15 Electrical connection 16 Local installation 16 Rating plate 17 Operation 18 Operating elements and displays 18 Switches and button functions...

Page 3: ...drying without sintering 30 Preliminary drying with sintering 30 Basic settings 31 Parameter settings 31 Switching off Sintering oven 34 RS 232 interface 35 Care and maintenance 43 Service programs 4...

Page 4: ...manu facturer Responsibilities of the operator The unit is used for commercial purposes The operator of the unit is there fore subject to the statutory obligations relating to occupational safety In...

Page 5: ...trained operating personnel Labelling scheme for integrated text boxes and references The following safety notices are used in this manual Danger Indicates an imminent danger that may cause serious p...

Page 6: ...ols indicates a general safety instruction indicates that a requirement must be met 1 indicates a step to be carried out indicates the outcome of carrying out a step y y indicates a list S1 indicates...

Page 7: ...them independently and recognise and avoid potential hazards Danger Electricity Risk of death from electric shock h h Do not touch live cables and components with wet hands h h Observe the accident p...

Page 8: ...y is assumed for damage that may be caused by misuse in correct operation incorrect connections or improper maintenance repair work carried out by untrained personnel All warranty services are also ex...

Page 9: ...h h Have at least two people carry move the sintering oven together Notice Transport damage To prevent injury to personnel and material damage h h Transport the unit in an upright position only h h Do...

Page 10: ...mage corrosion and other forms of damage Only remove it shortly before initial commissioning and store it in dry conditions for later reuse Storage Notice Temperature damage To prevent temperature dam...

Page 11: ...f a three part ceramic door panel see page 21 A safety switch disconnects the heating current as soon as the oven door is opened A slip clutch used in the drive mechanism prevents too high a contact p...

Page 12: ...30 EU RoHS 2011 65 EU The protection objectives of the Low Voltage Directive 2014 35 EU were complied with The following harmonised standards were applied EN 61010 1 2010 Safety requirements for elec...

Page 13: ...ces are also excluded in such cases Potential misuse y y Operation by untrained and insufficiently qualified personnel y y Use of products that have not been approved by the manufacturer y y Use of re...

Page 14: ...deviation Frequency 50 60 Hz Max power consumption 3 8 kW Protection Device end Customer end 16 AT Connection to a separate electrical circuit with a 16 A circuit breaker type K or type Z other types...

Page 15: ...in tering oven Keep a distance of 50 mm around the sintering oven for sufficient cooling Caution Tipping loads Supporting surface with an insufficient load bearing capacity When installing the sinteri...

Page 16: ...a protective earth conductor to be connected to the power socket When selecting the installation location ensure that the accompany ing mains cable is 2 0 m long Extending the cable is not permitted...

Page 17: ...n HT 2 M Zirkon 120 Page 17 Rating plate 10 1 8 2 3 4 9 5 11 7 6 1 Machine type designation 7 QR code 2 Operating voltage 8 Serial number 3 Mains frequency 9 Year of manufacture 4 Power 10 Manufacture...

Page 18: ...es to be run through with high precision The unit is operated via a membrane keyboard and menus displayed on an LCD screen The program controller has the following operating elements 4 5 6 7 8 9 10 11...

Page 19: ...current heating program Loads an existing program from the memory Saves a created program in the memory Setting the finishing time F Function button for setting the parameters see graphic Parameter s...

Page 20: ...t the voltage supply 2 Switch the sintering oven on at the mains switch The current temperature of the oven is displayed after approximately 3 seconds The oven door opens automatically Program slot st...

Page 21: ...on page 31 Using the door insulation 1 Insert the connecting pins Pos 2 into the base support Pos 1 2 Place the support Pos 3 on the connecting pins Pos 2 3 Place the centring pin Pos 4 in the centre...

Page 22: ...the sintering oven on The oven door opens automatically 2 Fill the sintering dish included in the delivery with sintering granu late 3 Place the item to be sintered in the sintering dish 4 Place the e...

Page 23: ...menu opens The sintering oven loads the heating program last used 2 Press the S4 button until the required heating program is reached or enter the desired heating program via the numeric pad 3 Press...

Page 24: ...p button again The heating program is stopped The status display changes from SEQUENCE to READY 3 Press the Start Stop button again to continue the heating program Removing the sintering dish from the...

Page 25: ...ating speed is 1 C min 2 F min the maximum heating speed is 99 C min 178 F min If the entry is below a two digit value the cursor must be moved over the relevant level button to the next input field A...

Page 26: ...eating level S3 for the third heating level etc If you do not require all 4 heating levels the temperature must be set to zero in the level not used Level S1 to S3 can be at zero Level S4 controls the...

Page 27: ...The oven door is only opened fully after the end of the program Saving the heating program with a name To uniquely identify a specific heating program it can be saved with a name you can freely choos...

Page 28: ...ng Renaming the heating program Requirements The program values are entered for all levels 1 Press the Save button The SAVE menu is displayed A memory name with up to four lines can now be saved in th...

Page 29: ...which a program should finish 1 Select a heating program 2 Press the Finishing time button The AUTOSTART program opens 3 Press the S1 button to enter the day of the week Set the days of the week usin...

Page 30: ...is function on these slots The special function is only active on slots 21 25 Values may only be entered in level S1 for the preliminary drying without sintering No values are assigned to levels S2 S4...

Page 31: ...ing oven are preset and pre programmed at the factory The sintering oven does not switch to summer winter time automatically 1 Switch the sintering oven on at the mains switch 2 Press the Function but...

Page 32: ...and time Next S1 Skip to the next Parameters menu Level 2 Max adjustable lift opening temperature S4 Serves as second line of safety The lift opening temp is set in level 4 Time scheme S3 Time display...

Page 33: ...using buttons 0 9 Notice A change made is only accepted if the cursor is no longer visible Setting the lift temperature 1 Press the Function button 2 Press the S1 button The second Parameters menu op...

Page 34: ...temperature oven The heating chamber can retain a significant amount of residual heat even when the sintering oven is switched off There is a risk of burns from the heating chamber walls and the oven...

Page 35: ...232 interface cable y y Computer with RS 232 connection option y y Software uCon available under http www umonfw com ucon y y Microsoft Excel licence Notice If the computer to be used has no RS 232 co...

Page 36: ...T 2 M Zirkon 120 Version4 2 4 09 2017 RS 232 interface 3 Set the configuration shown 4 If the Com Port is not known select a suitable one with Portscan 5 Confirm your entry with OK 6 Save your port co...

Page 37: ...the Standard option in the Logging menu The configuration window is opened 8 Set the checkmark as shown and give the TXT file a name 9 Confirm with OK 10 Start the sintering program at the sintering...

Page 38: ...Version4 2 4 09 2017 RS 232 interface 11 Click on the X button to write the data to the known TXT file here Test1 txt 12 The logging is terminated by clicking on the button X 13 Call up Microsoft Exc...

Page 39: ...rsion4 2 4 09 2017 Operating Manual Sintering Oven HT 2 M Zirkon 120 Page 39 The Text Conversion Assistant opens 15 Click on Next and make the following settings 16 Set the checkmark at Space 17 Click...

Page 40: ...ting Manual Sintering Oven HT 2 M Zirkon 120 Version4 2 4 09 2017 RS 232 interface 18 Click on the More button 19 Permute point and comma for both settings and confirm with OK 20 Click on the Finish b...

Page 41: ...RS 232 interface Version4 2 4 09 2017 Operating Manual Sintering Oven HT 2 M Zirkon 120 Page 41 21 The data series are displayed 22 Select the Diagram Assistant and choose a diagram type e g line...

Page 42: ...Page 42 Operating Manual Sintering Oven HT 2 M Zirkon 120 Version4 2 4 09 2017 RS 232 interface 23 Click on Next three times and then Finish 24 The finished diagram is displayed...

Page 43: ...gnificantly shorten the service life of the heating elements Service programs A cleaning cycle should be run periodically depending on how often the oven is used This serves to remove contamination du...

Page 44: ...live cables and components with wet hands h h Observe the accident prevention regulations when working with elec tric current Warning Hot surfaces Risk of serious burns to the limbs h h Do not touch...

Page 45: ...sary No indication on the dis play level LEDs do not light up There is no power supply Check the on site circuit breakers Check connection cable notify a quali fied electrician if necessary Pieces bro...

Page 46: ...f the chamber to reach room tempera ture User Thermocouple connect ed incorrectly wrong polarity Replace thermocouple connections Service Department Display Safety shut down Oven temperature is above...

Page 47: ...ring oven off 2 Disconnect the sintering oven from the voltage supply 3 Remove all connections e g PC interface cable etc from the sin tering oven Disposal Safety Warning Release of pollutants Polluta...

Page 48: ......

Reviews: