background image

LOGO 800

Manual

Mikado Model Helicopters GmbH • Graf-von-Schwerin-Str.40  • 14469 Potsdam • Germany 

phone +49 (0)331 23749-0 • fax +49 (0)331 23749-11 • www.mikado-heli.de

© Mikado Model Helicopters GmbH 2019, V1.0

Summary of Contents for LOGO 800

Page 1: ...LOGO 800 Manual Mikado Model Helicopters GmbH Graf von Schwerin Str 40 14469 Potsdam Germany phone 49 0 331 23749 0 fax 49 0 331 23749 11 www mikado heli de Mikado Model Helicopters GmbH 2019 V1 0...

Page 2: ...or 10 6 Torque Tube 11 7 Tail Boom Mounting 12 8 Tail Boom Brace 13 9 Swashplate 14 10 Rotor Head 15 11 Rotor Head Linkage 16 12 Wiring RC Components 17 13 Mounting ESC Battery 18 14 Canopy and Overvi...

Page 3: ...ding mounting plate depending on your servo 10 or 11 mm distance between holes Bag 1 3 Manual LOGO 800 Mikado Model Helicopters GmbH Page 3 1 Chassis M2x10 M3x12 M3 Stop M2 Stop M2 5x8 M2 5x8 M2 5x6 M...

Page 4: ...hex lock nuts in the right hand side frame Be sure to instert the adapters at this stage Manual LOGO 800 Mikado Model Helicopters GmbH Page 4 1 Chassis M2 5 Stop M2 5x6 M2 5x10 M2 5x12 M2 5x10 8x M2...

Page 5: ...Page 5 1 Chassis and Landing Struts 9 5x6 6x13x5 6x13x5 9 5x6 5 schwarz black silber silver 4x M3x3 M3x5 M3x5 M3x12 2 2x6 5 M3x22 M3x10 M3 Stop M3 Stop M2 5x12 M2 5 Stop 2 2x6 5 M3x22 M3 Stop M3 Stop...

Page 6: ...Bag 1 Only tighten the M3x20 screw once you have mounted the tail boom support Manual LOGO 800 Mikado Model Helicopters GmbH Page 6 1 Chassis M3x10 M3x20 4x 2x M3x10 M3x10 M3x20...

Page 7: ...using electrical tape or scotch tape Manual LOGO 800 Mikado Model Helicopters GmbH Page 7 2 Servo Mounting M3x12 2x Roll links Aileron left Roll rechts Aileron right 17 mm 17 mm 2 2x13 2 2x13 2x M3x12...

Page 8: ...1 mm axial play Use the silicone tube provided as a exible extension to easily mount the 4x26 mm bolt in the tail gear Apply grease to the one way bearing Manual LOGO 800 Mikado Model Helicopters Gmb...

Page 9: ...nst the main gear The herring bone gear helps with the proper alignment of pinion and main gear 3 There must be next to no backlash between main gear and pinion Check the gear mesh after the rst coupl...

Page 10: ...mesh The gear mesh should be set so that there is a very slight amount of play between the two bevel gears when rotating them around with just 1 or 2 positions where there is no play between the gears...

Page 11: ...ing the torque tube that the tail boom is dirt free inside If necessary clean it with a cloth Please apply a good amount of grease to the rubber o rings and to the inside of the tail boom before inser...

Page 12: ...ws holding the tail boom rmly making sure the drilled holes for the rotation prevention in the tail boom are aligned properly Finally x the tail boom using the M3x10 hex screws from both sides Manual...

Page 13: ...pinch the Tail Control Rod itself In addition you only need to tighten the bolt enough so that the Tail Control Rod Guide does not rotate when applying slight pressure to it If you do not rst put the...

Page 14: ...Gabriel must point outwards The ball of the swashplate ball runs a bit tightly in the beginning Please apply a few drops of oil to the ball This help in breaking in the swashplaste during ight Bag 9...

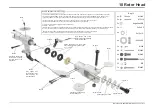
Page 15: ...0 shore dampener to one of the 2 x 90 shore dampeners which are included This is the Hard Damper Configuration and dampers will go 90 80 80 80 80 90 Installing the 2 x Hard Dampers will make the model...

Page 16: ...easily The brand name Gabriel must point outwards Tighten and secure the M4x25 screw in the main rotor head the M3x30 in the blade holders and the M3x25 in the swash plate driver after mounting and ad...

Page 17: ...ced in such a way that they cannot be damaged by any sharp edges during operation of the helicopter Please apply the fabric tube and the edge guard provided in this kit Both types of protection are al...

Page 18: ...th both quick release mechanisms In case the battery plate can only be inserted into the chassis with di culty in the beginning please apply a small amount of silicone oil at the edges Bag 11 Manual L...

Page 19: ...und the main shaft during mounting and dismounting otherwise you may damage your canopy Before each ight you should check that the canopy is mounted properly and securely If the canopy sits loosely it...

Page 20: ...Manual LOGO 800 Mikado Model Helicopters GmbH Page 20 15 Overview Spare Parts Mainframe 5015 5332 4517 4517 5017 5018 4515 5353 5020 4601 4099 5021 5022 4522 4524 5055 4516 4521 4521 4523 5022 5354...

Page 21: ...LOGO 800 Mikado Model Helicopters GmbH Page 21 15 Overview Spare Parts Mainframe 4469 4589 Set 4512 5333 5360 5023 5371 5025 1972 5027 13 Z hne Teeth 5028 14 Z hne Teeth 1940 4711 1953 5113 5113 5026...

Page 22: ...LOGO 800 Mikado Model Helicopters GmbH Page 22 15 Overview Spare Parts Mainframe 4099 4099 5053 4554 black 5338 white 5339 black 5340 white 4290 5034 5035 4915 5353 5033 4915 5032 1954 5336 black 5337...

Page 23: ...Manual LOGO 800 Mikado Model Helicopters GmbH Page 23 16 Overview Spare Parts Tail Boom 5037 5345 4562 5344 5341 5342 5343 5347 Set 5348 x4...

Page 24: ...do Model Helicopters GmbH Page 24 17 Overview Spare Parts Tail Rotor 4581 5351 5349 M2 5x12 M3x10 M2 5x8 4566 4524 4568 5352 4522 5350 M2 5x12 M2 5x12 M3x12 4567 M3x20 4584 4571 4570 2470 4583 2470 45...

Page 25: ...Manual LOGO 800 Mikado Model Helicopters GmbH Page 25 18 Overview Spare Parts Rotor Head 4507 1954 1981 4705 1956 4702 4509 4599 5047 2079 5049 4049 4703 5048 4706 5051 4508...

Reviews: