background image

15

For MT-55 / 55L / 65H

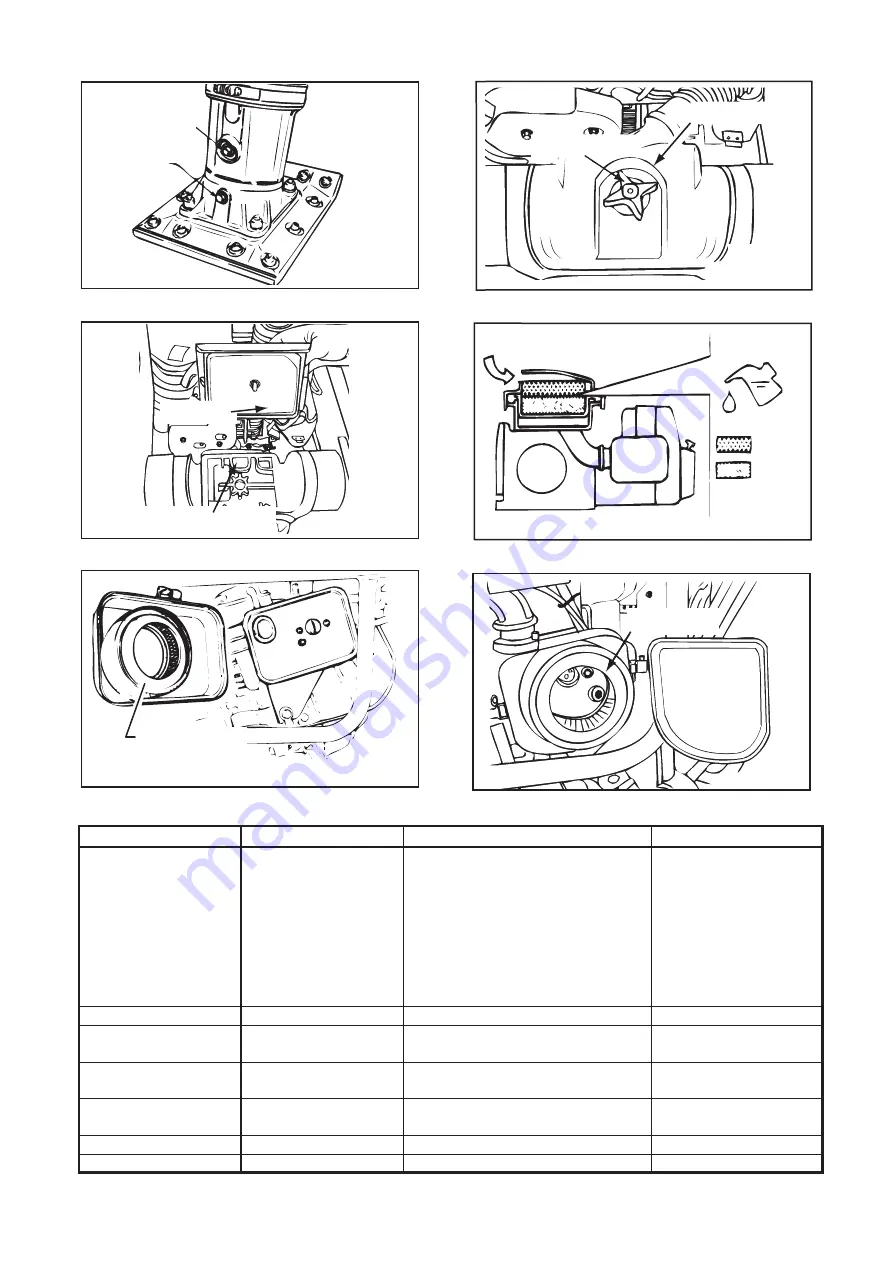
Air Cleaner

Bolt, Cover

Fig.11

All models

Oil Level Gauge

Drain Plug

Fig.10

Table of scheduled checks

Engine oil

Every 2 years

Fuel hose

Replace

How often?

Place to check

Item to check

Oil etc.

Daily

 (before starting 
                 operation)

Appearance

Air cleaner

Bolts, nuts

Handle

Rubber damper

Engine oil

Fuel tank

Fuel system

Flaws, deformity, stains

Dirt, flaws, deformation

Loose or missing parts

Flaws, deformity, cracks, breaks

Leaks, fuel level,presence of  dirt

Leaks, wear, loose parts

Engine oil
Engine oil

Gasoline

After first 20 hours

Engine oil

Replace once, after the first 20 hours 

Engine oil

Every 50 hours

Spark plug

Clean, adjust gap

Replace

Engine oil

Every 200 hours

Replace

Engine oil

Leaks,oil level,dirt

Primary element

Every 80 to 100 hours

Cleaning

Lamp kerosene

Secondary element

Every 100 to 150 hours

Cleaning

Neutral detergent

Engine oil(25-30cc)

(water washing and dry)

Main body lubrication oil

Main body lubrication oil

For MT-72FW / 72FWA / 84F

SAE30

2

㹼FF

13

㹼FF

Fig.13

For MT-55 / 55L / 65H

Fig.12

Bleather Filter

Element

For MT-72FW / 72FWA / 84F

Fig.14

Air Cleaner

For MT-55 / 55L

Fig.15

Element

Summary of Contents for MT-55

Page 1: ...ONFORMITY in this manual as well Original We thank you for selecting Mikasa Tamping Rammer For your safe and proper opera tion please read this manual and be always sure to keep it ready for reference...

Page 2: ......

Page 3: ...Nishimaki engineer R D Division Mikasa Sangyo Co Ltd Shiraoka machi Saitama Japan 12 Conformity assessment according to Annex VIII Full Quality Assurance procedure 13 Name and address of the Notified...

Page 4: ...1 2 3 4 5 6 7 8 9 10 11 12 4 1 4 2 4 3 4 4 4 5 4 6 4 7 4 8 4 9 6 1 6 2 12 1 12 2 General precautions Precautions when adding fuel Precautions about where to use the machine Precautions before starting...

Page 5: ...ds on the machine Use the machine with confidence for tamping earth and sand soil sand gravel and asphalt Do not use the machine for other type of jobs The upper section of the machine functions as a...

Page 6: ...nditions If you do not feel well due to overwork or illness If you are taking any medicine If you are under the influence of alcohol For details about the engine refer the separate instruction manual...

Page 7: ...stopping operation stop work immediately Before leaving the machine be sure to turn the engine off Also make sure to turn the engine off if you want to move the machine When the throttle lever is in...

Page 8: ...her than necessary for safety DO NOTuse a damaged wire cable Never lift or lower the machine rapidly when using a hydraulic shovel or a crane When lifting the machine do not allow any people or animal...

Page 9: ...hine cannot fall down If it you must lay the machine down close the fuel tank cap and oil fill plug securely Arrange the machine position so that the carburetor will be facing up After it is lying dow...

Page 10: ...REQ LWA105 DECAL LEVER OPERATION DECAL EYE PROTECTION DECAL EAR PROTECTION DEAL CAUTION ICONS MT DECAL FUEL CAUTION DECAL ENGINE HANDLING GS DECAL DO NOT LIFTING DEAL LIFTING POSITION MT 55 72 84 NP...

Page 11: ...your foot Be careful not to get burned Accidental burn may occur if you touch the hot parts engine muffler etc during opera tion or immediately after the machine stops 3DUW FRGH 1R Danger of hearing...

Page 12: ...MODEL MT 55 MT 55L MT 65H MT 72FW Hand Arm Vibration Level MT 72FWA MT 84F 8 5 Specifications Model MT 55 MT 55L MT 65H MT 72FW MT 72FWA MT 84F 11 2 5 8 16 1 17 3 15 1 14 0 Ahv m sec2...

Page 13: ...65H 1030 1025 1070 MT 72FW MT 72FWA MT 84F 1045 1025 1025 MT 72FW MT 72FWA MT 84F 1045 1025 1025 415 340 MT 55 MT 55L MT 65H 680 715 730 MT 55 MT 55L MT 65H 350 350 370 MT 55 MT 55L MT 65H 265 265 28...

Page 14: ...ER MUFFLER OIL LEVEL PLUG ON OFF SWITCH DRAIN PLUG FUEL TANK FUEL TANK CAP HANDLE AIR CLEANER FUEL COCK PRE CLEANER ENGINE BELLOWS FOOT PRE CLEANER MT 55 55L 65H 6 2 Components 10 THROTTLE LEVER TACHO...

Page 15: ...y serious trouble Be sure to tighten any screwed area Remove dirt and dust Particularly clean the vicinity of recoil starter and foot 7 1 7 2 7 3 7 4 7 5 Fuel Tank Fig 2 Fig 1 Oil Level Gauge Drain Pl...

Page 16: ...do not release it at the position where it has been pulled to but release it after returning closely to the starter case Fig 7 If the engine has started while listening to explosion sounds return the...

Page 17: ...g the tamping rammer to perform somewhat irregular movement Therefore it is recommended to perform warm up run while moving the throttle lever repeatedly between ON and OFF positions before entering t...

Page 18: ...gine oil Them tightly squeeze outer primary element sponge and shake off well the inner secondary element before installing them Fig 14 Fig 15 Rammer should be stored in such position as it is placed...

Page 19: ...presence of dirt Leaks wear loose parts Engine oil Engine oil Gasoline After first 20 hours Engine oil Replace once after the first 20 hours Engine oil Every 50 hours Spark plug Clean adjust gap Repla...

Page 20: ...ignition plug Short circuit due to defective insulation Improper spark gap Short circuit at Stop Button Switch Ignition coil defective Muffler clogged with carbon deposit Mixed fuel qualty inadequate...

Page 21: ...Governor spring defective Fuel flow defective Air taken in through suction line Air cleaner clogged Air in fuel pipe Fuel level in carburetor float chamber improper Carbon deposit in cylinder Ignitio...

Page 22: ...memo...

Page 23: ......

Page 24: ......

Reviews: