background image

Open by 
about 
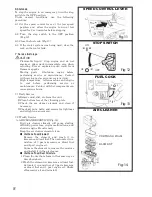
30 degrees

Throttle lever

Fig-5-D


3.Starting   

Gasoline Engine 

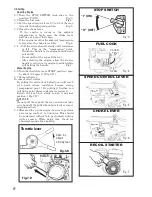
3-l  Turn  the  STOP  SWITCH  clock-wise  to  the 

position "I"(ON).                                              Fig.3 

3-2 Open the fuel cock.                                          Fig.4 

3-3 Set the speed control lever l/3 to 1/2 of the way 

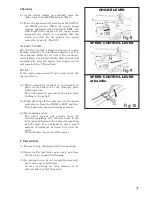
towards the high speed position                  Fig.5 

3-4 Close the choke lever.   

If  the  engine  is  warm  or  the  ambient 

temperature  is  high,  open  the  choke  lever 

half-way, or keep it fully open.   

If the engine is cold or the ambient temperature 

is low, close the choke lever fully.                Fig.6   

3-5 

Pull the starter handle slowly until resistance 

is  felt.  This  is  the  "compression"  point. 

Return the handle to its original position and 

pull swiftly.   

Do not pull out the rope all the way.   

After  starting  the  engine,  allow  the  starter 

handle to return to its original position while 

still holding the handle.                            Fig.7 

Diesel Engine 

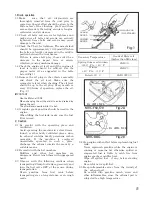
3-6 Turn the throttle lever to START position ( open 

by about 30 degrees ) ( Fig-5-D ) 

3-7 Operate Starter 

In case of recoil starter 

    By pulling the starter knob slowly, you will reach 

such  point  where  resistance  become  strong 

(  compression point  ).  By  pulling  it  further,  you 

will find a point where resistance is reduced. 

    Return  the  knob  but  slowly  return  it  original 

position. ( Fig.7-D ) 


CAUTION  

    Do not pull the rope all the way and do not take 

your hand off the pulled knob but slowly return it 

original position. 

3-8 After starting up the engine, be sure to perform 

a warm up run for 2 to 3 minutes. This should 

be performed without fail, particularly during 

winter  season.  While  doing  this,  check  for 

abnormal sound of gas leaking.   

Fig-7-D

CHOKE LEVER 


Fig- 6  

SPEED CONTROL LEVER 


Fig- 5  

RECOIL STARTER 


Fig- 7  

FUEL COCK 


Fig- 4  

CLOSE 

OPEN 
 

Fig- 3  

STOP SWITCH 


“ I ” (ON)

“ O ” (OFF)

6

Summary of Contents for MVC-40G

Page 1: ...G 50G 88G 90G 98D F60 F70 F80 INSTRUCTION MANUAL 402 03007 We thank you for selecting Mikasa Vibration Compactor For your safe and proper operation please read this manual and be always sure to keep i...

Page 2: ...n this document fulfills with all the requirements of the Directive 2000 14 EC Directive 2000 14 EC relating to the noise emission in the environment by equipment for use outdoors 11 Conformity assess...

Page 3: ...367 52370 52371 52373 52374 52391 52395 52396 52385 52386 52387 52388 52389 7 power sorce cont output Honda GX160 4 0kW Robin EX17 4 2kW Honda GX160 4 0kW Robin EX17 4 2kW Honda GX160 4 0kW Yanmar L48...

Page 4: ...v e 0 0 2 0 4 1 0 4 1 0 0 2 0 0 2 0 0 2 0 4 1 0 4 1 0 4 1 0 4 1 0 4 1 0 0 3 0 0 3 c c 3 1 3 5 3 1 3 1 3 1 3 1 1 1 1 1 1 1 1 1 s r e t i l y t i c a p a c k n a t r e t a W 0 8 3 3 F P R 3 3 A 4 3 A 0...

Page 5: ...or use this machine for athe other applications Structure The upper part is made up of Power source Handle Belt Cover Water Tank for sprinkling and Guard hook which are fixed by Engine base The Engine...

Page 6: ...g any machine or attachment Trial and error is not the way to become familiar with a piece of equipment This is expensive cuts equipment life and can create machine downtime Inexperience can cause inj...

Page 7: ...illing the fuel tank make sure the fuel filter is used 2 Caution 2 l Be careful with the operating place and ventilation Avoid operating the machine in a closed room tunnel or other badly ventilated p...

Page 8: ...turn to its original position while still holding the handle Fig 7 Diesel Engine 3 6 Turn the throttle lever to START position open by about 30 degrees Fig 5 D 3 7 Operate Starter In case of recoil st...

Page 9: ...ing asphalt it is advisable to paint the bottom face of the vibrating plate with diesel fuel This will assist in preventing the plate from sticking to the as halt 4 4 When shutting off the vibrator tu...

Page 10: ...ous burns 7 l Daily Service A Remove mud dirt etc from the unit B Clean bottom face of the vibrating plate C Check the air cleaner element and clean if necessary D Check all nuts bolts and screws for...

Page 11: ...ator assembly 7 4 Storage When storing the compactor for long periods after operation A Thoroughly drain the fuel from the fuel tank fuel pipe and carburetor B Pour a few drops of motor oil into the c...

Page 12: ...402 03001 05 04 300 OG 402 03006 07 04 500 OG...

Reviews:

Related manuals for MVC-40G