11
10
2. Fingered Chord Method (F.C.):
Finger Principle (F.C.):
1. Finger is the same relative position
as the chord.
2. Locomotion chord is different from
the finger chord, but the changing
result is the same.
See fig. 25
fig. 18
fig. 19
fig. 20
fig. 21
fig. 22
fig. 23
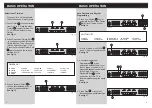
CHORD FINGERING:
1. Single Finger Method (S.F)
Finger Principle:
1.
Major chord:
press keynote key
only.
2.
Minor chord:
press keynote key
and any black key on the left
simultaneously.
3.
C7-seventh:
tpress keynote key
and any white key on the left
simultaneously.
4.
Minor seventh:
press keynote
key and one black key and one
white key on the left
simultaneously.
See fig. 24
fig. 24
fig. 25
BASIC OPERATION
BASIC OPERATION
M
J K
O
N
M
T
H
I
Record / Playback
-
To enter recording mode press
Record J . Notes played will be
recorded in the memory (up to a
maximum of 40). Press
Playback/Effect K , to play stored
notes. To listen again, just press
Playback/Effect K again.
For a new recording, please repeat
the above steps. Press Stop M ,
to quit the function.
See fig. 18
Guide Function
1. Press the Guide O and then press
the white key to select the melody
in performance. The main melody
will then be masked but is restored
if you don't play for three seconds.
See fig. 19
2. Press One Key N and then press
the white key to select a melody
in one key one note mode. Press
any key to perform the main
melody with the accompaniment
repeated.
See fig. 20
3. Press Percussion T to practise
percussion while music is playing.
Press Stop M to quit this function.
See fig. 21
Chord
1. When the rhythm starts, press
Single Finger Chord H and you
can accompany the single finger
chord according to the different
fingering in the chord-key part (
Keys 1-18 ). The fingering is
shown as Fig. 24.
See fig. 22 and 24
2. When the rhythm starts, press
Fingered Chord I button and you
can carry accompanying the
fingered chord according to the
different fingering in the chord-key
part. The fingering is shown as
Fig. 25.
See fig. 23 and 25


