background image

Mounting

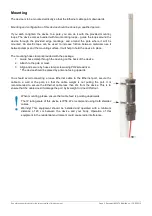
The device is to be mounted vertically so that the Ethernet cable points downwards. 

Mounting and configuration of this device should be done by a qualified person.

If you wish to tighten the device to a pole, you can do it with the provided mounting
loops. The device comes bundled with two mounting loops – guide the loops around the
device   through   the   provided   edge   markings,   and   around   the   pole   where   it   will   be
mounted. An  electric  tape   can  be  used  to  increase  friction  between  materials  use  it
between clamps and the mounting surface. It will help to hold the device in place.

The mounting hose clamp is provided with the package.

1. Guide hose clamp through the opening on the back of the device.
2. Attach to the pole or mast.
3. Align and secure by hose clamp screw using PH2 screwdriver.

* The device should be placed by antenna facing upwards.

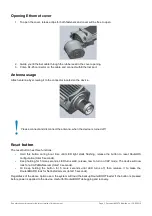
You should avoid connecting a loose Ethernet cable to the Ethernet port, secure the
cable   to   a   wall   or   the   pole,   so   that   the   cable   weight   is   not   pulling   the   port.   It   is
recommended to secure the Ethernet cable less than 2m from the device. This is to
ensure that the cable doesn't damage the port by its weight or doesn't fall out. 

When mounting, please ensure that cable feed is pointing downwards.
The IP rating scale of this device is IP54. We recommend using Cat6 shielded
cables.
Warning!  This  equipment   should   be   installed   and   operated   with   a   minimum
distance   of   20   cm   between   the   device   and   your   body.   Operation   of   this
equipment in the residential environment could cause radio interference.

See mikrotik.com/products for the latest version of this document.

Page 2, Document #52070 Modified on: 13.SEP.2019

Summary of Contents for Metal 52 ac

Page 1: ...the field or to apply the most basic initial settings for your MikroTik home access point 1 Scan QR code and choose your preferred OS 2 Install and open application 3 By default IP address and user name will be already entered 4 Click Connect to establish a connection to your device through a wireless network 5 Choose Quick setup and application will guide you through all basic configuration setti...

Page 2: ...or mast 3 Align and secure by hose clamp screw using PH2 screwdriver The device should be placed by antenna facing upwards You should avoid connecting a loose Ethernet cable to the Ethernet port secure the cable to a wall or the pole so that the cable weight is not pulling the port It is recommended to secure the Ethernet cable less than 2m from the device This is to ensure that the cable doesn t ...

Page 3: ... LED light starts flashing release the button to reset RouterOS configuration total 5 seconds Keep holding for 5 more seconds LED turns solid release now to turn on CAP mode The device will now look for a CAPsMAN server total 10 seconds Or Keep holding the button for 5 more seconds until LED turns off then release it to make the RouterBOARD look for Netinstall servers total 15 seconds Regardless o...

Page 4: ...e includes the following accessories that come with the device EU US Switching Power Supply 24 V 0 8A 19 2 W 2 4Ghz 5Ghz Dual Band OMNI Antenna 6 dBi for N FEMALE Grey color PVC housing 285 mm length Gigabit POE injector Plastic tie strap fastener 2 pcs Hose clamp 50 70 2 pcs N Male to N Female Right Angle Adapter Operating system support The device supports RouterOS software version 6 44 5 The sp...

Page 5: ...ntrolled environment This equipment should be installed and operated with a minimum distance of 20cm between the radiator and any part of your body Antenna Installation WARNING It is installer s responsibility to ensure that when using the authorized antennas in the United States or where FCC rules apply only those antennas certified with the product are used The use of any antenna other than thos...

Page 6: ... prieinamas šiuo interneto adresu https mikrotik com products LV Ar šo Mikrotīkls SIA deklarē ka radioiekārta RouterBOARD atbilst Direktīvai 2014 53 ES Pilns ES atbilstības deklarācijas teksts ir pieejams šādā interneta vietnē https mikrotik com products MT B dan Mikrotīkls SIA niddikjara li dan it tip ta tagħmir tar radju RouterBOARD huwa konformi mad Direttiva 2014 53 UE It test kollu tad dikjar...

Page 7: ...ðu 192 168 88 1 í vafra til að stilla það Nánari upplýsingar á http mt lv help is NO Instruksjonsmanual Koble strømadapteren for å slå på enheten Åpne 192 168 88 1 i nettleseren din for å konfigurere den Mer informasjon på http mt lv help no LT Naudojimosi instrukcija Prijunkite maitinimo adapterį įjunkite įrenginį Į interneto naršyklę 192 168 88 1 Atidarykite galite konfigūruoti gaminį Daugiau in...

Reviews: