background image

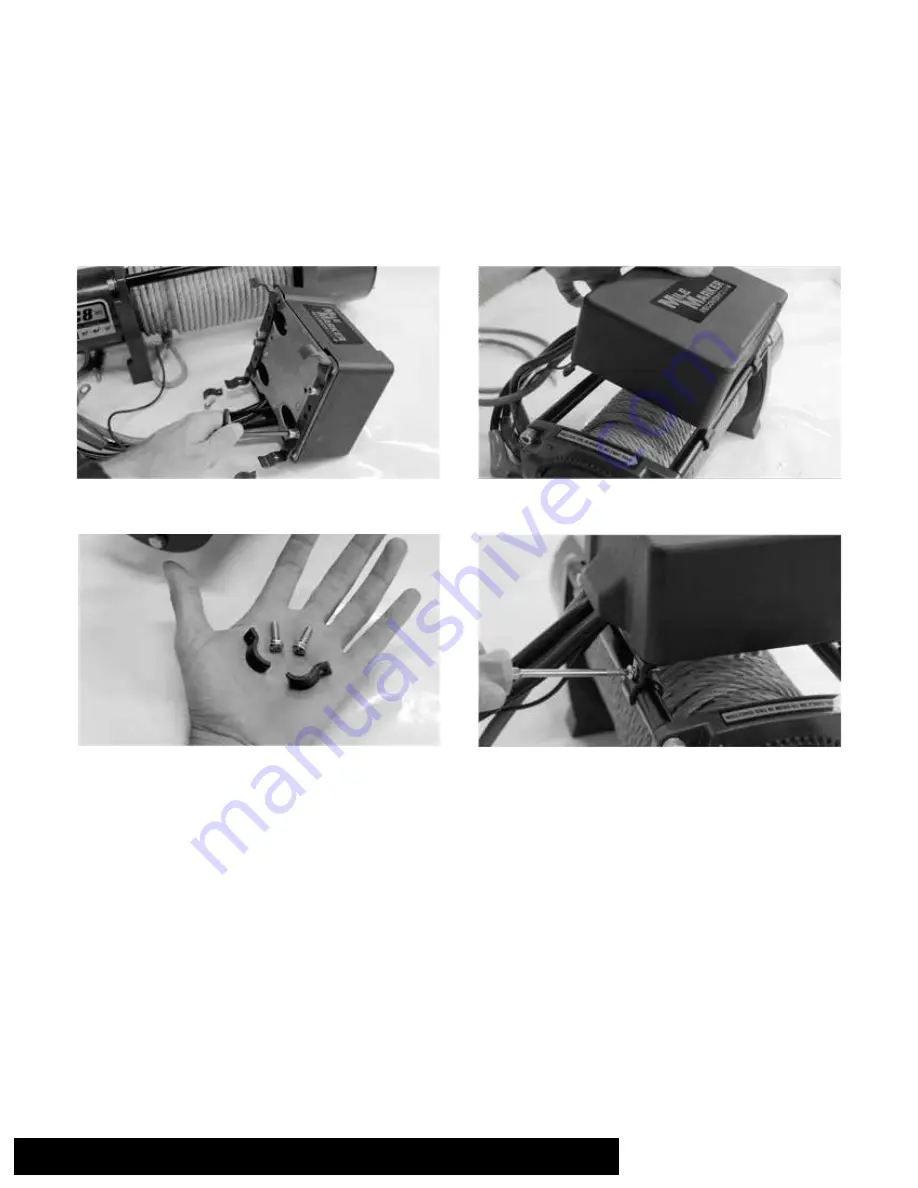
Mounting Control Box on Tiebars

1. Mount the control box to mounting brackets using 10 mm wrench (Fig 2-8)
2. Mount control box on the tie bars by attaching front end first and pushing down to snap in the back end (Fig. 2-9)
3. Locate the two extra pieces for the tie bars mounting brackets (Fig. 2-10)
4. Screw in these pieces to the rear side of the tie bar bracket using a Philips Head Screw Driver (Fig. 2-11)

Fig. 2-8

Fig. 2-10

Fig. 2-9

Fig. 2-11

2121 Blount Road Pompano Beach, FL 33069        MileMarker.com        1.800.886.8647

PAGE 6

Summary of Contents for 76-50246BW

Page 1: ...lbs 76 53251BW SYNTHETIC ROPE 76 50251BW STEEL CABLE SEC95 9 5000 lbs 76 53246BW SYNTHETIC ROPE 76 50246BW STEEL CABLE SEC8 8 000 lbs 77 53141W SYNTHETIC ROPE 77 50141W STEEL CABLE SEC15 15 000 lbs 76...

Page 2: ...caused by burrs slivers from broken strands DRUM Always make sure that there are at least 5 complete turns of steel cable synthetic rope left on the drum before winching KEEP HANDS AND FINGERS CLEAR O...

Page 3: ...moving an item with the winch secure the item Do not rely on the winch to hold it for an extended period Examine winch before using Components may be affected by exposure to everyday weathering chemic...

Page 4: ...ly for each winch provided 3 Torque the capscrews to about 35 ft lb 47 5 N m 4 All Mile Marker mounting systems come pre drilled with fairlead holes If you are using any other mounting platform drill...

Page 5: ...olts in the gear housing leg Fig 1 3 3 Separate leg and gear housing A slight tap with a hammer might be needed Fig 1 4 4 Place gear housing leg in the angle desired and screw in bolts Fig 1 5 Torque...

Page 6: ...bolts to the mounting points Fig 2 5 4 Attach the Tie Wrap around the small bracket to hold it down and clip the excess length Fig 2 6 2 7 Fig 2 1 Fig 2 3 Fig 2 2 Fig 2 4 Fig 2 5 Fig 2 7 Fig 2 6 Tools...

Page 7: ...ont end first and pushing down to snap in the back end Fig 2 9 3 Locate the two extra pieces for the tie bars mounting brackets Fig 2 10 4 Screw in these pieces to the rear side of the tie bar bracket...

Page 8: ...proper functioning if drum rotates in the incorrect direction when IN button is pressed green and yellow motor cables need to be switched CAUTION Cover all exposed electrical connections with insulat...

Page 9: ...t 5 wraps of steel cable or 10 wraps of synthetic rope on the initial layer Failure to do so will result in the outer wraps pressing against the inner wraps damaging the steel cable synthetic rope Alw...

Page 10: ...e operating conditions It is recommended to lay a dampener over the steel cable synthetic rope about halfway along to the hook attachment If a steel cable synthetic rope failure should occur the weigh...

Page 11: ...the cable or hook to connect directly to the nylon sling A shackle should always be used when attaching winch hooks to nylon slings NOTE The shackle must pass through both eyes of the sling Direct pu...

Page 12: ...battery cable Tighten nuts on cable connectors Connection Solenoid malfunctioning Tap solenoid to free contact applying 12 volts to coil terminal directly An audible clicking will occur when activati...

Page 13: ...t Pattern 4 bolt pattern 4 5 x 10 114 3 mm X 254 mm PERFORMANCE 15K Line Pull Line Speed Motor Current lb kg fpm mpm amps 12 V 0 0 16 7 5 120 4000 1816 12 3 7 202 6000 2724 10 5 3 2 225 8000 3632 9 2...

Page 14: ...Steel Cable 67 lbs 41 73 kg Bolt Pattern 4 Bolt pattern 4 5 x 10 114 3 mm X 254 mm FEATURES 4 9 HP Series Wound Motor Rugged Planetary Gear Sets Clockable Gear Housing Fast Line Speeds Submersible 400...

Page 15: ...ght Steel Cable 63 lbs 31 75 kg Bolt Pattern 4 bolt pattern 4 5 x 10 114 3 mm X 254 mm PERFORMANCE 8K Line Pull Line Speed Motor Current lb kg fpm mpm amps 12 V 0 0 38 1 11 6 70 2000 908 14 1 4 3 136...

Page 16: ...Screw 27 1 76 50256BW 27 Steel Cable 28 1 77 50141W 28 Brake Shaft Assembly 29 2 77 50141W 29 Tie Bar 30 1 77 50141W 30 Motor End 31 1 77 50141W 31 Solenoid Assembly 32 1 77 50141W 32 Solenoid Bracke...

Page 17: ...6 Screw 27 1 76 50256BW 27 Steel Cable 28 1 77 50141W 28 Brake Shaft Assembly 29 2 77 50141W 29 Tie Bar 30 1 77 50141W 30 Motor End 31 1 77 50141W 31 Solenoid Assembly 32 1 77 50141W 32 Solenoid Brack...

Page 18: ...Screw 27 1 76 50256BW 27 Steel Cable 28 1 77 50141W 28 Brake Shaft Assembly 29 2 77 50141W 29 Tie Bar 30 1 77 50141W 30 Motor End 31 1 77 50141W 31 Solenoid Assembly 32 1 77 50141W 32 Solenoid Bracke...

Page 19: ...6 Screw 27 1 77 50141W 27 Steel Cable 28 1 77 50141W 28 Brake Shaft Assembly 29 2 77 50141W 29 Tie Bar 30 1 77 50141W 30 Motor End 31 1 77 50141W 31 Solenoid Assembly 32 1 77 50141W 32 Solenoid Bracke...

Page 20: ...ranty submissions must reference winch serial number to be valid Warranty will only be valid for the original purchaser of the winch and installed on the vehicle for which it was originally registered...

Reviews: