background image

8

Getting Started

Unpacking Your Winch

•Unpack  your  new  Mile  Marker  winch  and  ensure 

that all the parts are included by referring to parts 

list  and  exploded  view  drawings  provided  in  this 

manual.

NOTE:

 If  you find any missing or broken parts, please 

call Mile Marker as soon as possible at the number 

present on the cover page of this manual.

Winch Mounting

NOTE:

  Mile  Marker  recommends  the  use  of  its 

mounting systems for proper winch installation and 

optimum  winch  performance.  However,  when  not 

using  Mile  Marker  Mounting  System,  ensure  that 

the  mounting  platform  is  strong  enough  to  meet 

the maximum rated load of the winch in use. Mile 

Marker recommends steel plates with thickness of at 

least 0.25”.

Your Winch should be aligned and secured to a solid 

part of the vehicle (front or rear) where the full rated 

load will be evenly distributed.

CAUTION:

 It is essential that the mounting surface 

be flat and the winch is mounted such that the three 

major sections (Gear housing end, drum and motor 
end) are in proper alignment.

1. Drill four mounting holes (10mm in Dia.), if neces-

sary, according to the bolt pattern mentioned in the 

winch specifications.

2. Fasten the winch body to the mounting platform 

using the four Capscrews (M10 X 34mm) and Nuts 

(M10) provided. 

3. Torque the Capscrews to about 35 ft-lb (47.5 N-

m).

4. All Mile Marker Mounting Systems come predrilled  

with fairlead holes. If you are using any other mount-

ing platforms, drill two holes for the roller fairlead 

installation. Position the holes such that the fairlead 

opening hole stretches from the circumference of the 

drum to the end of the maximum permissible layers 

on the drum in the direction cable is being rolled.

CAUTION:

 When replacing the capscrews or when 

longer  bolts  are  required,  make  sure  that  you  use 

bolts of Grade 5 or greater.

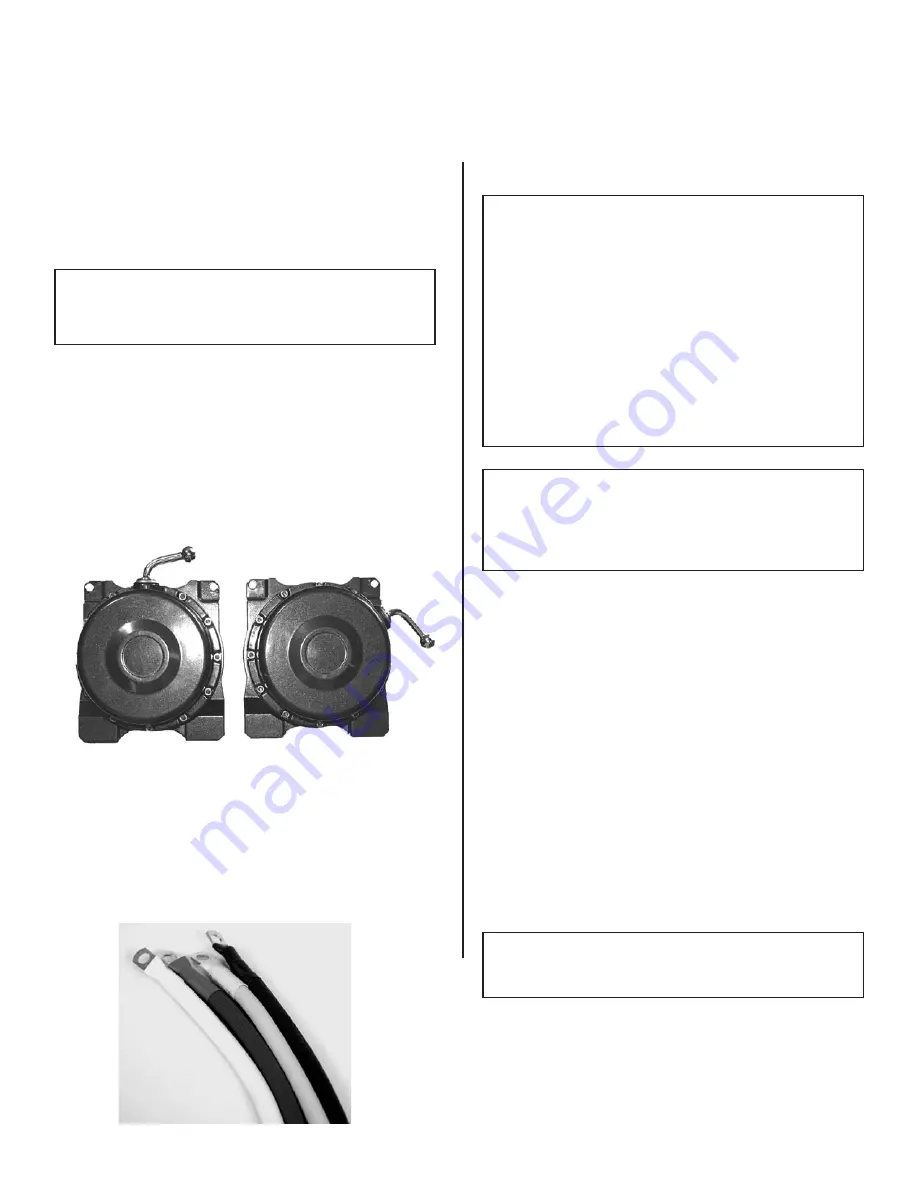
Clocking Positions: 0° and 60°

Clocking Instructions

Winch gear housing can be clocked in 12 ways en-

abling  the  user  to  position  the  clutch  lever  at  12 

equidistant  locations  (0°,  30°,  60°….360°).  Undo 

the 11 bolts (item # 33, M5x58) on the gear hous-

ing. Rotate the gear housing to any one of the above 

position so that all holes align. Secure the gear side 

housing to the winch leg by the 11 bolts (item # 33, 

M5x58) that were earlier removed. 

FRP  Insulated  Cables 

Your  new  Mile  Marker 

winch is packaged with Fibreglass Reinforced Poly-

mer  Sheathing  on  all  cables. This  exclusive  feature 

provides  better  heat  and  abrasion  resistance  over 

non insulated material, but all existing cable precau-

tions should contie to be followed carefully.

Summary of Contents for 77-50140

Page 1: ...2121 Blount Road Pompano Beach FL 33069 1 800 886 8647 1 954 782 0604 www milemarker com Installation and Operator s Manual Electric Winch System PEC8 PN 77 50140...

Page 2: ...Safety Warnings Precautions 3 Winching Tips Techniques 6 Getting Started Unpacking Your Winch 8 Winch Mounting 8 Control Box Installation 9 WinchOperation 12 Maintenance 14 Troubleshooting 14 Parts L...

Page 3: ...ITIONS Keep the working area well lit Do not use this winch in the presence of ammable gases or liquids 5 KEEP CHILDREN AWAY Keep children away from working area Never let children operate the winch 6...

Page 4: ...of the drum When possible please get the rope as straight as possible to the direction of the object 14 NEVER OPERATE THE WINCH WITHOUT THE ROPE FAIRLEAD FITTED Operator injury or winch damage can re...

Page 5: ...d or kinked 16 Do not cross over or under the cable while it is in process of loading 17 Do not move vehicle with cable extended and attached to load to pull it The cable could snap 18 Apply blocks su...

Page 6: ...to move the blanket or jacket as winching proceeds but halt winching when doing so Partially raising the hood of the vehicle will also give a measure of protection to its occupants from broken rope o...

Page 7: ...oft ground Pulley block attached to load using a suitable anchor point Note the angled direction tak en by the load and subsequent angle of rope feed back on the winch drum extreme example shown There...

Page 8: ...inch body to the mounting platform using the four Capscrews M10 X 34mm and Nuts M10 provided 3 Torque the Capscrews to about 35 ft lb 47 5 N m 4 All Mile Marker Mounting Systems come predrilled with f...

Page 9: ...perate Control Box Installation 2 1 Control Box and Tolls Needed 14mm 13mm Wrench Metric Allen Wrench Set PEC Series Control Box Installation You will need a 14mm wrench 13mm wrench a met ric Allen wr...

Page 10: ...m Wrench Repeat for both motor studs 2 8 Remove Nuts and lock washer from Motor Studs 14 mm wrench 7 Run battery power cables carefully under hood of vehicle avoiding interference with moving parts an...

Page 11: ...X 30 5M Drum Size 2 5 6 4 cm 9 23cm Net weight 80 lbs 36 kg Bolt Pattern 10 x 4 5 254MM X 114MM 4 bolts 3 8 Specifications Performance lbs kgs fpm mpm amps 12v 0 0 13 3 9 35 2000 907 11 3 3 100 4000...

Page 12: ...Usage of a snatch block is recommended to reduce the load on the winch motor All Mile Marker ElectricWinches feature anAutomat ic Load Holding brake so never run the winch against the brake OUT on th...

Page 13: ...Kill Switch from OFF position 3 6 To ON position LEDs will illuminated Blue 3 8 Toggle Down Power in Green LED 3 7 Remote Control Function Diagram 3 9 Toggle Down Power out Red LED FOR INTERMITTENT US...

Page 14: ...ot turn on Safety switch is OFF Switch Assy not connected properly Loose battery cable Solenoid malfunctioning Defective Switch Assembly Defective motor Water has entered motor Turn safety switch to O...

Page 15: ...Short Cable 11 1 Kill Switch 12 1 Screw ST 4X10 13 1 Switch Knob 14 1 Red Long Cable Item Quantity Description 15 1 Housing 16 1 Rubber Cover 17 1 Female Connector 18 2 LED 19 2 LED Holder 20 1 Case...

Page 16: ...Parts Breakdown Assembly 16...

Page 17: ...of sale To obtain any warranty coverage it is absolutely necessary that you present proof of purchase acceptable to Mile Marker such as a purchase receipt The obligation under this warranty statutory...

Page 18: ...returning party to determine a disposition of the merchandise as follows Return as is without repairing Provide an estimate of the repair costs to the sender for approval disapproval and return as di...

Page 19: ...____________________________ Store or catalog name ________________________________________________________________________ Store location _____________________________________________________________...

Page 20: ...UNT ROAD POMPANO BEACH FL 33069 USA MILE MARKERINCORPORATED WWW MILEMARKER COM INFO MILEMARKER COM 800 886 8647 TOLL FREE 954 782 0604 USA INT L 954 782 0770 FAX PN 77 50140 44 Copyright 2008 Mile Mar...

Reviews: