background image

4005356-01

(1550LFBv2, 1550LFPv2, 1550LFZv2)

L1 S

ERIES

© Copyright Miles Industries Ltd., 2015.

1550v2 Linear 3-1/2” Surround Kit

Installation Instructions

Approved for use with 

Valor Models 1500 and 1600 Heaters ONLY

The 1550v2 Linear 3-1/2” Surround Kit is designed to be 
used on the Linear L1 1500 and Linear L1 2-sided 1600 
Valor heaters.

The application of this kit does not affect the venting 
capabilities or method of preparation of the heater as 
described in the heater installation manual.

This trim fi ts fl at against the cement board with the ability 
to tuck additional non-combustible materials up to 1/2 
inch thickness behind the trim.

Replacing the side panels on the trim allow non-
combustible material thickness to be increased to 1 inch.

Overview

 (Fireplace engines sold separately)

Trim size

Non-combustible 
cement board

Barrier screen

LH Trim panel

RH Trim panel

LH Side door

RH Side 
door

Trim

Plinth

21-1/4” (540 mm)

46-3/16” (1173 mm)

Thickness

 1-3/8” (35 mm)

HOT GLASS

 WILL 

CAUSE BURNS.

DO NOT TOUCH 

GLASS 

UNTIL COOLED.

NEVER 

ALLOW CHILDREN 

TO TOUCH GLASS.

DANGER

!

A barrier designed to reduce the risk of burns from the hot 
viewing glass is provided with this appliance and shall be 
installed for the protection of children and other at-risk 
individuals.

Notes: 

This kit must be installed 

or serviced by a qualifi ed installer, 
service agency or gas supplier. 
These instructions are to be 

used 

in conjunction with the main 
installation instructions for the 
above listed heater models.

I N S TA L L E R

Leave this manual 

with the appliance.

C O N S U M E R

Retain this manual for 

future reference.

Summary of Contents for 1550LFBv2

Page 1: ...ombustible material thickness to be increased to 1 inch Overview Fireplace engines sold separately Trim size Non combustible cement board Barrier screen LH Trim panel RH Trim panel LH Side door RH Sid...

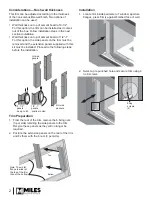
Page 2: ...f installation can be used Wall thickness on top of cement board of 0 1 2 For this option the trim can be installed as it comes out of the box Follow installation steps in the next section Installatio...

Page 3: ...wall finish under the trim TOP of door this space is wider TOP of door tab at the rear Left door BOTTOM of door this space is narrower Rear view Front view 4 Identify left hand door and its orientati...

Page 4: ...re installed on the fireplace front after screen is re installed on the fireplace front after maintenance if it has been removed maintenance if it has been removed WARNING Removing the screen The barr...

Page 5: ...003091AZ 5 Plinth 4002929AZ 4002929AZ 4002929AZ 6 Trim frame 4005362 4005362BR 4005362P 7 Barrier screen 4004215 4004215 4004215 8 x 3 8 black screws 4 100A757 100A757 100A757 1 2 3 4 5 6 7 Designed a...

Page 6: ...u foyer Valor indiqu ci dessus INSTALLATEUR Laissez cette notice avec l appareil CONSOMMATEUR Conservez cette notice pour consultation ult rieure 1550LFBv2 1550LFPv2 1550LFZv2 La Bordure Linear 3 1 2...

Page 7: ...options d installation sont offertes paisseur du mur par dessus le panneau de b ton de 0 1 2 pouce 0 13 mm Pour cette option la bordure peut tre install e sans qu il soit n cessaire de la modifier Pas...

Page 8: ...u mur HAUT de porte cet espace est plus large HAUT de porte onglet l arri re Porte gauche BAS de porte cet espace est plus troit Arri re Avant 4 Identifiez la porte gauche et son orientation selon les...

Page 9: ...t tre rem plac par le pare tincelles con u par le manufactu rier pour cet appareil Pour nettoyer la vitre de la fen tre et l int rieur du foyer consultez la section Information l intention du consomma...

Page 10: ...he 4002929AZ 4002929AZ 4002929AZ 6 Bordure 4005362 4005362BR 4005362P 7 Pare tincelles 4004215 4004215 4004215 Vis noires no 8 x 3 8 4 100A757 100A757 100A757 Liste de pi ces 1 2 3 4 5 6 7 Con ue et f...

Reviews: