background image

11

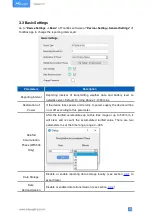
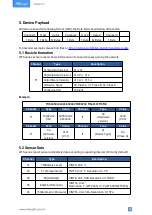
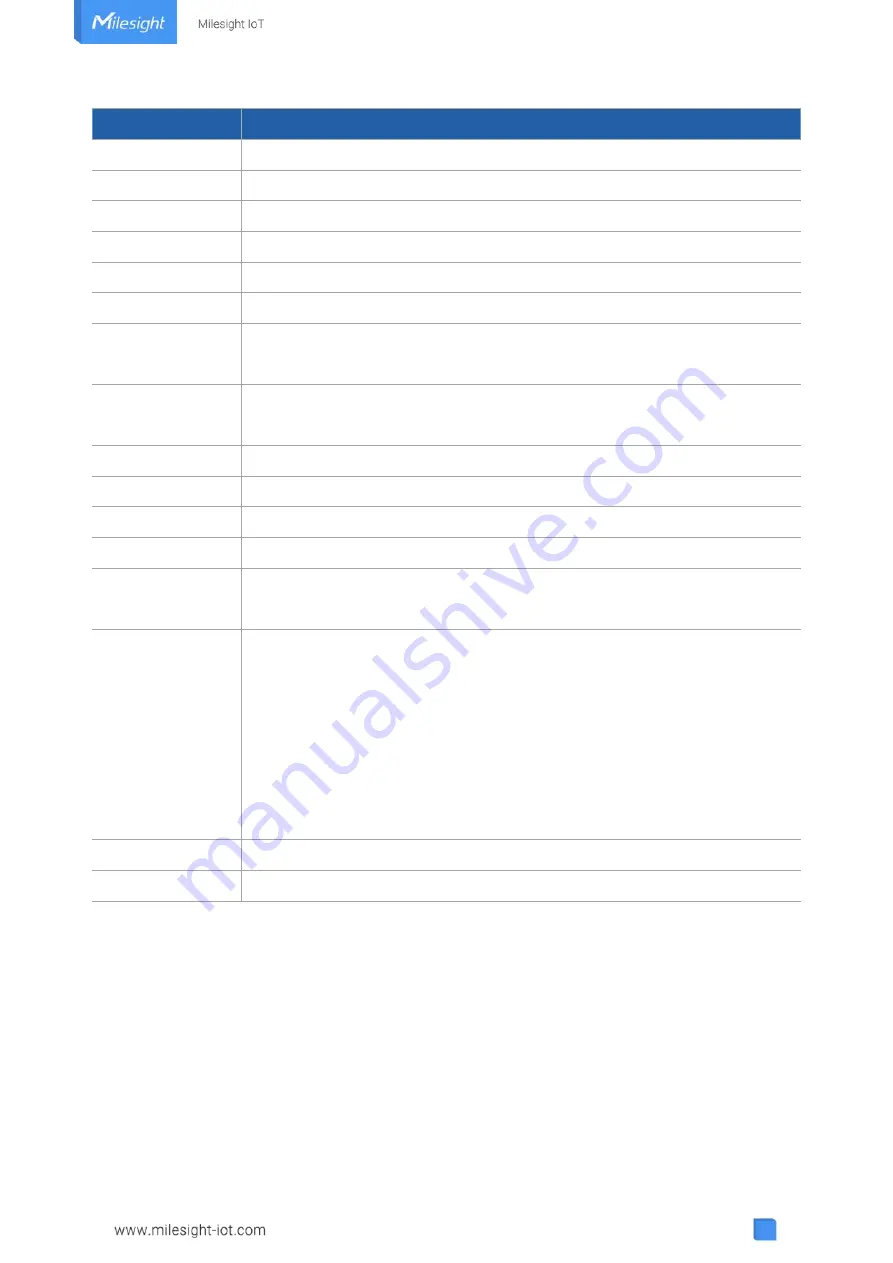
Parameters

Description

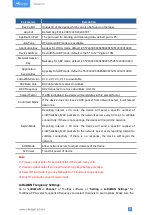
Device EUI

Unique ID of the device which can also be found on the label.

App EUI

Default App EUI is 24E124C0002A0001.

Application Port

The port used for sending and receiving data, default port is 85.

Join Type

OTAA and ABP mode are available.

Application Key

Appkey for OTAA mode, default is 5572404C696E6B4C6F52613230313823.

Device Address

DevAddr for ABP mode, default is the 5

th

to 12

th

digits of SN.

Network Session

Key

Nwkskey for ABP mode, default is 5572404C696E6B4C6F52613230313823.

Application

Session Key

Appskey for ABP mode, default is 5572404C696E6B4C6F52613230313823.

LoRaWAN Version V1.0.2, V1.0.3, V1.1 are available.

RX2 Data Rate

RX2 data rate to receive downlinks.

RX2 Frequency

RX2 frequency to receive downlinks. Unit: Hz

Spread Factor

If ADR is disabled, the device will send data via this spread factor.

Confirmed Mode

If the device does not receive ACK packet from network server, it will resend
data once.

Rejoin Mode

Reporting interval ≤ 30 mins: the device will send a specific number of
LinkCheckReq MAC packets to the network server every 30 mins to validate
connectivity; If there is no response, the device will re-join the network.
Reporting interval > 30 mins: the device will send a specific number of
LinkCheckReq MAC packets to the network server every reporting interval to
validate connectivity; If there is no response, the device will re-join the
network.

ADR Mode

Allow network server to adjust datarate of the device.

Tx Power

Transmit power of device.

Note:

1) Please contact sales for device EUI list if there are many units.
2) Please contact sales if you need random App keys before purchase.
3) Select OTAA mode if you use Milesight IoT Cloud to manage devices.
4) Only OTAA mode supports rejoin mode.

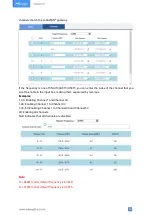
LoRaWAN Frequency Settings:

Go to “

LoRaWAN -> Channel

” of ToolBox software or “

Setting -> LoRaWAN Settings

” for

ToolBox APP to select supported frequency and select channels to send uplinks. Make sure the

Summary of Contents for WTS Series

Page 1: ...IoT Weather Station Featuring LoRaWAN WTS Series User Guide...

Page 2: ...nded to be used as a reference sensor and Milesight will not should responsibility for any damage which may result from inaccurate readings Do not place the device close to objects with naked flames D...

Page 3: ...port Email iot support milesight com Support Portal support milesight iot com Tel 86 592 5085280 Fax 86 592 5023065 Address Building C09 Software Park III Xiamen 361024 China Revision History Date Doc...

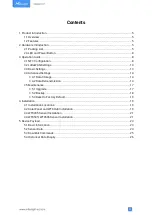
Page 4: ...ed Settings 14 3 4 1 Data Storage 14 3 4 2 Data Retransmission 14 3 5 Maintenance 17 3 5 1 Upgrade 17 3 5 2 Backup 18 3 5 3 Reset to Factory Default 19 4 Installation 19 4 1 Installation Locations 19...

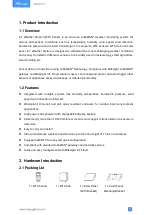
Page 5: ...d trigger other sensors or appliances easily via webpage or mobile App remotely 1 2 Features Integrated with multiple sensors like humidity temperature barometric pressure wind speed wind direction ra...

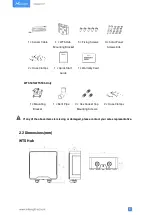
Page 6: ...Screws Kits 2 Hose Clamps 1 Quick Start Guide 1 Warranty Card WTS505 WTS506 Only 1 Mounting Bracket 1 Bent Pipe 3 Hex Socket Cap Mounting Screws 2 Hose Clamps If any of the above items is missing or d...

Page 7: ...7 WTS305 WTS505...

Page 8: ...r more than 3 seconds On Off Reset Press and hold the button for more than 10 seconds Blink 3 times Check On Off Status Quickly press the power button for within 3 seconds Light On Device is on Light...

Page 9: ...fault password is 123456 Note 1 Ensure the location of smartphone NFC area and it s recommended to take off phone case 2 If the smartphone fails to read write configurations via NFC keep the phone awa...

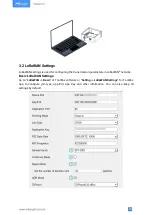
Page 10: ...ing the transmission parameters in LoRaWAN network Basic LoRaWAN Settings Go to LoRaWAN Basic of ToolBox software or Setting LoRaWAN Settings for ToolBox App to configure join type App EUI App Key and...

Page 11: ...does not receive ACK packet from network server it will resend data once Rejoin Mode Reporting interval 30 mins the device will send a specific number of LinkCheckReq MAC packets to the network serve...

Page 12: ...the input box making them separated by commas Examples 1 40 Enabling Channel 1 and Channel 40 1 40 Enabling Channel 1 to Channel 40 1 40 60 Enabling Channel 1 to Channel 40 and Channel 60 All Enabling...

Page 13: ...ation of Power If the device loses power and returns to power supply the device will be on or off according to this parameter Rainfall Accumulation Phase WTS506 Only After the rainfall accumulates up...

Page 14: ...x App to enable data storage feature 2 Go to Maintenance Basic of ToolBox software or Device Maintenance of ToolBox App click Export then select the data time period and click Save to export data Note...

Page 15: ...after device re connects the network Here are the steps for data retransmission 1 Ensure the device time is correct please use Toolbox software or ToolBox App to sync the time If you set LoRaWAN vers...

Page 16: ...inutes if the reporting interval is more than 30 minutes the time packets sent reporting interval 4 After the network connected back the device will send the lost data from the point in time when the...

Page 17: ...click Browser to import the firmware and upgrade the firmware ToolBox App 1 Download firmware from Milesight website to your smartphone 2 Open Toolbox App and click Browse to import firmware and upgra...

Page 18: ...RaWAN frequency band 1 Go to Template page on the App and save current settings as a template You can also edit the template file 2 Select one template file which saved in the smartphone and click Wri...

Page 19: ...es around the distance between the IoT weather station and the nearest obstacle is preferably 10 times the height of the obstacle Keep away from radars transmitters and any other instruments which can...

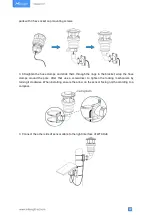
Page 20: ...wo sides of bracket with screw kits 3 Straighten the hose clamps and slide them through the rectangular rings in the solar panel s bracket wrap the hose clamps around the pole After that use a screwdr...

Page 21: ...the arrow on the sensor facing north according to a compass Users can install the sensor with other installation methods by selecting other accessories 4 4 WTS505 WTS506 Sensor Installation 1 Connect...

Page 22: ...rings in the bracket wrap the hose clamps around the pole After that use a screwdriver to tighten the locking mechanism by turning it clockwise When installing ensure the arrow on the sensor facing n...

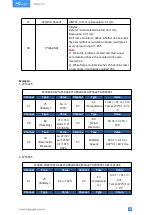
Page 23: ...annel Type Description ff 01 Protocol Version 01 V1 09 Hardware Version 01 40 V1 4 0a Software Version 01 14 V1 14 0f Device Type 00 Class A 01 Class B 02 Class C 16 Device SN 16 digits ff166454c32424...

Page 24: ...will always upload 255 017564 03671001 046871 05840001 0673aa27 07929201 Channel Type Value Channel Type Value 01 75 Battery 64 100 03 67 Temperature 10 01 01 10 272 Temp 272 0 1 27 2 C Channel Type V...

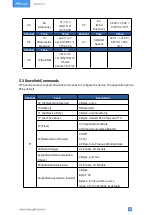
Page 25: ...3 c4 5060 0 01 5 0 6 mm Counter 25 37 Channel Type Description ff 03 Set Reporting Interval 2 Bytes unit s 10 Reboot ff Reserved 11 Set Device Time 4 Bytes unix timestamp 17 Set Time Zone 2 Bytes desi...

Page 26: ...Command format ff03b004 Channel Type Value ff 03 Set Reporting Interval b0 04 04 b0 1200s 20 minutes ff10ff Channel Type Value ff 10 Reboot ff Reserved ff17d8ff Channel Type Value ff 17 Set Time Zone...

Page 27: ...7 00 Example 1 Enquire historical data between 2022 10 10 14 45 00 to 2022 10 10 15 35 00 Reply ff 6a Report Interval 3 Bytes Byte 1 01 Byte 2 interval time unit s range 30 1200s 60s by default Channe...

Page 28: ...ue 20 ce Historical Data 56991a63 2022 10 10 15 31 52 Temperature 0e 01 01 0e 27 C Humidity 64 100 50 Barometric pressure 8c 27 27 8c 1012 4 hPa Wind Direction c7 06 06 c7 173 5 Wind Speed 0400 0004 0...

Reviews: