.
A complete Parts List is available at www.MillerWelds.com
OM-232 384 Page 25
6-4.
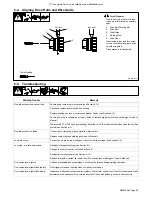
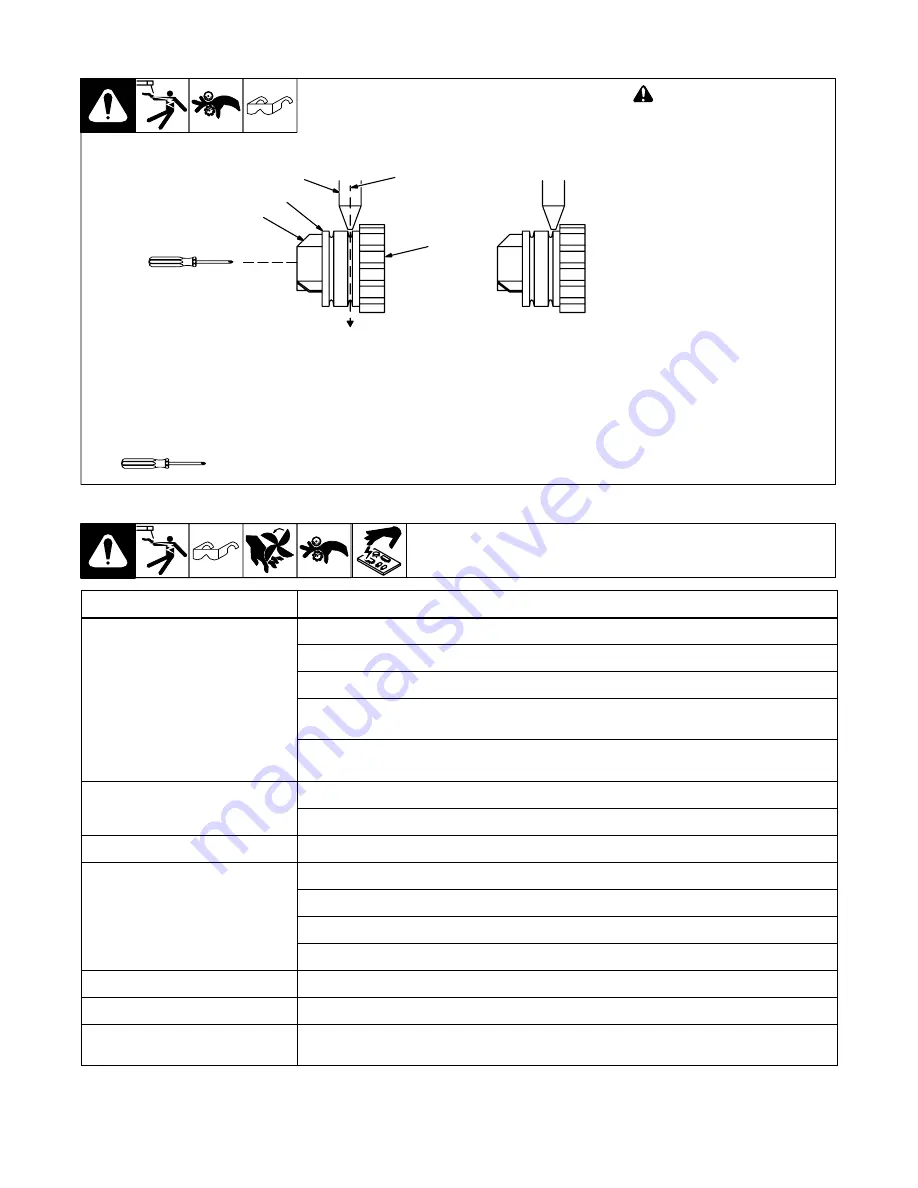
Aligning Drive Rolls and Wire Guide
!
Turn Off power.
View is from top of drive rolls look-
ing down with pressure assembly
open.
1
Drive Roll Securing Nut
2
Drive Roll
3
Wire Guide
4
Welding Wire
5
Drive Gear
Insert screwdriver, and turn screw
in or out until drive roll groove lines
up with wire guide.
Close pressure roll assembly.
Ref. 800 412-A
Correct
Incorrect
4
3
2
1
5
Tools Needed:
6-5.
Troubleshooting
Welding Trouble
Remedy
No weld output; wire does not feed.
Secure power cord plug in receptacle (see Section 4-12).
Check and replace power switch if necessary.
Replace building line fuse or reset circuit breaker if open (see Section 4-12).
Secure gun plug in receptacle or repair leads, or replace trigger switch (see welding gun Owner’s
Manual).
Thermostat TP1 or TP2 open (overheating). Allow fan to run; the thermostat will close when the unit has
cooled (see Section 6-2).
No weld output; wire feeds.
Connect work clamp to get good metal to metal contact.
Replace contact tip (see welding gun Owner’s Manual).
Low weld output.
Connect unit to proper input voltage or check for low line voltage (see Section 4-12).
Low, high, or erratic wire speed.
Readjust front panel settings (see Section 5-1).
Change to correct size drive roll (see Section 6-3).
Readjust drive roll pressure (see Section 4-13).
Replace inlet guide, contact tip, and/or liner if necessary (see welding gun Owner’s Manual).
Over temperature light on.
Unit has overheated and output stops. Let unit cool before continuing welding operation.
Over temperature light blinks rapidly.
Gun trigger is closed or shorted when unit power is turned on.
Over temperature light blinks slowly.
Indicates a malfunction in the wire drive system or drive motor overcurrent. Check for proper spool brake
adjustment or obstructions in the wire feed system. Check wire guides, gun liner and contact tip.


