79
6.
Add approximately 20 gallons of environmentally safe antifreeze suitable for the climate in your
area.
7.
Start the product pump and run at rated volume.
8.
Open and close ALL valves on the sprayer to ensure you have clean antifreeze through the
entire system.
NOTE:
The pressure gauge hose is supplied from the rear of the sprayer and is a “dead end” circuit.
The following procedure is recommended for winterizing.
a. With the sprayer pump turned off, carefully remove the pressure line from the bottom of the
pressure gauge.
b. Hold the end of the hose above a bucket and have an assistant start the sprayer pump
momentarily at an idle ONLY. Leave run at idle until clean antifreeze comes out of the
hose. Be careful of any “splash back” in the bucket.
c. Stop the sprayer pump and reattach the hose to the gauge.
9.
Turn on the boom until antifreeze begins spraying from the spray tips. Shut off the sprayer and
let the antifreeze remain in the system.
Chemical Inductor
Be sure to drain the chemical inductor system, flush with clean water then run environmentally safe
antifreeze (RV antifreeze) through the system. Open all inductor valves to insure antifreeze has
been run through the entire inductor system.
Foam Marker
IMPORTANT: The liquid lines and tank must be drained completely prior to storage. If liquid
in this system is allowed to freeze, several components may be damaged.
1.
Remove the in-line filter bowl at the bottom of the tank and flush tank with warm water.
2.
Replace the filter bowl. Fill the tank with at least 2 gallons of hot water. Turn on the machine
and allow to run out each side until no foam is generated. Repeat if necessary.
3.
Add RV type antifreeze to the tank. Do not use windshield washer fluid because it can clog
the foamer.
4.
Turn on machine until antifreeze solution reaches each foamhead.
5.
Check the air and liquid lines for holes and replace as required. Be sure to flush and drain all
liquid from the system prior to storage in freezing temperatures.
Cleaning the outside of the sprayer
1.
Thoroughly clean the outside of the sprayer with soap and water until all surfaces are clean. A
high pressure washer would help this process.
2.
Paint all scratched or rusty surfaces.
3.
Check all safety decals, reflectors and lights that they are in good condition and function
properly. Replace or repair as needed.
4.
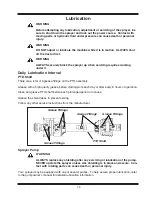
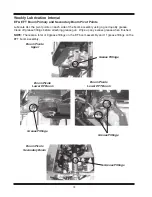
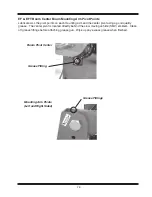
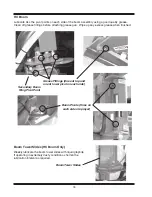
Grease and lubricate all fittings and slide areas. Refer to the “Lubrication” section of this
manual.
Summary of Contents for 500 BW
Page 6: ......
Page 31: ...27 Spray Tip Wear...
Page 38: ...34 TeeJet Air Induction Spray Tips At Various Speeds And Pressures 20 Inch Tip Spacing...
Page 94: ......
Page 96: ...2007 by Miller St Nazianz Inc...

