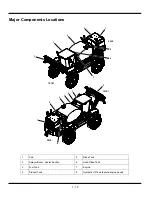
background image

B

B

1 - 3

CHAPTER 1 - GENERAL AND SAFETY INFORMATION
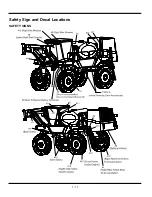
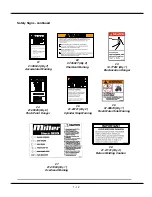
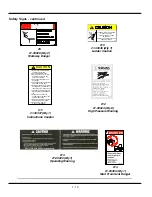
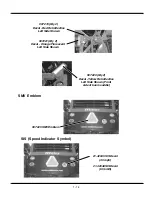
Safety Precautions

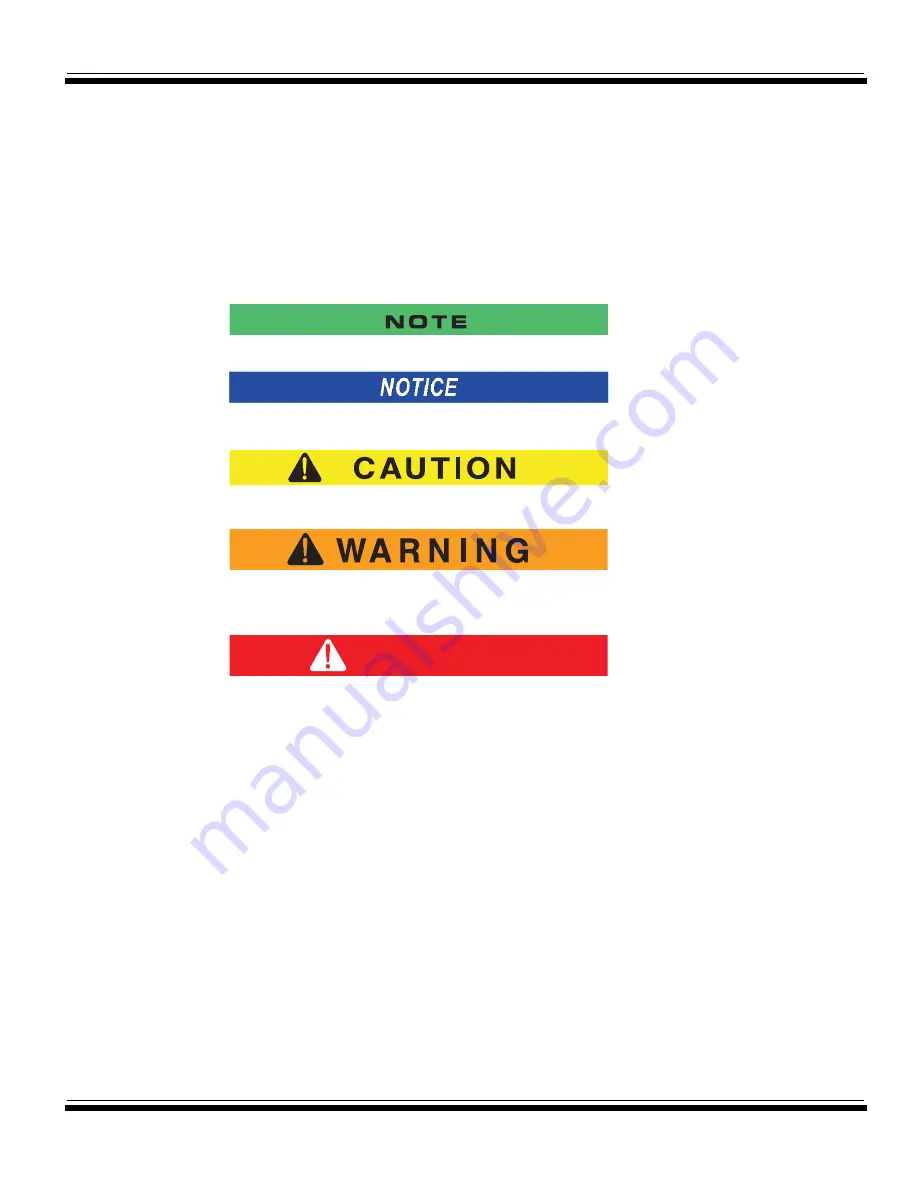
Notes, Notices, Cautions, Warnings, and Dangers Definitions

Throughout this guide 

NOTE, NOTICE, CAUTION, WARNING,

 and

 DANGER

 will be used. Please observe these

NOTES, NOTICES, CAUTIONS, WARNINGS, 

and 

DANGERS;

 be aware that servicing a vehicle requires mechanical

skill and a regard for conditions that may be hazardous. Improper service or repair may damage the vehicle or render it

unsafe.

Addresses practices not related to personal injury. 

Indicates a situation which, if precautions are not complied with, may result in equipment or property damage. 

Indicates a hazardous situation which, if not avoided, may result in minor or moderate personal injury.

Indicates a hazardous situation which, if not avoided, could result in death or serious

injury.

DANGER

DANGER

Indicates a hazardous situation which, if not avoided, will result in death or serious injury.

BEFORE you attempt to operate this machine, read and study the following safety information. In addition, 
MAKE SURE that every individual who operates or works with this equipment, whether family member or 
employee, is familiar with these safety precautions. Miller-St. Nazianz provides guards for exposed moving parts 
for the operator’s protection; however, some areas cannot be guarded or shielded in order to make sure of 
proper operation. The OPERATOR’S MANUAL AND SAFETY SIGNS on the machine itself warn you of dangers 
and SHOULD BE READ AND OBSERVED CLOSELY.

Failure to follow these precautions could result in death or serious injury.

Summary of Contents for NITRO 4000 Series

Page 1: ...BOX127 ST NAZIANZ WI 54232 920 773 2121 FAX 920 773 1200 NITRO SPRAYER MAINTENANCE AND REPAIR MANUAL 4000 SERIES MODELS DO NOT OPERATE THIS EQUIPMENT UNTIL THIS MANUAL HAS BEEN READ AND UNDERSTOOD Pa...

Page 2: ...follow the recommended procedures may result in injury and equipment damage and could void the war ranty The machine serial number is located on the inside front right side frame rail below the lift a...

Page 3: ...COMPONENTS 1 7 Towing Safety Precautions 1 8 Moving a Downed Vehicle 1 8 Safety Sign and Decal Locations 1 11 SAFETY SIGNS 1 11 Major Components Locations 1 15 Hoses Fittings General 1 16 Application...

Page 4: ...2 4 Cab Air Charcoal Filter 2 5 AC Recirculation Blower Motor 2 5 REMOVAL 2 5 INSTALLATION 2 6 AC Blower Motor 2 6 REMOVAL 2 6 INSTALLATION 2 6 AC Evaporator Heater 2 7 REMOVAL 2 7 INSTALLATION 2 8 AC...

Page 5: ...t 2 20 Overhead Console Panel 2 21 Front Interior Panel 2 22 Floor Mat 2 22 Cab Roof 2 23 REMOVAL 2 23 INSTALLATION 2 23 Cab Steering Column Covers 2 24 REMOVAL 2 24 INSTALLATION 2 24 Cab Windshield 2...

Page 6: ...and Platforms 3 4 REAR DECK 3 4 Removal 3 4 Installation 3 4 MID PLATFORM 3 5 Removal 3 5 Installation 3 5 FRONT PLATFORM 3 6 Removal 3 6 Installation 3 6 Suspension Cylinders 3 7 SUSPENSION SYSTEM G...

Page 7: ...6 CHAPTER 4 ENGINE General Notices Cautions Warnings and Dangers For Engine Procedures 4 5 ENGINE TROUBLESHOOTING 4 7 Engine Fault Codes General 4 8 Engine Fault Codes QSB and QSL Engines 4 9 Upper Fa...

Page 8: ...l 4 40 Right hand Bottom and Top Engine Enclosure Covers 4 40 Exhaust Shield 4 41 Right Engine Bay Panel 4 41 INSTALLATION 4 41 Right Engine Bay Panel 4 41 Exhaust Shield 4 42 Right hand Bottom and To...

Page 9: ...55 INSTALLATION 4 55 AC Receiver Dryer 4 56 REMOVAL 4 56 INSTALLATION 4 56 Alternator 4 57 REMOVAL 4 57 INSTALLATION 4 57 Starter Motor 4 58 REMOVAL 4 58 INSTALLATION 4 59 Air Cleaner Filter Element...

Page 10: ...ve and Hydraulics Procedures 5 3 Troubleshooting 5 4 HYDRAULIC SYSTEM CLEANLINESS 5 4 HYDRAULIC SYSTEM PRESSURE 5 4 Front Steering Cover 5 4 REMOVAL 5 4 INSTALLATION 5 5 Tire 5 6 NITRO 4000 SERIES MAI...

Page 11: ...ANK VACUUM PROCEDURE 5 25 Shop Vac or Vacuum Device Method 5 25 Brake Pedal Valve 5 26 REMOVAL 5 26 Underneath Cab 5 26 Inside Cab 5 27 INSTALLATION 5 27 Inside Cab 5 27 Underneath Cab 5 27 Hydrostati...

Page 12: ...Shifting System Schematics 5 56 CHAPTER 6 SPRAYER General Notices Cautions Warnings and Dangers For Sprayer Procedures 6 3 Spray Monitor 6 4 Rinse Tank 6 6 REMOVAL 6 6 INSTALLATION 6 6 Product Tank 6...

Page 13: ...Maintenance and Adjustment 6 21 Flow Meter Recalibration 6 22 Foamer System 6 23 FOAMER SYSTEM TROUBLESHOOTING 6 23 FOAMER SYSTEM MAINTENANCE 6 24 FOAM MARKER CONTROL BOX TEST PROCEDURE 6 25 CHAPTER...

Page 14: ...ic Hose Routing Hyd Hose Routing 11 Fan Relief Valve Hydraulic Hose Routing Hyd Hose Routing 12 Hydrostatic Tandem Pump Set Hydraulic Hose Routing Hyd Hose Routing 13 Hydraulic Oil Tank Hydraulic Hose...

Page 15: ...tions 1 7 Electrical Safety Precautions 1 7 OPERATION OF ELECTRICAL COMPONENTS 1 7 Towing Safety Precautions 1 8 Moving a Downed Vehicle 1 8 Safety Sign and Decal Locations 1 11 SAFETY SIGNS 1 11 Majo...

Page 16: ...Table of Contents Chapter 1 continued 1 2 Title Page Number Nitro Sprayer Model Specifications 1 38 Model 4215 4215HT 1 38 Model 4240HT 1 39 Model 4275 1 40 Model 4315 1 41 Model 4365 1 42...

Page 17: ...in minor or moderate personal injury Indicates a hazardous situation which if not avoided could result in death or serious injury DANGER DANGER Indicates a hazardous situation which if not avoided wil...

Page 18: ...certified individuals to operate this machine Wear safety goggles and all proper clothing when operating servicing or refilling this machine Always read and follow all manufacturers recommendations wh...

Page 19: ...icing any sprayer component Drain all fluids from the sprayer system before servicing any sprayer component Flush with water three times Use only pipe hose and fittings rated for the maximum psi ratin...

Page 20: ...xiation or other bodily injury or death Disconnect the battery negative cable first then the positive cable and discharge any capacitors before beginning any repair work Put a Do Not Operate tag in th...

Page 21: ...h NEW wheels Never rework weld heat or braze rims NO WELDING SHOULD BE DONE without prior authorization from Miller St Nazianz If you have a wheel on your sprayer with a rim leaking air contact your M...

Page 22: ...tem power the parking brakes will automatically apply The parking brake is spring applied when hydraulic pressure is lost Contact your dealer for prop er procedure to disable the parking brake Tow the...

Page 23: ...sconnects and valve plugging set out the Port A Power along with the fittings from the kit P N 21 25539 see Drawing below for details 0 1 0 1 2 2 2 2 2 2 2 2 3 2 22 3 0 2 2 0 3 3 3 2 0 1 1 0 2 3 3 3 3...

Page 24: ...e was removed Multifunction Cartridge 8 Locate the four multifunction cartridges located on the back side of the hydrostat the second hex coupling hex nut should be turned counterclockwise three full...

Page 25: ...1 11 Safety Sign and Decal Locations SAFETY SIGNS...

Page 26: ...9025 Qty 6 Pinch Point Danger 5 21 20121 Qty 2 Cylinder Stop Warning 6 07 09573 Qty 1 Fresh Water Tank Warning WARNING Avoid bodily injuries from hydraulic oils and gas under pressure Before removing...

Page 27: ...ing machine unattended 9 Wait for all movement to stop before servicing machiner y 8 Stop engine put trans in neutral and set parking brake before dismounting 7 Use flashing warning lights on highway...

Page 28: ...cal Orange Florescent Left Side Shown SIS Speed Indicator Symbol 21 42045 SIS Decal 40 mph 907219 Qty 2 Decal Red Retroflective Left Side Shown 907220 Qty 2 Decal Yellow Retroflective Left Side Shown...

Page 29: ...onents Locations 1 Cab 5 Rinse Tank 2 Sprayer Boom Center Section 6 Hand Rinse Tank 3 Fuel Tank 7 Engine 4 Product Tank 8 Hydraulic Oil Tank behind engine panel 2 1 4 8 7 5 6 3 2 1 6 3 4 5 7 8 FRONT F...

Page 30: ...go pivoting motions can create an undesirable situa tion A swivel joint can provide a solution to this situation by permitting pivoting motions that reduce the bending transmitted to the hose assembly...

Page 31: ...stems Relieve system pressure before adjusting con nections Intervals for Replacements Hose assemblies and seals used on hose fittings and adapters will eventually age harden wear and deterio rate und...

Page 32: ...groove 3 Hand tighten fitting until backup washer or washer face if straight fitting bottoms on face and O ring is seated 4 Position angle fittings by unscrewing no more than one turn 5 Tighten straig...

Page 33: ...Place one wrench on the hose end body and with the second wrench tighten the swivel nut to the torque shown in the following chart Flare Type Fitting Torque Chart Tube Size OD Nut Size Across Flats T...

Page 34: ...61 275 6 5 420 9 7 6 32 1380 00909 375 10 8 580 16 12 6 40 1380 01015 420 12 9 610 18 13 8 32 1640 01400 580 19 14 900 30 22 8 36 1640 01474 610 20 15 940 31 23 10 24 1900 01750 725 27 21 1120 43 32 1...

Page 35: ...250 7630 18900 350 270 42300 800 600 1 1 8 12 1 1250 8560 21200 400 300 47500 880 660 1 1 4 7 1 2500 9690 24000 500 380 53800 1120 840 1 1 4 12 1 2500 1 0730 26600 550 420 59600 1240 920 1 3 8 6 1 375...

Page 36: ...02000 1800 68 51 1 4 20 25000 0318 2850 12 ft lb 9 ft lb 3450 11 ft lb 1 4 28 2500 0364 3250 14 10 3950 13 5 16 18 3125 0524 4700 25 18 5700 21 5 16 24 3125 0580 5200 25 20 6300 23 3 8 16 3750 0775 70...

Page 37: ...440 1080 93100 1325 1 1 4 7 1 2500 9690 87200 1820 1360 105400 1600 1 1 4 12 1 2500 1 0730 96600 2000 1500 116700 1750 1 3 8 6 1 3750 1 1550 104000 2380 1780 1 3 8 12 1 3750 1 3150 118400 2720 2040 1...

Page 38: ...10 16 2 00 157 0 14790 120 20800 170 20 2 50 245 0 23070 235 32460 330 24 3 00 383 0 33240 405 46760 570 Non Ferrous Materials Bolt Size 18 8 Stainless Steel in lb Brass in lb Silicon Bronze in lb Alu...

Page 39: ...6 ft lb 18 ft lb 143 21 ft lb 22 3 8 24 22 18 20 13 ft lb 23 25 7 16 14 31 26 29 19 33 36 7 16 20 33 27 31 20 35 38 1 2 13 43 35 40 26 45 49 1 2 20 45 37 42 27 47 51 9 16 12 57 47 53 34 59 65 9 16 18...

Page 40: ...12 390 318 361 251 408 470 1 1 4 7 523 428 485 336 546 627 1 1 4 12 480 394 447 308 504 575 1 1 2 6 888 727 822 570 930 1064 Non Ferrous Materials Continued Bolt Size 18 8 Stainless Steel in lb Brass...

Page 41: ...This as a preview PDF file from best manuals com Download full PDF manual at best manuals com...

Reviews: