Pellerin Milnor Corporation
75
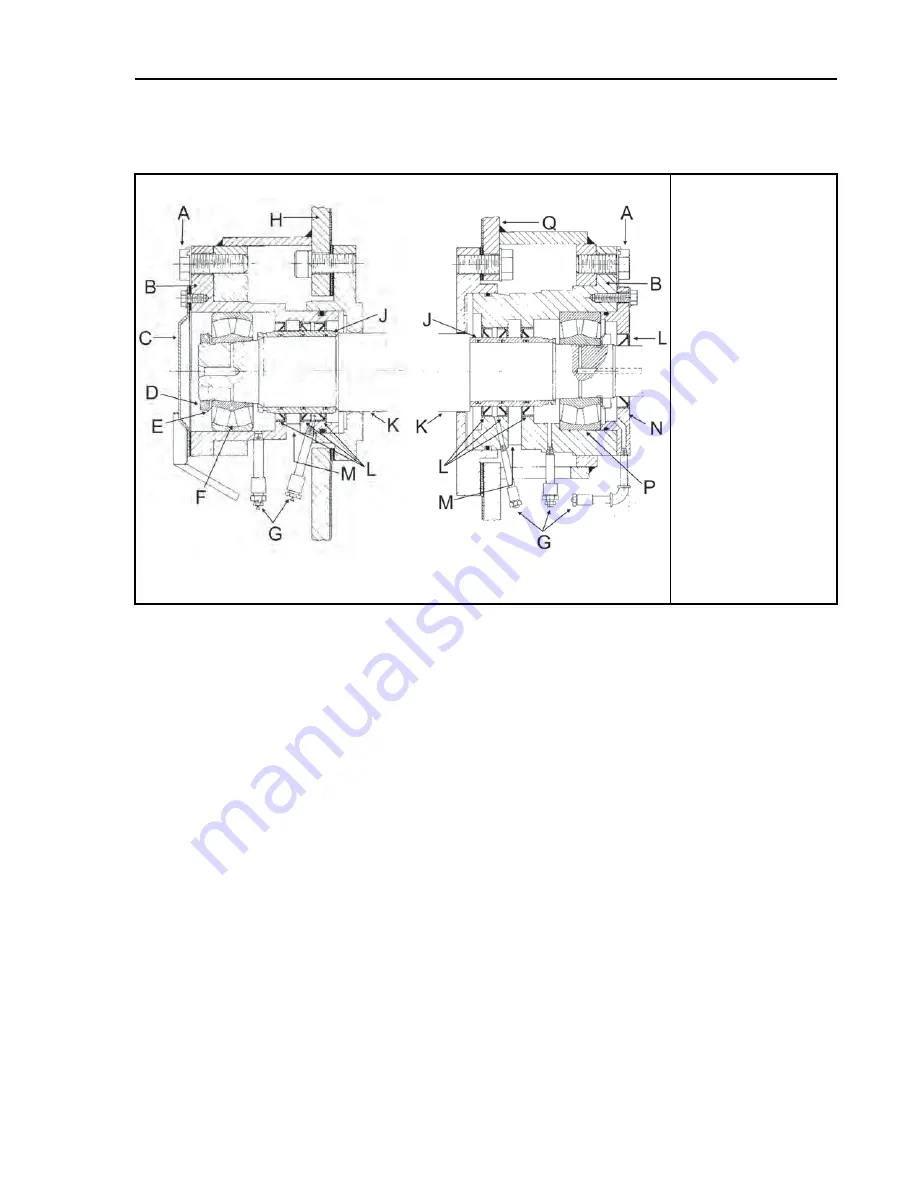
Figure 25.
Cross Section View of Front and Rear Bearing Assemblies (Bearing Assembly for 60"
and 72" WED Shown. Others similar.)
Front Bearing Assembly
Rear Bearing Assembly
Legend
A...
Cap bolt
B...
Bearing housing
(bearing and seal
carrier)
C...
Bearing cover
D...
Bearing lock nut
E...
Bearing lock
washer
F...
Front bearing
(floating)
G...
Bearing and seal
cavity leak offs
H...
Shell front
J...
Seal sleeves
K...
Shaft
L...
Seals
M...
Shaft seal leak off
cavities
N...
Shaft seal holder
P...
Rear bearing
(fixed)
Q...
Shell rear
Access to the bearings and seals for lubrication is provided by the various grease passages. Ex-
cess lubricant is excreted through the bearing and seal cavity leak offs as shown on
The bearings and seals must be lubricated regularly and the leak off cavities flushed out periodi-
cally through the plugged cleanout connections, in strict accordance with the preventive mainte-
nance procedures elsewhere.
If bearing replacement becomes necessary due to wear, it is essential that the bearings
and seals
are replaced. Seal replacement requires removal of the bearing housing and seal sleeve. (In rare
instances where the seals are known to be in good condition, it is not necessary to remove the
bearing housing, seals or seal sleeve when a bearing is replaced.)
A pulling fixture is required
to remove the bearing housing. A set of guide rods, a seal sleeve setting fixture and a bear-
ing setting fixture are required for reinstallation of the housing.
These tools are available for
rental or purchase from the Milnor
®
factory and are pictured elsewhere in this section. Contact
the factory two weeks in advance of repairs, when ordering these tools.
This maintenance is performed in the following order:
1. Remove old bearing(s). When removing both bearings, remove the front (soil side) bearing
first.
2. Remove bearing housings, seal sleeves, and seals.
3. If both bearings were removed, install the bearing housing, seal sleeve, seals, and new bearing
on the rear (clean side).
4. Install the bearing housing, seal sleeve, seals, and new bearing on the front (soil side).
Summary of Contents for 42044SR2
Page 2: ......
Page 9: ...1 General Service Information Pellerin Milnor Corporation 7 ...
Page 23: ...This page intentionally blank ...
Page 43: ...2 Safety Related Components Assemblies Pellerin Milnor Corporation 41 ...
Page 51: ...3 Drive Assemblies Pellerin Milnor Corporation 49 ...
Page 59: ...Pellerin Milnor Corporation 57 Drive Base 5 Sheets 4244SP2 SM Single Motor Drive Assemblies ...
Page 87: ...This page intentionally blank ...
Page 111: ...This page intentionally blank ...
Page 114: ...112 Pellerin Milnor Corporation 6 Shell and Door Assemblies ...
Page 124: ...122 Pellerin Milnor Corporation 7 Control and Sensing Assbmlies ...
Page 128: ...126 Pellerin Milnor Corporation 8 Chemical Supply Devices ...
Page 129: ...This page intentionally blank ...
Page 136: ...134 Pellerin Milnor Corporation 9 Water and Steam Piping and Assemblies ...
Page 137: ...This page intentionally blank ...
Page 154: ...152 Pellerin Milnor Corporation 10 Pneumatic Piping and Assemblies ...


