background image


    3. 

例行维护


PELLERIN MILNOR CORPORATION


1. 

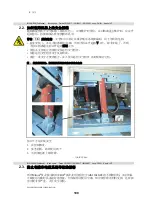
让机器运行或使用手动功能运行电机直至其发热。


2. 

断开机器电源。


3. 

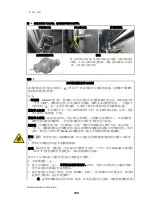
如果电机有润滑脂排放塞,则将其拆下。参

警告说明


 22 


4. 

向停机的电机加入

EM

润滑脂(

 10

)。

  6

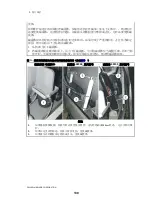
铭牌显示电机以

60

赫兹运行,则每次添

加的润滑脂量为

0.65

盎司(

18.4

毫升)。


5. 

如果电机设有润滑脂排放塞,则将机器运行两小时或使用手动功能让电机运行两小时。
更换排放塞。


 11: 

电机润滑脂添加间隔和数量。使用

EM

润滑脂

 10


在电机铭牌上(参

  6


间隔


数量


NEMA

IEC

框架尺寸


转速小于等于(转

/

分)


年份


小时


液量盎司


毫升


900 


5.5 


11000 


1200 


4.5 


9000 


1800 


6000 


最多

210 

132


3600 


1.5 


3000 


0.34 


9.5 


900 


4.5 


9000 


1200 


3.5 


7000 


1800 


2.5 


5000 


>210

280 

132

180


3600 


2000 


0.65 


18.4 


900 


3.5 


7000 


1200 


6000 


1800 


4000 


>280

360 

180

200


3600 


0.5 


1000 


0.87 


24.6 


900 


2.5 


5000 


1200 


4000 


1800 


2000 


>360

5000 

200

300


3600 


0.5 


1000 


2.23 


63.2 


121

Summary of Contents for 48040F7B

Page 1: ...anual Number ECN MQIHTM01U1 2015332A Publishing System TPAS2 Access date 08 10 2015 Document ECNs Latest 48040F7B F7N H7N 68036H5N PELLERIN MILNOR CORPORATION POST OFFICE BOX 400 KENNER LOUISIANA 70063 0400 U S A ...

Page 2: ......

Page 3: ...h 3 Maintenance Guide Rubber Spring resting Tilt Washer extractor MQIHTM01EN 20120917 47 Deutsch 49 Wartung Gummifederlagerung kippbare Waschschleudermaschine MQIHTM01DE 20120917 95 中国的 97 维修保养 橡胶弹簧减震 倾斜式洗脱 机 MQIHTM01ZH 20120917 ...

Page 4: ......

Page 5: ...English 1 1 ...

Page 6: ......

Page 7: ... 20120917 Access Date 20120917 Depth Detail Custom n a Applicability IHT Language Code ENG01 Purpose publication Format 1colA Maintenance Guide Rubber Spring resting Tilt Washer extractor PELLERIN MILNOR CORPORATION POST OFFICE BOX 400 KENNER LOUISIANA 70063 0400 U S A 3 ...

Page 8: ...Applicable Milnor products by model number 48040H7N 68036H5N 4 ...

Page 9: ...nance 2 1 2 Safety Alert Messages Internal Electrical and Mechanical Hazards Document BIUUUS11 2 1 3 Safety Alert Messages Cylinder and Processing Hazards Document BIUUUS13 2 1 4 Safety Alert Messages Unsafe Conditions Document BIUUUS14 2 1 4 1 Damage and Malfunction Hazards 2 1 4 1 1 Hazards Resulting from Inoperative Safety Devices 2 1 4 1 2 Hazards Resulting from Damaged Mechanical Devices 2 1 ...

Page 10: ...mical tube fully below the machine inlet Figure 6 A Configuration that Prevents Flow in the Machine When the Pump is Off if the chemical tube and tank have no pressure 2 3 2 6 Prevent leaks Chapter 3 Routine Maintenance 3 1 Routine Maintenance Rubber Spring resting Tilt Washer extractor Document BIUUUM09 3 1 1 How To Show the Maintenance On a Calendar Table 1 Where to Put Marks On a Calendar 3 1 2...

Page 11: ...njector These are examples Your machine can look different Figure 12 Air Tube for the Water Level Sensor These are examples Your machine can look different Figure 13 Water Pressure Regulator for Chemical Flush These are examples Your machine can look different Figure 14 Steam Inlet Strainer These are examples Your machine can look different Figure 15 Compressed Air Inlet Strainers These are exampl...

Page 12: ...ber Spring resting Washer extractor see Supplement 4 Figure 23 Tilt Components On Each Side of Rubber Spring resting Washer extractor Hydraulic Tilt Supplement 5 How to Do a Test of the Mechanical Brake Figure 24 Example of Disk Brake Your machine can look different 3 1 7 Maintenance Components Hydraulic Power Group Document BIPPBM05 Figure 25 Hydraulic Power Components and System Oil Capacity Sup...

Page 13: ...nd which are in the families of machines defined below 1 1 1 Functional Description Washer extractors wash linen using water and nonvolatile chemicals and remove excess water by centrifugal force Rubber Spring resting Washer extractor models are suspended washer extractors with a housing in which the shell rests on rubber springs These models are for use in on premise laundry and industrial applic...

Page 14: ...rial no see the declaration for your machine Manufacturing date see the declaration for your machine is in conformity with the provisions of 2006 42 EC 17 May 2006 Machinery 2004 108 EC 15 December 2004 Electromechanical compatibility 2006 95 EC 12 December 2006 Low voltage Pellerin Milnor Corporation certifies that the machine s listed above manufactured in Kenner Louisiana 70063 USA conform s as...

Page 15: ...e responsibility of the installer owner of the machine s to ensure compliance with all requirements for on site preparation installation and operation Our conformance to the above listed standards is certified with exceptions listed in MILNOR Conformance Report see the declaration for your machine Place Kenner Louisiana 70063 USA Date of first issue of above mentioned machine type Signature Kennet...

Page 16: ...ng environment Therefore the owner user must do or ensure the following recognize all foreseeable safety hazards within his facility and take actions to protect his personnel equipment and facility work equipment is suitable properly adapted can be used without risks to health or safety and is adequately maintained where specific hazards are likely to be involved access to the equipment is restric...

Page 17: ... showing the source of electrical disconnect 2 1 1 2 Personnel Inform personnel about hazard avoidance and the importance of care and common sense Provide personnel with the safety and operating instructions that apply to them Verify that personnel use proper safety and operating procedures Verify that personnel understand and abide by the warnings on the machine and precautions in the instruction...

Page 18: ... 1 3 Safety Alert Messages Cylinder and Processing Hazards Document BIUUUS13 The following are instructions about hazards related to the cylinder and laundering process WARNING 3 Crush Hazards Contact with the turning cylinder can crush your limbs The cylinder will repel any object you try to stop it with possibly causing the object to strike or stab you The turning cylinder is normally isolated b...

Page 19: ...ne with any guard cover or panel removed exposes moving components Do not remove guards covers or panels 2 1 4 1 2 Hazards Resulting from Damaged Mechanical Devices WARNING 10 Multiple Hazards Operating a damaged machine can kill or injure personnel further damage or destroy the machine damage property and or void the warranty Do not operate a damaged or malfunctioning machine Request authorized s...

Page 20: ... absence of any other overriding standard WARNING 15 Confined Space Hazards Confinement in the cylinder can kill or injure you Hazards include but are not limited to panic burns poisoning suffocation heat prostration biological contamination electrocution and crushing Do not enter the cylinder until it has been thoroughly purged flushed drained cooled and immobilized End of BIUUUS27 BIUUUS06 Publi...

Page 21: ...ook specs Dates 20120917 20120917 20120917 Lang ENG01 Applic IHT 2 3 Prevent Damage From Chemical Supplies and Chemical Systems This document uses Simplified Technical English Learn more at http www asd ste100 org All Milnor washer extractors and CBW tunnel washers use stainless steel with the AISI 304 specification This material gives good performance when chemical supplies are correctly applied ...

Page 22: ...osilicic acid that stay on the stainless steel because they are not quickly flushed with water The book Textile Laundering Technology by Charles L Riggs gives data about correct chemical supplies and formulas 2 3 1 2 Incorrect Configuration or Connection of Equipment Many chemical systems do not prevent a vacuum in the chemical tube for example with a vacuum breaker when the pump is off do not pre...

Page 23: ...igure 3 Incorrect Configurations That Let the Chemical Supply Go In the Machine by a Siphon Schematic Views Legend P Pump T Chemical tank S The siphon occurs above here Liquid in the gray parts of the chemical tube and tank can go in the machine 19 ...

Page 24: ...the gray areas can go in the machine 2 3 2 Equipment and Procedures That Can Prevent Damage 2 3 2 1 Use the Chemical Manifold Supplied There is a manifold on the machine to attach chemical tubes from a chemical pump system Figure 3 shows examples The manifold has a source of water to flush the chemical supplies with water Figure 5 Examples of Manifolds for Chemical Tubes Your equipment can look di...

Page 25: ... after the pump stops 2 3 2 5 Put the chemical tube fully below the machine inlet It is also necessary that there is no pressure in the chemical tube or tank when the system is off Figure 6 shows this configuration Figure 6 A Configuration that Prevents Flow in the Machine When the Pump is Off if the chemical tube and tank have no pressure Schematic View Legend I Chemical inlet on the machine L Ch...

Page 26: ...r plant add the items in Section 3 1 2 to that schedule If not you can put marks on a calendar that work with the tables in Section 3 1 2 The marks are the numbers 2 3 4 5 and 6 It is not necessary to show the number 1 items you do each day on the calendar The number 2 items you do each 40 to 60 hours 3 each 200 hours 4 each 600 hours 5 each 1200 hours and 6 each 2400 hours These are the Mark numb...

Page 27: ...ions if necessary If the machine operates more than 12 hours each day do the day items two times each day Do the other items at the given hours or on the days that you show on a calendar see Section 1 Do all items in all tables for the maintenance intervals that apply for example day 40 to 60 hours and 200 hours Tip The sections that follow the maintenance summary give more data about the maintena...

Page 28: ... See Figure 10 and Section 2 3 Prevent Damage From Chemical Supplies and Chemical Systems x day self purging filter and regulator for compressed air See Figure 16 Make sure the bowl drains automatically x 200 hours filter element for the filter and reguator Replace the filter if you cannot remove contamination x 2400 hours strainer in water regulator for optional supply injector and pumped chemica...

Page 29: ...ecessary x 2400 hours hydraulic tank Remove used oil from the tank Add oil 68 Table 10 x 200 hours Disk brake reservoir See Figure 24 Examine the oil level and quality Add oil Dot3 Table 10 if necessary If the oil is contaminated it is necessary to bleed the brake system Speak to your dealer or Milnor This is not routine maintenance Table 5 Components that Become Worn Examine Tighten or replace if...

Page 30: ...e plate See Figure 20 and Section 3 1 4 2 x 200 hours seal Add 0 12 oz 3 6 mL of grease EPLF2 Table 10 x 200 hours rear bearing Add 0 3 oz 9 mL of grease EPLF2 x 200 hours front bearing Add 0 3 oz 9 mL of grease EPLF2 Other Grease Ports x 200 hours hydraulic door bushings See Figure 21 Add 0 06 oz 1 8 mL of grease EPLF2 Table 10 x 200 hours door latch plunger x 200 hours door open plunger See Figu...

Page 31: ...e Section 3 1 3 x 200 hours water pressure regulator for optional supply injector See Figure 11 Value 28 PSI 193 kPa x 200 hours water pressure regulator for chemical flush See Figure 13 Value 28 PSI 193 kPa x 200 hours compressed air mechanisms See Supplement 2 Figure 17 x 200 hours bath level sensor that uses air pressure Examine the air tube and connections See Figure 12 x 200 hours air pressur...

Page 32: ...intenance painted metal unpainted aluminum dust dirt grease frame members warm water with soap then water to flush Use clean cloths Do not get water in electrical components rubber dirt oil grease drive belts hoses warm water with soap then water to flush Use clean cloths Flush fully Oil or soap must not stay on drive belts Make sure that drive belts are serviceable clear plastic acrylic discolora...

Page 33: ...Procedures CAUTION 21 Risk of damage Hydraulic pressure can push out seals and push grease into unwanted areas example motor windings Use a hand grease gun A power grease gun gives too much pressure Know the quantity of grease your grease gun gives each cycle each stroke Operate the grease gun slowly 10 to 12 seconds for one cycle Add only the specified quantity Stop if new grease come out of a dr...

Page 34: ...ase with power removed from the machine If you must remove a guard to get access to the grease plate prevent access to the machine by other personnel If you obey these precautions use the Manual mode to operate the machine at wash speed Then add grease at the grease plate 3 1 4 3 Procedures for Motors If a motor on your machine does not have grease fittings no grease maintenance is necessary If a ...

Page 35: ...0 Hz and 1765 RPM at 60 Hz 5 NEMA IEC frame size Example 256T CAUTION 22 Risk of damage You can push grease into the windings and burn out the motor if you fail to remove the grease drain plugs If the motor has grease drain plugs remove them before you add grease If the motor has grease relief fittings it is not necessary to remove them Apply grease as follows 1 Operate the machine or use manual f...

Page 36: ...o hours Replace the drain plug Table 11 Motor Grease Intervals and Quantities Use grease EM Table 10 On Motor Nameplate see Figure 7 Interval Quantity NEMA IEC Frame Size RPM Less Than or Equal To Years Hours Fluid Ounces mL 900 5 5 11000 1200 4 5 9000 1800 3 6000 Up to 210 132 3600 1 5 3000 0 34 9 5 900 4 5 9000 1200 3 5 7000 1800 2 5 5000 210 to 280 132 to 180 3600 1 2000 0 65 18 4 900 3 5 7000 ...

Page 37: ... as shown in Figure 8 Look for worn pulleys as shown in Figure 8 With the machine in operation Do not touch the machine Look and listen A belt can have some vibration and not cause damage It is necessary to correct this condition only if the vibration is large A belt must have sufficient tension that there is no slippage on the pulley during operation If slippage occurs you can usually tell from t...

Page 38: ...essary Figure 9 Electric Box and Inverter These are examples Your machine can look different 30022X_ Washer extractor 48040F_ Washer extractor 76039 CBW Tunnel Washer Legend 1 Air filter 2 Fan on elecrtric box door Tip Put streamers in front of the fan to make sure the fan operates 3 Inverter cooling vanes and vents See caution statement 23 4 Braking resistor if applicable CAUTION 23 Risk of damag...

Page 39: ...ak to your dealer or Milnor if you see corrosion damage Figure 11 Soap Chute and Optional 5 compartment Supply Injector These are examples Your machine can look different Soap Chute Supply Injector Flush Water Adjustment Components Legend 1 Do not let chemical supplies stay on surfaces 2 Water pressure regulator See caution statement 25 3 Adjustment screw 4 Water pressure gauge 5 Strainer inside C...

Page 40: ...ducer 3 Air tube See caution statement 26 4 Air chamber CAUTION 26 Risk of malfunction The level sensor must give correct data Keep the connecting tube or hose free of blockages and leaks Make sure that the connections are tight Figure 13 Water Pressure Regulator for Chemical Flush These are examples Your machine can look different 64050E6N Washer extractor 76039CBW Tunnel Washer Legend 1 Water pr...

Page 41: ...2 Steam valve WARNING 27 Risk of severe injury You can accidentally release pressurized steam Close the external shutoff valve and release remaining pressure before you do maintenance Figure 15 Compressed Air Inlet Strainers These are examples Your machine can look different T Strainer Outside machine frame on some models T Strainer Inside machine frame on some models Y strainer Used on some model...

Page 42: ...tor Frequently you can hear a valve open and close When a signal from the controller to operate the mechanism occurs the air pressure must increase sufficiently before movement occurs When the signal stops the system must release the compressed air You can usually hear the sound of the exhaust air for a short time When a compressed air mechanism operates correctly its time of movement is usually l...

Page 43: ... Ball Valve Type Legend 1 Factory set needle valves to cause two air cylinders to move together Do not adjust 2 Quick exhaust valves 3 Position indicator Yellow when valve is open 4 Arrow position indicator Figure 18 Speed Sensor photoeye on Some Machines View of Cylinder Pulley and Speed Sensor Legend 1 Cylinder pulley cone 2 Bracket attached to bearing housing 3 Speed sensor photoeye The sensor ...

Page 44: ... circuit when a person or object operates the control Examples emergency stop button kick plate pull cord emergency stop button a red push button on a yellow field that locks when a person pushes it the electrical contacts stay open It is necessary to turn the button clockwise to unlock it A machine can have zero or more emergency stop buttons kick plate a metal plate on a shuttle conveyor that op...

Page 45: ...ush the start button 1 Do the test on a different emergency stop mechanism Continue until you do the test on all emergency stop mechanisms on the machine No An electrical component is defective Shut down the machine Do not let the machine operate until you correct the problem 3 1 6 Maintenance Components Large Extractors Document BIWUUM03 Figure 20 Grease Ports for Grease only Bearing Assembly Gre...

Page 46: ...fied intervals It is only necessary to replace them if there is an indication that they are damaged or very worn Examine the shock absorbers at the intervals given in the maintenance summary It is necessary to replace a shock absorber if you see oil come out from the mechanism see the figure that follows This shows that seals are worn It is also necessary to replace the shock absorber if the rubbe...

Page 47: ...ary to replace this component Speak to your dealer or Milnor This is not routine maintenance 2 If oil is present here the seals are worn Replace the shock absorber 3 If the rubber in a connector is very worn or missing replace the shock absorber Figure 23 Tilt Components On Each Side of Rubber Spring resting Washer extractor Hydraulic Tilt Lower Pivot for Hydraulic Cylinder Tilt Pivots With No Lub...

Page 48: ...d is too slow Extract speed will cause deterioration of the brake components that is not necessary 3 Look at the cylinder through the door glass or site glass 4 Push the Emergency Stop switch 0 Confirm that the cylinder stops in the time appropriate for the type of machine Divided cylinder and Staph Guard 4 seconds Open cylinder 10 seconds Note 1 On most machines there is no manual output for drai...

Page 49: ...l from the system in routine maintenance 2 Remove oil here 3 Level and temperature gauges 4 Tank is full when the level is here 5 Housing with oil filter 6 Hydraulic pressure gauge Supplement 6 How to Replace the Hydraulic Oil or Add Oil to the Full Mark If the drain and or the fill pipe on the tank has a quick disconnect fitting remove it if necessary to connect a hose After you complete the work...

Page 50: ... machine operates correctly the oil can get a brown color This condition is satisfactory Speak to your local hydraulic maintenance company if one or more of these oil conditions occur not transparent a brown to black color a gray to white color particles or bubbles a sour or burned odor Give the hydraulic company a sample of the oil to examine They can identify the type of deterioration and tell y...

Page 51: ...Deutsch 2 47 ...

Page 52: ......

Page 53: ...ernommen die in der nichtenglischen Version enthaltenen Informationen zu prüfen da diese vollständig durch Dritte erstellt wurde Milnor ist daher ausdrücklich nicht für inhaltliche oder formale Fehler haftbar und trägt keine Verantwortung für das Vertrauen auf oder die Folgen der Verwendung von Informationen in der nichtenglischen Version Milnor oder seine Vertreter oder Mitarbeiter sind in keinem...

Page 54: ...Gilt für die Milnor Produkte mit den folgenden Modellnummern 48040H7N 68036H5N 50 ...

Page 55: ...ninformationen 2 1 1 5 Wartung 2 1 2 Sicherheitswarnmeldungen Gefahren innerhalb der Elektrik und Mechanik Dokument BIUUUS11 2 1 3 Sicherheitswarnmeldungen Gefahren durch Trommel und Behandlungsvorgänge Dokument BIUUUS13 2 1 4 Sicherheitswarnmeldungen Gefährliche Bedingungen Dokument BIUUUS14 2 1 4 1 Gefahren durch Schäden und Fehlfunktionen 2 1 4 1 1 Gefahren durch betriebsunfähige Sicherheitsein...

Page 56: ... Abbildung 3 Falsche Konfigurationen die die Chemikalien Betriebsmittel aufgrund von Gravitation in die Maschine gelangen lassen 2 3 2 Ausrüstung und Verfahren die Schaden verhindern können 2 3 2 1 Die Benutzung des Chemikalien Sammelrohrs Abbildung 4 Beispiele für Sammelrohre für chemische Rohre Ihr Zubehör könnte anders aussehen 2 3 2 2 Leitung schließen 2 3 2 3 Lassen Sie kein Vakuum zu 2 3 2 4...

Page 57: ...die Daten in Abschnitt 3 1 4 3 verwenden Tabelle 8 Vorrichtungen und Einstellungen 3 1 3 Entfernung von Verunreinigungen Tabelle 9 Arten von Verunreinigungen Reinigungsmittel und Reinigungsverfahren 3 1 4 Kennzeichnung der Schmiermittel und Schmierverfahren Tabelle 10 Schmiermittelidentifikation 3 1 4 1 Umgang mit der Fettpresse 3 1 4 2 Verfahren für Lagerkomponenten im Verbindung mit einem Fettsc...

Page 58: ...ohr für den Wasser Sensor Dies sind nur Beispiele Ihre Anlage kann anders aussehen Abbildung 12 Wasserdruckregler für die Spülung mit Chemikalien Dies sind nur Beispiele Ihre Anlage kann anders aussehen Abbildung 13 Vorfilter für Dampfzulauf Dies sind nur Beispiele Ihre Anlage kann anders aussehen Abbildung 14 Druckluft Einlassfilter Dies sind nur Beispiele Ihre Anlage kann anders aussehen Abbildu...

Page 59: ... Waschschleudermaschine mit Gummifederlagerung siehe Ergänzung 4 Abbildung 22 Kippkomponenten auf jeder Seite der Waschschleudermaschine mit Gummifederlagerung Hydraulisches Kippen Ergänzung 5 Prüfung der mechanischen Bremse Abbildung 23 Beispiel einer Scheibenbremse Ihre Anlage kann anders aussehen 3 1 7 Wartung von Komponenten Hydraulikaggregat Dokument BIPPBM05 Abbildung 24 Hydraulische Leistun...

Page 60: ...Diese Modelle sind für Vor Ort Wäschereien und für Industrieanwendungen geeignet Einige dieser Modelle werden zum Be und Entladen gekippt 1 1 2 Maschinenkennzeichnung Modellnummer sowie sonstige Daten Ihrer Maschine befinden sich auf dem Typenschild das an der Maschine angebracht ist Siehe folgende Abbildung Ende BIUUUF01 BIWUUL01 Published Book specs Dates 20120917 20120917 20140619 Lang GER01 Ap...

Page 61: ...006 A1 2009 Sicherheit von Maschinen Elektrische Ausrüstung von Maschinen Teil 1 Allgemeine Anforderungen Die Sicherheitsuebereinstimmung mit den Standards ist im Milnor Handbuch siehe die Erklärung für Ihre Maschine beschrieben Dieses Schreiben bestaetigt dass die Maschine n lediglich den geforderten vorgenannten Standards entspricht entsprechen Es ist die Verantwortung der installierenden Firma ...

Page 62: ...e vorhersehbaren Gefahren innerhalb seines Arbeitsbereiches erkannt und Maßnahmen ergriffen werden um Personen Ausrüstungen und Arbeitsbereich zu schützen Arbeitsausrüstung und Betriebsmittel geeignet und angepaßt sind ohne Sicherheits oder Gesundheitsrisiken benutzt werden können und in angemessener Weise instandgehalten werden an Orten an denen bestimmte Gefahren zu erwarten sind der Zugang zu d...

Page 63: ...besondere die Stromversorgung siehe VDE Vorschriften Plazieren Sie Sicherheitshinweise an auffälligen Orten einschließlich Gefahrensymbole die auf elektrische Anschlüsse hinweisen 2 1 1 2 Personal Belehren Sie das Personal über Gefahrenvermeidung und die Wichtigkeit von Vorsicht und Vernunft Stellen Sie den Personen die für sie zutreffenden Sicherheits und Betriebsanleitungen zur Verfügung Vergewi...

Page 64: ...ut und benutzen Sie diese im Notfall um die Maschine zu stoppen 2 1 3 Sicherheitswarnmeldungen Gefahren durch Trommel und Behandlungsvorgänge Dokument BIUUUS13 Die folgenden Anweisungen betreffen Gefahren in Bezug auf die Trommel und den Waschvorgang WARNUNG 3 Quetschgefahr Berührung der drehenden Trommel kann Stoßverletzungen an Gliedmaßen hervorrufen Die Trommel stößt jeden Gegenstand zurück mit...

Page 65: ...ARNUNG 9 Verhakungs und Quetschgefahr Schutzgitter Abdeckungen und Seitenbleche Bei Betreiben der Maschine mit fehlenden Schutzgittern Abdeckungen und Seitenblechen sind sich bewegende Maschinenteile gegen Berührung ungeschützt Entfernen Sie keine Schutzgitter Abdeckungen oder Seitenbleche 2 1 4 1 2 Gefahren durch beschädigte Teile der Mechanik WARNUNG 10 Verschiedene Gefahren Das Betreiben einer ...

Page 66: ...chen und Stoßverletzungen hervorrufen Diese Teile bewegen sich automatisch Die Maschine darf ausschließlich von qualifiziertem und autorisiertem Personal instandgesetzt werden Sie müssen die Gefahrenquellen eindeutig verstanden haben und wissen wie Gefahren zu vermeiden sind Wenn eine Blockierung Verriegeln Ausschalten der Maschine in der Wartungsanleitung gefordert wird ist nach der gegenwärtigen...

Page 67: ... ihrer Position mit Schraube Mutter und den mitgelieferten Unterlegscheiben sichern Immer beide Stützen verwenden 3 Die Stromversorgung für die Maschine unterbrechen verschließen und mit Warnschild sichern Ende BIUUUS06 BIWUUI06 Published Book specs Dates 20120917 20120917 20140619 Lang GER01 Applic IHT 2 3 Vermeiden von Schäden durch chemische Betriebsmittel und Systeme All Milnor Waschschleuderm...

Page 68: ...Chlorbleiche Kieselfluorwasserstoffsäure die auf dem Edelstahl haften bleiben wenn sie nicht schnell mit Wasser weggespült werden Das Buch Textilwäsche Technologie von Charles L Riggs enthält Daten über korrekte chemische Betriebsmittel und Rezepturen 2 3 1 2 Falsche Konfiguration oder Verbindung von Geräten Viele Chemikalien Systeme verhindern Sie kein Vakuum in dem Chemikalien Rohr z B mit einem...

Page 69: ...ationen die die Chemikalien Betriebsmittel über ein Siphon in die Maschine gelangen lassen Schematische Ansichten Legende P Pumpe T Chemischer Tank S Der Siphon kommt hier vor Flüssigkeit in den grauen Bereichen des Chemikalien Rohrs und Tanks können in die Maschine gelangen 65 ...

Page 70: ...r Tank D Chemisches Rohr Flüssigkeit in den grauen Bereichen kann in die Maschine gelangen 2 3 2 Ausrüstung und Verfahren die Schaden verhindern können 2 3 2 1 Die Benutzung des Chemikalien Sammelrohrs Es gibt ein Sammelrohr an der Maschine das die Chemikalien Rohre vom Chemikalien Pumpsystem festmacht Abbildung 3 zeigt 3 Beispiele Das Sammelrohr hat eine Quelle an Wasser zum Spülen der chmischen ...

Page 71: ...ülen Sie das Rohr mit Wasser nachdem die Pumpe stoppt 2 3 2 5 Bringen Sie das chemische Rohr vollständig unter dem Maschinenzufluss an Es ist auch wichtig dass es keinen Druck in der Chemikalien Rohr oder dem Tank gibt wenn das System ausgeschaltet ist Abbildung 5 zeigt diese Konfiguration Abbildung 5 Eine Konfiguration die den Fluss in die Maschine verhindert wenn die Pumpe ausgeschaltet ist wenn...

Page 72: ...bschnitt 3 1 2 in diesen Plan ergänzen Anderenfalls auf einem Kalender die Punkte eintragen die zu den Tabellen in Abschnitt 3 1 2 gehören Die Markierungen sind die Ziffern 2 3 4 5 und 6 es ist nicht erforderlich Ziffer 1 tägliche Wartungsarbeiten im Kalender einzutragen Die Ziffer 2 steht für Wartungsarbeiten die alle 40 bis 60 Betriebsstunden ausgeführt werden Ziffer 3 steht für Wartungsarbeiten...

Page 73: ...5 46 47 48 49 50 51 52 53 54 55 56 57 58 59 60 Bis 40 2 2 2 2 3 2 2 2 2 3 2 2 2 2 4 2 2 2 2 3 2 2 2 2 3 2 2 2 2 6 41 60 2 2 3 2 2 2 3 2 2 6 Wiederholen 3 1 2 Wartungsüberblick Die Tabellen in diesem Abschnitt enthalten die Einträge für die routinemäßige Wartung der Maschine Jede Tabelle steht für eine bestimmte Prozedurart Beispiel Fett auf Lager und Buchsen auftragen Im Tabellenkopf finden Sie di...

Page 74: ...00 Stunden Befestigungselemente Befestigungselemente müssen fest sitzen x Tag Sicherheitsstützen Stangen und Stifte rot lackiert Sprechen Sie bezüglich Ersatzteilen mit Ihrem Händler oder Milnor x 200 Stunden Fundamentschrauben und Fundamentmörtel Abdichtung muss einwandfrei sein Schrauben müssen festgezogen sein x Tag Not Aus Mechanismus Siehe dazu Ergänzung 3 Einen Bedienungstest durchführen x 6...

Page 75: ...und Abschnitt 2 3 Vermeiden von Schäden durch chemische Betriebsmittel und Systeme x Tag selbstreinigender Druckluftfilter und regulator Siehe dazu Abbildung 15 Sicherstellen dass sich die Schüssel automatisch leert x 200 Stunden filter element for the filter and reguator Replace the filter if you cannot remove contamination x 2400 Stunden Sieb im Wasserregler für optionale Versorgung durch Injekt...

Page 76: ...ben x 2400 Stunden Hydrauliktank Altöl aus dem Tank entfernen Öl hinzugeben 68 Tabelle 10 x 200 Stunden Scheibenbremsbehälter Siehe dazu Abbildung 23 Ölstand und Öltemperatur prüfen Bei Bedarf Öl DOT3 Tabelle 10 auffüllen Wenn das Öl verunreinigt ist die Bremsanlage entlüften Wenden Sie sich an Ihren Händler oder an die Fa Milnor Dies ist keine Routinewartung Tabelle 5 Verschleißanfällige Komponen...

Page 77: ...unden Dichtung Mit 3 6 ml Fett EPLF2 schmieren Tabelle 10 x 200 Stunden Hinteres Lager Mit 0 3 Unzen 9 ml Schmierfett EPLF2 schmieren x 200 Stunden Vorderes Lager Mit 9 ml Fett EPLF2 schmieren Andere Schmierpunkte x 200 Stunden Hydrauliktürbuchse Siehe dazu Abbildung 20 Mit 0 06 Unzen 1 8 ml Schmierfett EPLF2 schmieren Tabelle 10 x 200 Stunden Türverriegelungskolben x 200 Stunden Türöffnungskolben...

Page 78: ... Abschnitt 3 1 3 x 200 Stunden Wasserdruckregulierer für optionalen Versorgungsinjektor Siehe dazu Abbildung 10 Wert 28 PSI 193 kPa x 200 Stunden Wasserdruckregler für die Chemikalienspülung Siehe dazu Abbildung 12 Wert 193 kPa 28 psi x 200 Stunden Druckluftvorrichtungen Siehe dazu Ergänzung 2 Abbildung 16 x 200 Stunden Füllstandssensor der Luftdruck nutzt Untersuichen Sie das Luftrohr und Verbind...

Page 79: ...me Seifenlösung anschließend mit Wasser spülen Saubere Tücher verwenden Kein Wasser auf Elektroteile gelangen lassen Gummi Schmutz Öl Fett Antriebsriemen Schläuche Warme Seifenlösung anschließend mit Wasser spülen Saubere Tücher verwenden Gründlich spülen Auf den Antriebsriemen dürfen sich weder Öl oder Seife ablagern Die Antriebsriemen müssen funktionsfähig sein Transparente Kunststoffe Acryl Ver...

Page 80: ...esse ACHTUNG 21 Gefahr von Beschädigungen Der Hydraulikdruck kann Dichtungen herausdrücken so dass Fett in unerwünschte Bereiche gelangt Beispiel Motorwicklungen Eine Handfettpresse verwenden Eine mechanische Fettpresse erzeugt einen zu hohen Druck Die Fettmenge ermitteln die die Fettpresse bei jedem Zyklus jedem Hub abgibt Die Fettpresse langsam betätigen 10 bis 12 Sekunden pro Zyklus Nur mit der...

Page 81: ...ei Sollte für den Schmiervorgang das Entfernen einer Schutzvorrichtung erforderlich sein sorgen Sie bitte dafür dass die Maschine in dieser Zeit keinen weiteren Personen zugänglich ist Unter Einhaltung dieser Vorsichtsmaßnahmen verwenden Sie Modus Manual um die Maschine mit Waschgeschwindigkeit zu betreiben Bringen Sie dann das Fett auf 3 1 4 3 Durchführung für Motoren Wenn ein Motor an der Maschi...

Page 82: ... 5 Rahmengröße nach NEMA IEC Beispiel 256T ACHTUNG 22 Gefahr von Beschädigungen Wenn die Schmiermittelablassschrauben nicht entfernt werden kann Fett in die Wicklungen eingepresst werden und den Motor verbrennen Wenn der Motor Schmiermittelablassschrauben hat diese herausdrehen und erst dann nachschmieren Wenn der Motor Schmiermittelentlastungsbohrungen mit Druckentlastung hat ist es nicht notwend...

Page 83: ...assschraube wieder einsetzen Tabelle 11 Motorschmierintervalle und Schmiermittelmengen Fett EM auftragen Tabelle 10 Am Motortypenschild siehe Abbildung 6 Intervall Schmiermittelmenge Rahmengröße nach NEMA IEC Drehzahl bis maximal Jahre Stunden Unzen Milliliter 900 5 5 11000 1200 4 5 9000 1800 3 6000 Bis zu 210 132 3600 1 5 3000 0 34 9 5 900 4 5 9000 1200 3 5 7000 1800 2 5 5000 210 zu 280 132 zu 18...

Page 84: ...g 7 suchen Auf verschlissene Riemenscheiben wie in Abbildung 7 achten Bei laufender Maschine die Maschine nicht berühren Anschauen und zuhören Ein Riemen kann eine gewisse Vibration aufweisen ohne Schäden zu verursachen Dieser Zustand muss nur korrigiert werden wenn starke Vibrationen auftreten Ein Riemen muss ausreichend gespannt sein damit er während des Betriebs nicht auf der Riemenscheibe ruts...

Page 85: ...r gegebenenfalls aus Abbildung 8 Schaltkasten und Umrichter Dies sind nur Beispiele Ihre Anlage kann anders aussehen Wäscher Schleuder 30022X Wäscher Schleuder 48040F Tunnelwaschanlage 76039 CBW Legende 1 Luftfilter 2 Gebläse an der Tür des Schaltschranks Tipp Vor das Gebläse Streamer stellen um die Funktion zu überprüfen 3 Umrichterkühlgebläse und Entlüftungsöffnungen Siehe dazu Vorsichtshinweis ...

Page 86: ...ler oder die Fa Milnor verständigen Abbildung 10 Soap Chute und Optionaler 5 Fach Versorgungs Injektor Dies sind nur Beispiele Ihre Anlage kann anders aussehen Waschmitteltrichter Versorgungs Injektor Spülwasser Bedienkomponenten Legende 1 Lassen Sie keine Chemikalien Betriebsmittel auf den Oberflächen zurück 2 Wasserdruck Regler Siehe Vorsichtshinweis 25 3 Einstellschraube 4 Wasserdruckmesser 5 I...

Page 87: ...tshinweis 26 4 Luftkammer ACHTUNG 26 Gefahr von Fehlfunktionen Der Schwimmersensor muss korrekte Daten anzeigen Die Anschlussleitung bzw den Schlauch frei von Leckstellen und Verstopfungen halten Die Verschraubungen müssen dicht sein Abbildung 12 Wasserdruckregler für die Spülung mit Chemikalien Dies sind nur Beispiele Ihre Anlage kann anders aussehen 64050E6N Wasserdruckregler Tunnelwaschanlage 7...

Page 88: ... Verletzungen Es kann versehentlich Dampf unter Druck austreten Das externe Absperrventil schließen und den Restdruck entspannen bevor Wartungsarbeiten durchgeführt werden Abbildung 14 Druckluft Einlassfilter Dies sind nur Beispiele Ihre Anlage kann anders aussehen T Vorfilter Bei einigen Modellen außerhalb des Maschinenrahmens T Vorfilter Bei anderen Modellen innerhalb des Maschinenrahmens Y Vorf...

Page 89: ... ein Signal von der Steuerung zur Betätigung der Vorrichtung eintrifft muss sich der Druck der Druckluft erst ausreichend aufbauen bevor die Bewegung ausgeführt wird Wenn das Signal stoppt muss das System die Druckluft entspannen In der Regel ist das Geräusch der ausströmenden Luft kurzzeitig zu hören Wenn eine druckluftbetätigte Vorrichtung einwandfrei funktioniert beträgt ihre Stellzeit in der R...

Page 90: ...k eingestellte Nadelventile zur gemeinsamen Bewegung von zwei Druckluftzylindern Nicht einstellen 2 Schnellablassventile 3 Positionsanzeige Gelb wenn Ventil geöffnet ist 4 Pfeil zur Richtungsanzeige Abbildung 17 Geschwindigkeitssensor Fotoauge bei einigen Maschinen Ansicht der Zylinderscheibe und des Geschwindigkeitssensors Legende 1 Zylinderscheibe konisch 2 Halterung am Lagergehäuse befestigt 3 ...

Page 91: ... die Steuerung bedienen Examples emergency stop button kick plate pull cord Not Aus Taste eine rote Drucktaste auf einem gelben Feld die arretiert wenn eine Person ihn drückt die elektrischen Kontakte bleiben geöffnet Die Taste muss zum Entsperren im Uhrzeigersinn gedreht werden Eine Maschine kann null oder mehr Not Aus Tasten haben Trittplatte eine Metallplatte auf einem Pendelband das einen Scha...

Page 92: ...ismus durhführen Fortfahren bis alle Not Aus Mechanismen in der Maschine geprüft wurden Nein Eine elektrische Komponente ist defekt Die Maschine ausschalten Die Maschine nicht laufen lassen bis das Problem behoben wurde 3 1 6 Wartung von Komponenten Große Schleudermaschine Dokument BIWUUM03 Abbildung 19 Schmiernippel für das nur zu schmierende Lagergehäuse Schmierplatte 01 10025X 01 10025Y oder 01...

Page 93: ...ann ausgetauscht werden wenn es Anzeichen für Schäden oder Verschleiß gibt Die Stoßdämpfer zu den in der Wartungsübersicht angegebenen Intervallen prüfen Ein Stoßdämpfer muss unbedingt ausgetauscht werden wenn Öl aus seinem Mechanismus läuft siehe nachfolgende Abbildung Diese zeigt dass die Dichtungen verschlissen sind Der Stoßdämpfer muss auch dann ausgetauscht werden wenn das Gummi in einem Ansc...

Page 94: ...48040_ Modell gezeigt Stoßdämpfer 68036_ Modell gezeigt Legende 1 Wenn Brüche in der Gummifeder auftreten muss diese Komponente ausgetauscht werden Wenden Sie sich an Ihren Händler oder an die Fa Milnor Dies ist keine Routinewartung 2 Wenn hier Öl vorhanden ist sind die Dichtungen verschlissen Replace the shock absorber 3 Wenn das Gummi in einem Anschluss sehr verschlissen ist oder fehlt den Stoßd...

Page 95: ...bei Betriebsstörungen eintreten Solche Fälle treten beispielsweise ein wenn die Betriebsspannung ausfällt und ein Stoppschalter gedrückt wird Damit die Maschine sicher betrieben werden kann diese Prüfung in den Abständen durchführen die im Wartungsplan vorgegeben sind 1 Wenn die Maschine Wäschegut enthält dieses entfernen 2 Eine Waschformel starten In der Waschsequenz einen Ablassvorgang auswählen...

Page 96: ...ser Fehler wiederholt reparieren lassen Wenden Sie sich an Ihren Händler oder an die Fa Milnor Dies ist keine Routinewartung Abbildung 23 Beispiel einer Scheibenbremse Ihre Anlage kann anders aussehen Ansicht der Bremseinheit und des Behälters Legende 1 Korrekter Flüssigkeitsstand Die Flüssigkeit bis zu dieser Markierung auffüllen wenn die Bremse angezogen oder nicht angezogen ist 3 1 7 Wartung vo...

Page 97: ... das Rohr oder die Entlüftung mit einer Kappe verschließen Ergänzung 7 Prüfung der Hydrauliköleigenschaften Bei Hydrauliköl ist mit zwei Arten von Alterung zu rechnen Verunreinigung und chemische Veränderungen Verunreinigungen lassen sich mit speziellen Filtern entfernen Um Schäden der Komponenten zu vermeiden beispielsweise durch Rost das Öl ersetzen wenn es sich chemisch verändert hat Etwa ein h...

Page 98: ...eich in dem sich Öl auf einer Maschinenfläche sammelt Die üblichen Symptome für eine Leckstelle durch die Luft in das System gelangt sind Das Öl im Ölbehälter enthält Luftbläschen Wenn die Hydraulik arbeitet erzeugt die Maschine ein Geräusch wie Kugellager in einem Rohr Ein Hydraulikleck muss repariert werden Wenden Sie sich an Ihren Händler oder an die Fa Milnor Dies ist keine Routinewartung Ende...

Page 99: ...中国的 3 95 ...

Page 100: ......

Page 101: ...ilnor has made no attempt to verify the information contained in the non English version as it was completely done by a third party Therefore Milnor expressly denies liability for errors in substance or form and undertakes no responsibiity for the reliance on or consequences of using the information in the non English version Under no circumstances shall Milnor or its agents or officers be liable ...

Page 102: ...适用的 Milnor 产品型号 48040H7N 68036H5N 98 ...

Page 103: ... 安全公告 滚筒转动过程中发生危险 文件 BIUUUS13 2 1 4 安全公告 其它不安全的情况 文件 BIUUUS14 2 1 4 1 机器损坏及故障危险 2 1 4 1 1 安全装置不工作导致的危险 2 1 4 1 2 受损的机械设备引发的危险 2 1 4 2 粗心使用引发的危险 2 1 4 2 1 粗心操作引发危险 对操作员工至关重要的 信息 参阅整本说明书中提到的操作者危险 2 1 4 2 2 粗心维保引发危险 对维保员工至关重要的 信息 查阅整本说明书中提到的维修危险 2 2 如何使用机器上的安全插销 文件 BIUUUS06 图 1 橡胶弹簧悬挂 液压倾斜系列洗衣 脱水机的安全架 2 3 防止皂液和皂液系统导致的损害 文件 BIWUUI06 2 3 1 皂液会怎样导致损害 2 3 1 1 危险的皂液和洗涤程式 2 3 1 2 不正确地配置或连接设备 图 2 使皂液可以通过虹吸管...

Page 104: ...2 3 2 6 防止泄漏 3 例行维护 3 1 例行维护 文件 BIUUUM09 3 1 1 如何在日历上显示维护日程 表 1 如何在日历上做标记 3 1 2 维护概要 表 2 护罩和相关组件 表 3 过滤器 滤网和敏感组件 表 4 液体容器 表 5 磨损的组件 表 6 轴承和衬套 参见电机的表 7 表 7 电机润滑日程 使用章节 3 1 4 3 中的数据填写本表 表 8 机构和设置 3 1 3 如何清除污染物 表 9 污染物类型 清洁剂和清洁程序 3 1 4 润滑剂标识和程序 表 10 润滑剂标识 3 1 4 1 润滑脂喷枪流程 3 1 4 2 维护连接润滑脂盘的轴承组件的程序 3 1 4 3 电机流程 图 6 电机润滑脂维护条件 表 11 电机润滑脂添加间隔和数量 使 用EM润滑脂 表 10 100 ...

Page 105: ...示例 您的机器可能与此不同 图 14 压缩空气入口过滤器 以下为示 例 您的机器可能与此不同 图 15 清除水汽和其他污染物的自净式 空气管道过滤器 以下为示例 您的 机器可能与此不同 附件 2 如何检查压缩空气机构 图 16 压缩空气机构 以下为示例 您 的机器可能与此不同 图 17 一些型号机器的速度传感器 光 电眼 图 18 接近开关以下为示例 您的机器 可能与此不同 附件 3 如何检测紧急停止机制 3 1 6 维护组件 大型脱水机 文件 BIWUUM03 图 19 只使用润滑脂的轴承组件的润滑 脂嘴 图 20 仓门润滑脂嘴 开仓型号以下为 示例 您的机器可能与此不同 附件 4 关于减震器 图 21 橡胶弹簧悬挂洗衣脱水机两侧的 悬挂组件 参见附件 4 图 22 橡胶弹簧悬挂洗衣脱水机各侧的 倾斜组件 液压倾斜 附件 5 如何检测机械制动器 图 23 盘式制动器示例 你的机器可能 与...

Page 106: ...ublished Book specs Dates 20120917 20120917 20150807 Lang CHI01 Applic IHT 1 2 一般内容EC 符合性声明书 制造商 Pellerin Milnor公司 我们在此声明 为以下信息独立承担责任 包括机器的 类型 参见您的机器的声明书 序列号 参见您的机器的声明书 制造日期 参见您的机器的声明书 符合以下规定 2006 42 EC 2006年5月17日 机械 2004 108 EC 2004年12月15日 机电兼容性 2006 95 EC 2006年12月12日 低电压 Pellerin Milnor公司证明 上述机器制造于美国路易斯安那州肯纳市 邮编70063 并符合 以下标准的验证程序 ISO 10472 1 1997 工业洗衣机械的安全要求 第1部分 一般要求 ISO 10472 2 1997 工业洗衣机械的安全...

Page 107: ...准的安全合规信息详见MILNOR手册 参见您的机器的声明书 本函仅为确认机器达到上述规定标准 机器的安装 所有者需要负责遵守关于现场准备 安 装和操作的所有规定 除了MILNOR符合性报告中列出的例外外 我们的机器符合上文列出的各项标准并得到认 证 参见您的机器的声明书 Place Kenner Louisiana 70063 USA 上述机器类型的首次发布日期 签名 Kenneth W Gaulter 工程经理 签名 Russell H Poy 工程副总裁 完 BIWUUL01 103 ...

Page 108: ...使用者 对提供安全的工作环境负有主要责任 因此 机器所有者 使用者必须做到或者确保达到以 下 对于厂房及设备的安全隐患进行识别并采取预防措施 保证员工 设备及设施的安全 设备适宜并安装正确 使用时对健康或安全无害 并进行定期的维护保养 如果可能有一定的危险性 只有操作人员允许靠近并使用设备 只有特别指定的员工可以对设备进行维修 改动或维护保养 提供信息 操作指引以及培训 征询工人及 或工人代表的意见 所运行的设备必须与以下要求相符 设备所有者 使用者必须确保设备的安装和维护足以满 足这些要求 控制系统必须可见 可识别并有标记 放置于危险区域之外 不会导致无意操作引发事 故 控制系统必须安全 发生故障或损坏时不会产生危险 设备运行稳定 保护工作设备 避免其开裂 采用防护装置 防止任何人员进入危险区域 或进入危险区域之前必须停止危险部件的 运行 防护装置必须结实并不易移动或拆除 不会产生二次危...

Page 109: ...安全指南和其他机器说明书里 有说明 安全警示牌必须保持清洁 防止上面的信息模糊 安全警示遗失或损坏后要立刻 更换 机器的安全指南及其它说明书必须随时可供相关工作人员查阅 查阅机器的维修保 养说明书来获取安全警示的零件编号 如需更换安全警示牌或说明书 请联系我们 2 1 1 5 维护保养 确保按照例行标准及定期维保计划对机器进行检修保养 在皮带 皮带轮 轴 轴套和密封压盖等零件严重损坏前就要及时更换 一旦发现明显的问题 必须及时查明原 因 并进行必要的修理 例如 滚筒 筒体 框架破裂 转动元件如电机 传动组件 轴承等磨损 弯曲 冒烟 过热 滚筒 筒体 轴承壳体弯曲破裂 密封胶条 进水管和进 水阀等漏水漏气 不允许没有维修资格的人员对机器进行维修保养 2 1 2 安全公告 机器内部电及机械危险 文件 BIUUUS11 贴在机器上的一张或者多张安全张贴 类似于下图 提示职员注意机器内的危险及电器...

Page 110: ...使用其他溶剂 洗涤时可使含有溶剂的布草挥发 出易燃蒸汽 洗涤过程中 不要用易燃溶剂 不要洗涤含易燃物质的布草 咨询当地的消防部门 公安局及保险公司 2 1 4 安全公告 其它不安全的情况 文件 BIUUUS14 2 1 4 1 机器损坏及故障危险 2 1 4 1 1 安全装置不工作导致的危险 危险 6 肢体被缠住及切断的危险 筒体门锁 门锁有故障的机器 在运行和 或开始运 行过程中导致筒体门被打开 而使旋转中的滚筒暴露出来 不要操作有明显损坏或故障的机器 警告 7 多样化危险 当安全保险装置失效时操作机器 可能使员工致死或受伤 损坏或 损毁机器 破坏财物和 或使保修失效 请不要损坏任何安全装置 安全装置出现故障时不可操作机器 寻求授权经销商的 服务 警告 8 电死或电灼伤危险 电气箱门 当电气箱门没锁上就操作机器时 会使电气箱 内部的高压元件暴露出来 这样就造成触电致死或致伤 不要打开电气...

Page 111: ... 仅按既定用途使用机器 清楚操作说明书的重要性 2 1 4 2 2 粗心维保引发危险 对维保员工至关重要的信息 查阅整本说明书中提到的维修危 险 警告 13 电死或电灼伤危险 触电可致死或致重伤 如果机器总电源没有切断 电气箱 内仍然有电 只有经过资格确认及授权的人员才可对机器进行维修 你必须清楚所有危险及懂得 如何避免这些危险 遵循通用OSHA 标准 当维修说明文件里要求停止机器工作才进行时 在美国境外 如果没有要求遵循其他更重要的标准时 则遵循OSHA标准 警告 14 肢体缠住及碾压危险 运转的零部件通常有防护栏 盖板 和面板隔离开 接 触可能会使肢体被缠住或碾压 这些零部件通常是自动运转的 只有经过资格确认及授权的人员才可对机器进行维修 你必须清楚所有危险及懂得 如何避免这些危险 遵循通用OSHA 标准 当维修说明文件里要求停止机器工作才进行时 在美国境外 如果没有要求遵循其他更重要...

Page 112: ...向下滑动的危险 除非安装了 并且为机器断电 挂牌 否则不得在升起的下工作 除非安装了 否则 不得在机器通电时在升起的附近工作 使用本文件规定的流程安装这些安全组件 保持这些安全组件处于良好状况 规定一处安全方便的地方 在不使用这些安全组件 的时候储存它们 图 1 橡胶弹簧悬挂 液压倾斜系列洗衣脱水机的安全架 按以下方法安装安全 1 在控制器处 2 参考附图 始终使用两个 3 为机器电源上锁 挂牌 完 BIUUUS06 BIWUUI06 Published Book specs Dates 20120917 20120917 20150807 Lang CHI01 Applic IHT 2 3 防止皂液和皂液系统导致的损害 所有Milnor 洗衣脱水机和CBW 洗衣龙均使用符合AISI 304标准的不锈钢材料 该材料在 正确使用皂液时具备很好的性能 但如果错误使用皂液 则可能导致该材料受损 ...

Page 113: ...器或机器中的布草造成的损害负责 2 3 1 皂液会怎样导致损害 2 3 1 1 危险的皂液和洗涤程式 一些可能导致损害的例子包括 非常高浓度的氯漂白剂 乙酸和次氯酸盐混合物 由于不能被水快速冲走而会留在不锈钢上的皂液 例如 氯漂白剂 氟硅酸等 由Charles L Riggs 撰写的 纺织品洗涤技术 提供了有关正确皂液和程式的数据 2 3 1 2 不正确地配置或连接设备 很多皂液系统 不能防止在泵关闭的情况下皂液管内出现真空 例如 配备真空断路器 也没有在皂液管进入机器的位置设置断流措施 例如 阀门 如果皂液能够在皂液系统关闭的情况下进入机器 就可能会造成损害 一些组件配置可能 让皂液通过虹吸管进入机器 图 2 另一些配置则可能让皂液在重力作用下进入机器 图 3 109 ...

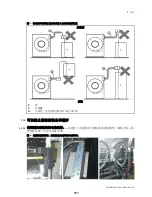
Page 114: ...2 安全 PELLERIN MILNOR CORPORATION 图 2 使皂液可以通过虹吸管进入机器的错误配置 示意图 标注 P 泵 T 皂液罐 S 虹吸作用在这里发生 皂液罐和皂液管灰色区域的液体可以进入机器 110 ...

Page 115: ... 安全 PELLERIN MILNOR CORPORATION 图 3 使皂液可以通过重力作用进入机器的错误配置 示意图 标注 P 泵 T 皂液罐 D 皂液管 灰色区域的液体可以进入机器 2 3 2 可以防止损害的设备和程序 2 3 2 1 使用随机器提供的皂液歧管 在歧管上设有连接皂液泵系统的皂液管 如图3所示 歧 管装有水源 可用水冲洗皂液 图 4 皂液管歧管示例 您的设备外观可能与此不同 111 ...

Page 116: ... 在皂液管线内安装高于储罐满液位的真空断路器 2 3 2 4 用水冲洗皂液管 如果留在皂液泵和机器之间的管道内的液体可能流入机器 则应在 皂液泵停止运行后用水冲洗该管道 2 3 2 5 让皂液管位置完全低于机器入口位置 同时 还需要保证在系统关闭时 皂液管和皂 液罐内没有压力存在 图 5展示了这种配置 图 5 可以在皂液泵关闭状态 如果皂液管和皂液罐内没有压力 下防止皂液流入机器的配置 示意图 标注 I 机器上的皂液入口 L 皂液管 P 泵 T 皂液罐 2 3 2 6 防止泄漏 在维护皂液泵系统时 使用正确的组件 确保所有接头都安装正确 确保所有连接紧固 完 BIWUUI06 112 ...

Page 117: ...遵守其他本地标准要求 更换在维护中拆卸的护罩和面板 3 1 1 如何在日历上显示维护日程 如果您使用软件管理工厂的维护日程 可以将章节 3 1 2中的项目加入该日程 如果您并未 使用软件 您可以在日历上根据章节 3 1 2的表格做出标记 标记分别为数字2 3 4 5和 6 没有必要在日历上标出数字1 每天执行的维护项目 数字2 每40 60小时需要维护 的项目 3 每200小时 4 每600小时 5 每1200小时 6 每2400小时 这些数字就 是章节 3 1 2各表左侧窄列顶部的 标记 数字 表 1展示了应将标记填入日历何处 例如 如果您的机器每周运行41 60小时 则前三个标 记为2 2和3 分别将这些标记填入机器开始运行后的第1 第2和第3周 如果您在每周特 定一天进行定期维护 则将标记填入该周当日 继续在后续各周上做出标记 也可能每周 有必要多次进行40 60小时 2 的维护 如...

Page 118: ...38 39 40 41 42 43 44 45 46 47 48 49 50 51 52 53 54 55 56 57 58 59 60 40以下 2 2 2 2 3 2 2 2 2 3 2 2 2 2 4 2 2 2 2 3 2 2 2 2 3 2 2 2 2 6 41 60 2 2 3 2 2 2 3 2 2 6 重复 3 1 2 维护概要 本章内的表格规定了您的机器的定期维护项目 每个表格用于一种类型的程序 例如 为 轴瓦和衬套加润滑脂 表的顶部列出了一般流程 更多数据 列给出了必要的特殊指示 如果机器每天运行超过12小时 则应每天开展两次 每日 维护项目 在日历规定的指定 日期或制定小时数时维护其他项目 参见第1章 当达到维护间隔 例如 每日 40 60 小时和200小时 时 应对所有表中列出的所有适用项目进行维护 温馨提示 维护概要后的章节给出了有关维护项目的更多信息 当您了解该...

Page 119: ...00小时 一些型号的水压调节器中安 装了过滤器 用于可选的喷 射器和泵送皂液 参见图 10 x 200小时 进气口过滤器 参见图 14 x 200小时 蒸汽入口过滤器 在一些 型号中 蒸汽为可选功能 参见图 13 x 200小时 速度传感器 光电眼 参见图 17 x 2400小时 接近开关 参见图 18 x 1200小时 液压油罐的液压油过滤器 参见图 24 使用新品更换旧品 请与经销 商或Milnor联系 表 4 液体容器 检查 必要时添加液体 保持组件清洁以避免损坏 Mark 1 2 3 4 5 6 频率 组件 更多数据 参见章节 3 1 4 润滑剂标识和 程序 x 每日 参见图 24和附件 6 检查油位和温度 如 果需要加入68号油 表 10 如果温度高 于130 F 54 C 或油受到污染 则必 须进行维护请与经销商或Milnor联系 x 600小时 参见附件 7 检查液压油是否受...

Page 120: ...盘01 10025X 如果您的机器有该润滑脂盘 则使用本数据 参见图 19和章节 3 1 4 2 x 200小时 密封 加入0 18盎司 5 4毫升 EPLF2润滑脂 表 10 x 200小时 后轴承 加入0 3盎司 9毫升 EPLF2润滑脂 x 200小时 前轴承 加入0 6盎司 19毫升 EPLF2润滑脂 轴承外壳的润滑脂盘01 10025Y 如果您的机器有该润滑脂盘 则使用本数据 参见图 19和章节 3 1 4 2 x 200小时 密封 加入0 12盎司 3 6毫升 EPLF2润滑脂 表 10 x 200小时 后轴承 加入0 3盎司 9毫升 EPLF2润滑脂 x 200小时 前轴承 加入0 3盎司 9毫升 EPLF2润滑脂 其他润滑脂嘴 x 200小时 液压门衬套 参见图 20 加入0 06盎司 1 8毫升 EPLF2 润滑脂 表 10 x 200小时 门阀柱塞 x 200小时 开门...

Page 121: ...性能降低 Mark 1 2 3 4 5 6 频率 组件 更多数据 x 2400小时 控制器电路 检查电气箱的接线和接头 寻找是否有腐蚀 或松动的接头 参见章节 3 1 3 x 200小时 可选供液喷射器的水压调节 器 参见图 10 读数值 28磅 平方英寸 193千 帕 x 200小时 冲洗皂液的水压调节器 参见图 12 读数值 28磅 平方英寸 193 千帕 x 200小时 压缩空气装置 参见附件 2 图 16 x 200小时 使用空气压力的浸泡层传感 器 检查空气管和接头 参见图 11 x 200小时 轴承外壳的空气压力 参见图 15 读数值 10磅 平方英寸 69千 帕 x 200小时 液压管线压力 参见图 24 运行中合适的最大压力为700 磅 平方英寸 48巴 117 ...

Page 122: ... 然后用水冲洗 用清洁的抹布擦拭 不要让水进入电气组件 橡胶 污垢 油渍 油 腻 驱动带 软管 用热水和肥皂清洗 然后用水冲洗 用清洁的抹布擦拭 彻底冲洗 驱动带上不能 留有油渍或肥皂 保证驱动带适于使用 透明塑料 亚力克 褪色 发黄 压缩空气滤罩 可视流量表 用热水和肥皂清洗 然后用水冲洗 再使 用亚力克清洁剂 不 得使用氨水 只使用必要的清洁剂 洗涤和冲洗后使用清 洁 柔软的抹布擦拭 遵守亚力克清洁剂的指 示 玻璃 褪色 发黄 门玻璃 各部位 玻璃 用氨水的水溶液清 洗 用水冲洗 再使 用丙酮清洗 使用清洁 柔软的抹布擦拭 仅使用必要的清 洁剂 必要时浸泡在清洗机内清洗 软空气过滤器 纤毛 过滤器 灰尘 纤毛 在变频器电气箱 门上 在空气管 路滤罩内 在干 燥器中 车间真空吸尘器 在真空吸尘器不能清除污染物时 使用新过滤 器更换旧过滤器 刚性过滤器 水和蒸 汽的滤网 矿物颗粒 水管路内...

Page 123: ...排放口或其他开口溢出 则停止添加 去除皮带和皮带轮上溢出的润滑脂 表内规定了润滑脂的添加量 单位为液量盎司和毫升 您还可以使用润滑脂喷枪周期 行 程 为单位 一轮周期表示您拉动扳机一次 一轮喷射量通常约为0 06盎司 1 8毫升 您的润滑脂喷枪实际喷射量可能多于或少于这一标准 使用以下方法测量润滑脂喷枪的输 出量 1 确保润滑脂喷枪可以正常运行 2 操作润滑脂喷枪 将润滑脂喷入具有液量盎司或毫升量标的小型容器 缓慢并完全拉动 扳机 3 喷入足够的润滑脂以精确测量 记录润滑脂喷枪的轮数 拉动扳机的次数 4 计算润滑脂喷枪每轮喷射的润滑脂量 示例 2盎司 64轮 每轮0 031盎司 示例 59毫升 64轮 每轮0 92毫升 3 1 4 2 维护连接润滑脂盘的轴承组件的程序 您的机器外壳或内壳有一个润滑脂盘 您需要在 这里加入轴承外壳组件的润滑脂 正确的程序是当机器以洗涤速度旋转时加入润滑脂 但...

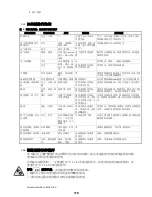
Page 124: ...尺寸和速度的电机的润滑脂添加间隔和添加量 您可以从电机铭牌上获得这些数据 使用表 7 在节 3 1 2记录您机器上电机的数据 图 6 电机润滑脂维护条件 润滑脂嘴和润滑脂减压口 润滑脂嘴和润滑脂排放塞 电机铭牌 润滑脂嘴 无减压或排放塞 标注 1 润滑脂嘴 2 润滑脂减压口 不要拆除 3 润滑脂排放塞 首先拆除 4 电机转速 转 分 本例为50赫兹1464 转 分 60赫兹1765转 分 5 NEMA IEC 框架尺寸 例如 256T 警告 22 损坏风险 如果您未能拆下润滑脂排放塞 您可能会将润滑脂挤入绕组并烧毁 电机 如果电机具有润滑脂排放塞 则应在添加润滑脂前将其拆下 如果电机具有润滑脂 减压嘴 则没有必要将其拆下 按以下方法添加润滑脂 120 ...

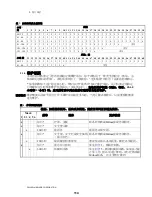
Page 125: ...换排放塞 表 11 电机润滑脂添加间隔和数量 使用EM润滑脂 表 10 在电机铭牌上 参见图 6 间隔 数量 NEMA IEC 框架尺寸 转速小于等于 转 分 年份 小时 液量盎司 毫升 900 5 5 11000 1200 4 5 9000 1800 3 6000 最多210 132 3600 1 5 3000 0 34 9 5 900 4 5 9000 1200 3 5 7000 1800 2 5 5000 210到280 132 到180 3600 1 2000 0 65 18 4 900 3 5 7000 1200 3 6000 1800 2 4000 280到360 180 到200 3600 0 5 1000 0 87 24 6 900 2 5 5000 1200 2 4000 1800 1 2000 360到5000 200到300 3600 0 5 1000 2 23 63...

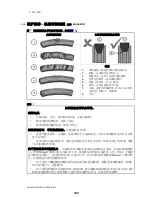
Page 126: ... 附件 1 如何检查皮带和皮带轮 在断电后 寻找污垢 灰尘 油污和润滑脂 去除污染物 检查皮带损坏情况 如图 7所示 检查皮带轮磨损情况 如图 7所示 在机器运行时 不得触碰机器 目测和耳听检查 皮带可能会存在一定振动 这种振动不会造成损害 只有在振动幅度过大时才有必 要予以纠正 皮带必须具备足够张力 保证皮带轮在运行时不会打滑 如果存在打滑现象 通常 可以通过噪音发现 关于更换组件和调整张力 为保证组件的服务寿命以及机器运行寿命 必须正确调整张 力 您的Milnor经销商可以完成这项工作 如果您知道如何完成这项工作 例如 正确对 齐皮带和皮带轮 并且您希望自行完成该工作 您可以联系经销商或Milnor以了解零件 号 在调整张力前更换磨损组件 对于使用全螺纹螺杆和螺母固定电机底座位置的机器 根据需要旋转螺杆上的螺 母以调节张力 拧紧螺母 对于使用弹簧保持电机底座张力的机器 使用随机器提供的...

Page 127: ...脱水机 76039 洗衣龙 标注 1 空气过滤器 2 电气箱门上的风扇 提示 在风扇前方系上飘带 以确定风扇正常运行 3 变频器冷却叶片和通风口 参见警告说明 23 4 制动电阻 如适用 警告 23 损坏风险 气流速度不够时 变频器可能烧毁 保持风扇 过滤器 变频器和制动电阻清洁 图 9 皂液泵系统的皂液歧管入口 参见警告说明 24 以下为示例 您的机器可能与此不同 36026V7J 60044WP2 76039CBW 警告 24 机器和布草受腐蚀的风险 只能将皂液管连接至皂液歧管入口 组织泄露 从表面上去除泄露的皂液 如果发现腐蚀损害 请与经销商或Milnor联系 123 ...

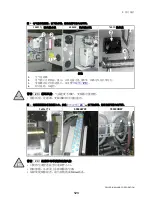
Page 128: ...整组件 标注 1 不要让皂液留在斜槽表面 2 水压调节器 参见警告说明 25 3 调节螺丝 4 水压计 5 内侧过滤器 警告 25 受伤和损坏风险 如果水压过高 皂液可能会溅洒到人员和机器表面 确保压力设置在维护总数规定的水平 图 11 水位传感器的空气管 以下为示例 您的机器可能与此不同 30022T5E型洗衣脱水机 42044SP2型洗衣脱水机 36030F8_型洗衣脱水机 30022V6J型洗衣脱水机 标注 1 液位开关 2 压力传感器 3 空气管 参见警告说明 26 4 空气室 警告 26 故障风险 液位传感器的数据必须正确 保证连接管或软管没有阻塞或泄露 124 ...

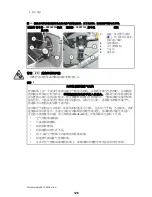
Page 129: ...压调节器 2 水压表 3 参见警告说明 28 拆下插头以拆除过滤 器 图 13 蒸汽入口过滤器 以下为示例 您的机器可能与此不同 42044SP2洗衣脱水机 76039CBW洗衣龙 标注 1 蒸汽过滤器 在拆下插 头前先释放蒸汽压力 参见警告说明 27 2 蒸汽阀 警告 27 严重受伤风险 您可能会意外放出高压蒸汽 在维护前关闭外部切断阀并释放剩余压力 图 14 压缩空气入口过滤器 以下为示例 您的机器可能与此不同 T形过滤器 部分型号的过滤器位 于机器框架外 T形过滤器 部分型号的过滤器 位于机器框架内 Y形过滤器 部分型号使用 标注 1 参见警告说明 28 拔下插头以拆除过滤器 2 压缩空气入口 125 ...

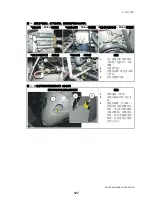
Page 130: ...余压力 附件 2 如何检查压缩空气机构 您的机器上有一个或多个依靠压缩空气移动的机构 在检查压缩空气机构时 应目测检 查机构并听其运行时的声音 不得接触机构或将手放入机器内 通常您可以直接看到或 在位置指示器上看到运行情况 您会频繁听到阀门开闭的声音 当控制器发出操作机构 的信号时 气压必须充分增加才能引起移动 在信号停止时 系统必须释放压缩空气 您通常可以听到短时间排气的声音 在压缩空气机构运行正常时 其移动时间通常小于2秒 运行应当平稳 不会摇动 改变 速度或在移动中停止 不能正常运行的机构将导致性能变差 如果机构不能正常运行 并且您不能修复该问题 请与经销商或Milnor联系 可能的原因包括以下几项 空气管阻塞或泄露 气流控制阀磨损 机构组件磨损 向机器供应的气压不足 用于去除空气管路中污染物的组件被阻塞 快速排气阀或排气管被阻塞 在具有空气管路润滑器的机器上 故障或错误调整导致无法...

Page 131: ...Milnor滚筒型 气动排水阀 Milnor滚筒型 气动带式制动器 Milnor滚筒型 气动水和蒸汽阀 斜角型 气动水阀 球阀型 标注 1 出厂设置的针阀导致两 个滚筒一起移动 不得 调整 2 快速排气阀 3 位置指示器 黄色表示阀 门开启 4 箭头位置指示器 图 17 一些型号机器的速度传感器 光电眼 筒体滑轮和速度传感器视图 标注 1 筒体滑轮 锥形 2 安装在轴承外壳上的支 架 3 速度传感器 光电眼 传感器可以看到锥体上 的孔 然后向控制器发 出脉冲数据 如果镜头 积灰 那么本数据可能 错误 此时将发生错误 并停止运行 127 ...

Page 132: ...紧急停止机制 手动控制开关 当有人或物操作开关时 将会断开3线电路 示例 紧急 停止按钮 踢脚板 拉绳 紧急停止按钮 黄底红色按钮 当按下时会被锁住 电路接头保持断开 必须顺时针 旋转按钮才能将其解锁 一台机器可能没有或有多个紧急停止按钮 踢脚板 穿梭输送机上的一块金属板 当某一物体对该板施加足够压力时 则会启动一 个开关 踢脚板通常是穿梭输送机上最先接触到穿梭输送机路径中物体的组件 所有 在某一路径上左转 右转的Milnor穿梭输送机 都会在机器两侧设有踢脚板 警告 29 即使您首先与踢脚板接触 您也可能会因被穿梭输送机撞击而死亡或受重 伤 不得在穿梭输送机运行时检测踢脚板 拉绳 输送机上的一根拉绳 当某人拉动该绳时会启动一个开关 所有Milnor独立输送机 即并非大型机器组件的输送机 在其两侧都设有拉绳 按以下方法对机器上的所有紧急停止机制进行检测 1 为机器通电 M 2 按下启动按钮...

Page 133: ...1 10025X 01 10025Y或01 10025Z 标注 1 密封润滑脂嘴 2 后轴承润滑脂嘴 3 前轴承润滑脂嘴 4 润滑脂盘零件编号 一定 要根据您机器上的润滑 脂盘型号使用润滑脂 01 10025X 01 10025Y 或01 10025Z 图 20 仓门润滑脂嘴 开仓型号以下为示例 您的机器可能与此不同 门铰链 使用手动门的型号 门柱 使用液压门的型号 锁门柱塞 大多 数型号 开门柱塞 少数 型号 标注 1 润滑脂嘴 一个位置 某些机器必须打开仓门 才能到达 2 润滑脂嘴 三个位置 3 无需润滑 4 在柱塞表面用一薄层润 滑脂 附件 4 关于减震器 使用橡胶弹簧悬挂的Milnor洗衣脱水机也配备了减震器 这些减震器的连接方式与汽车不 同 没有必要按照固定周期更换减震器 只需要在有迹象显示减震器受损或磨损严重时 129 ...

Page 134: ...器 减震器损坏将导致内壳在机器运行时过多移动 如果出现了严重的移动 并且你不确定 原因 则可以按以下方法测试减震器 1 从机器上拆下减震器 2 将减震器放在硬质地面上 用力下压减震器 可用的减震器应当缓慢压缩 同时当你 放开时 会缓慢回弹到初始长度 如果压缩或反弹过快 则表明减震器损坏 图 21 橡胶弹簧悬挂洗衣脱水机两侧的悬挂组件 参见附件 4 橡胶弹簧 每侧两个 减震器 48040_系列型号 减震器 68036_系列型号 标注 1 如果橡胶弹簧破裂 则表明有必要更换该组件 请与经销商或Milnor联系 这并非例行维 护 2 如果在这里看到油迹 则表示密封受损 更换减震器 3 如果接头内的橡胶部分磨损或丢失 更换减震器 130 ...

Page 135: ...住滚筒 尽管机械制 动器通常不能在运行时停止滚筒 参见注 2 但在发生特殊情况时需要使用 例如当电 源断电时和按下停止开关时 为确保机器能够安全运行 应按照维护日程中给出的间隔 进行检测 1 如果机器中有布草 将其取出 2 运行洗衣程序 将程序快进到排水 参见注 1 你必须在滚筒处于排水速度时运行 测试 洗涤速度过慢 而脱水速度将导致制动组件产生不必要的磨损 3 通过仓门玻璃或观察窗观察滚筒 4 按下紧急停止开关 0 确认滚筒停止时间符合该类型机器标准 分体式滚筒和Staph Guard 4秒 开放式滚筒 10秒 注 1 绝大多数机器不能提供手动输出的排水速度 如果你的机器在手动模式下能输出排水速度 则可以直接使用该速度 不必启动洗衣程序 如果滚筒未能在给定的时间内停止 则必须进行维修 请与经销商或Milnor联系 这并 非例行维护 警告 31 损坏风险 如果操作员错误地使用制动组件停止自...

Page 136: ...维护 图 23 盘式制动器示例 你的机器可能与此不同 制动组件和制动液罐视图 标注 1 正确的液位 无论制动是否在使用中 你都可以将制动液加到这个位置 3 1 7 维修组件 液压动力组 文件 BIPPBM05 图 24 液压动力组件和系统液压油容量 液压动力组件 标注 1 注油嘴 在这里注入液压油 油罐容量 15 5加仑 59升 系统总容量 17加仑 64升 你在定期维护时不能完全放空 系统中的所有油 2 这里放出液压油 3 液位和温度计 4 液位达到这里时 表示油罐已满 5 外壳和滤油器 6 液压压力计 附件 6 如何更换液压油或补满液压油 如果油罐上的排油及 或注油管具有快速断开接头 则在必要时将其拆下以连接软管 在 完成工作后 将接头或封盖装回排油 注油管上 排出已使用的油 132 ...

Page 137: ...两种原因导致变质 污染和化学变化 您通常可以使用特殊过滤器去除污 染物 为避免对组件造成损害 例如 生锈 有必要在发生化学变化时更换液压油 用杯子从油罐的排油管接出大约一品脱 半千克 油 如果液压油是新的 则应当为透 明琥珀色 并没有污染 在机器正常运行时 油可能会变为褐色 这种状况是可以接受 的 如果润滑油符合以下任一状况 请联系您本地的液压维护公司 不透明 黑褐色 灰白色 颗粒物或气泡 酸味或烧焦的气味 为液压公司提供一份液压油样品进行检验 他们可以找出变质的原因 并告诉您正确的 处理程序 如果可以使用特殊过滤器清除污染物 则他们可以提供必要的设备 附件 8 如何检测液压系统的泄露 警告 32 中毒危险 高压力下泄露的液压油可能会穿透您的皮肤 进入您的体内 甚 至致人死亡 不得用手指检测组件是否存在液压泄露 液压系统的泄露包括液压油泄露或空气泄漏 如果出现高压油泄露 您通常会看到油渍 ...

Reviews: