background image

37091/04 – ch20 (Issued: 2020-06)

CliniMACS® Plus System User Manual (Canadian edition)

4 – STEP


1: CliniMACS® CD19 Reagent

IV.  Preparation of leukapheresis product

The  following  sections  describe  the  recommended  procedure 

for  the  preparation  of  the  leukapheresis  product  using  the 
Terumo Sterile Connection Device (TSCD).

-  The operator must be familiar with the operation and use of 

the TSCD.

-  Before  starting  the  cell  labeling  and  separation  procedure 

ensure that all needed supplies and equipment are available.

Analysis

Before starting the preparation of the leukapheresis product the 
following parameters should be determined:

-  Total number of leukocytes
-  Percentage of CD19 positive cells
-  Total number of CD19 positive cells
-  Viability

Recheck  the  parameters  after  the  labeling  procedure.  This  is 
necessary  because  the  following  three  sample  parameters 
have  to  be  entered  in  the  software  during  the  setup  of  the 
CliniMACS Plus Instrument prior to loading the tubing set onto 
the instrument:

-  Concentration of leukocytes per mL
-  Percentage of CD19 positive cells
-  Final volume of the cell sample (sample loading volume)

Other tests might be required depending on the intended use 
of the cells. Record all data.

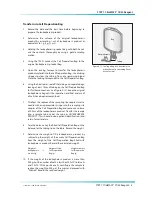
Important


All  bag  handling  should  be  done  in 
a  sterile  environment  (e.g.  laminar 
flow hood) using aseptic techniques. 
The  connection  of  tubing  using  the 
TSCD may be performed outside the 
laminar flow hood.


Perform  sample  preparation  and 
cell  separation  at  room  temperature 
(+19 °C to +25 °C [+66 °F to +77 °F]). 
Lower or higher ambient temperature 
will  result  in  less  purity  and  yield  of 
the target cells.

Summary of Contents for CliniMACS Plus System

Page 1: ...ge of pages Date Signature Delivery no Exchange of pages Date Signature Delivery no Exchange of pages Date Signature Delivery no Exchange of pages Date Signature Delivery no Exchange of pages Date Sig...

Page 2: ...ystem User Manual Canadian edition Software 2 4x Miltenyi Biotec B V Co KG Friedrich Ebert Stra e 68 51429 Bergisch Gladbach Germany Miltenyi Biotec Technical Support 49 2204 8306 8484 49 2204 8306 80...

Page 3: ...us Instrument CliniMACS CD34 Reagent CliniMACS Tubing Set CliniMACS Tubing Set LS CliniMACS Depletion Tubing Set and CliniMACS PBS EDTA Buffer Only those products which are included in the ARTG may be...

Page 4: ...8 General set up menus 17 1 3 9 Cleaning 19 1 3 10 Maintenance 19 1 3 11 Instrument disposal 19 2 Glossary 1 2 1 Glossary of symbols 1 2 1 1 Safety symbols 1 2 1 2 Symbols used for labeling of product...

Page 5: ...tion Bag 5 Dilution 6 Centrifugation 7 Volume adjustment 7 V Magnetic labeling of cells 9 Incubation with the CliniMACS CD34 Reagent 9 Removal of excess reagent 10 CliniMACS CD19 Reagent 1 I General i...

Page 6: ...CliniMACS PBS EDTA Buffer 3 Labeling and preparation of bags 3 IV Preparation of leukapheresis product 4 Analysis 4 Transfer into Cell Preparation Bag 5 Dilution 6 Centrifugation 7 Volume adjustment...

Page 7: ...LECTION 1 2 1 Switch on of the CliniMACS Plus Instrument 1 Choice of separation program CD34 SELECTION 1 2 1 DEPLETION 2 1 1 Switch on of the CliniMACS Plus Instrument 1 Choice of separation program D...

Page 8: ...eck of all tubing and attachments 10 Integrity test 11 Connect Cell Preparation Bag 13 Final check of the liquid sensor 13 Alternative installation of CliniMACS Tubing Sets 1 CliniMACS Depletion Tubin...

Page 9: ...DEPLETION 2 1 1 Separation procedure 1 Disconnect bags and record process code 3 Unload tubing set and shutdown 4 Analysis of cells 4 DEPLETION 3 1 1 Separation procedure 1 Disconnect bags and record...

Page 10: ...EU the Directive 2004 23 EC human tissues and cells or the Directive 2002 98 EC human blood and blood components must be followed Thus any clinical application of the target cells is exclusively withi...

Page 11: ...49 2204 8306 8484 49 2204 8306 80 hotline 49 2204 8306 89 macsde miltenyi com www miltenyibiotec com CliniMACSPlus Instrument information Record below the model and serial number located on the back o...

Page 12: ...ament and of the Council of 8 June 2011 on the restriction of the use of certain hazardous substances in electrical and electronic equipment The CliniMACS Plus Instrument is UL Listed see Figure 1 1 F...

Page 13: ...magnet unit is switched on Contact Miltenyi Biotec Technical Support 5 The instrument is a protection class I device and may only be plugged into an outlet with a grounded connection 6 Before cleanin...

Page 14: ...instrument Avoid spills Do not operate the instrument if it has been exposed to moisture Avoid ingress of any liquid into the valves 15 Afterrunningapatientsampleandpriortodecontamination the instrume...

Page 15: ...Hz Fuses 2 T4A 250V 5 20 mm Use only fuses with UL and European approvals acc to IEC 127 2 III EN 60127 2 III DIN 41662 Operation conditions 10 C to 30 C 50 F to 86 F with 0 to 85 humidity at an altit...

Page 16: ...y and if not installed and used in accordance with the instructions may cause harmful interference to radio communications However there is no guarantee that interference will not occur in a particula...

Page 17: ...trument If the provided power cable is missing contact Miltenyi Biotec for information on a replacement part Guidance and manufacturer s declaration Electromagnetic emissions The CliniMACS Plus Instru...

Page 18: ...gle phase 0 0 UT during 250 300 cycle 0 UT during 0 5 cycle 0 45 90 135 180 225 270 315 0 UT during 1 cycle and 70 UT during 25 30 cycles single phase 0 Rated power frequency magnetic field IEC 61000...

Page 19: ...0 2 0 3 9 9 810 870 930 800 960 GSM 800 900 TETRA 800 iDEN 820 CDMA 850 LTE Band 5 Pulse modulation 18 Hz 2 0 3 28 28 1720 1845 1970 1700 1990 GSM 1800 CDMA 1900 GSM 1900 DECT LTE Band 1 3 4 25 UMTS...

Page 20: ...ase of the separation process Eleven pinch valves ensure controlled flow of buffer and cell suspension throughout the procedure The CliniMACS Plus Software offers the operator the choice between vario...

Page 21: ...lBag Baghanger clamp Liquid sensor Pinchvalve Pre column holder Magnetic separationunit Pumpdoor Displaywith touchscreen MainON OFF switch Peristaltic pump Baghangerfor buffer bag Bag compartment Figu...

Page 22: ...ized local Miltenyi Biotec Service Provider Unpacking Unpacking the instrument should be performed by two people according to the following instructions 1 Cut the plastic straps using a pair of scisso...

Page 23: ...tive foam 5 Lift the top carton vertically off the pallet see Figure 1 10 6 Remove the inner carton see Figure 1 11 Figure 1 9 Remove the parts and the protective foam Figure 1 10 Lift the top carton...

Page 24: ...st 10 cm away from the wall Note Do not locate the instrument next to any vibrating equipment which might cause movement during operation 9 Attach bag hangers Tighten rods with clockwise twists until...

Page 25: ...and back panel Then switch on the instrument again If the instrument does not start correctly or the window displays an error message note the error message number switch the instrument off and contac...

Page 26: ...Screen 1 1 and DO NOT press ENT then Then press 5 The window will display Screen 1 3 as shown DATE AND TIME SETTING To set date and time press 0 Follow the instructions shown on Screen 1 4 Date or ti...

Page 27: ...Contact the Miltenyi Biotec Technical Support for further information and instructions to continue If an operator had entered this program by mistake the operator may leave the program by pressing STO...

Page 28: ...equired 1 3 11Instrument disposal The CliniMACS Plus Instrument must be separately collected according to the European directive of waste of electrical and electronic equipment WEEE For final disposal...

Page 29: ...ign Warning Magnetic field 2 1 2 Symbols used for labeling of products Medical device European conformity approval with ID number 0123 ID number of Notified Body T V S D Product Service GmbH Munich UL...

Page 30: ...Manual Canadian edition 2 2 Non ionizing radiation Separate collection for waste of electrical and electronic equipment Fuse Keep dry Fragile handle with care This way up OFF power ON power Do not re...

Page 31: ...ature limit Non pyrogenic fluid path Batch code Part number Contents of the packaging Catalogue number REF Serial number Unique Device Identifier Sterilized using aseptic processing techniques Sterili...

Page 32: ...7091 04 ch20 Issued 2020 06 CliniMACS Plus System User Manual Canadian edition 2 4 Single sterile barrier system Single sterile barrier system with protective packaging outside Phone Fax E mail Websit...

Page 33: ...t stage but the expression is downregulated upon B cell maturation to plasma cells The CD19 antigen is further expressed on most malignant B cells and a subset of follicular dendritic cells CD34 antig...

Page 34: ...or to the magnetic labeling with the CliniMACS Anti Biotin Reagent CliniMACS Tubing Set CliniMACS Tubing Set LS Set of tubing connectors columns and bags through which the magnetically labeled cell su...

Page 35: ...paration Bag after cell washing Plasma Waste Bag Waste bag to collect excess plasma prior to the labeling procedure Pre column First column in the CliniMACS Tubing Set and the CliniMACS Tubing Set LS...

Page 36: ...ion The operator can choose from a menu of separation programs depending on the intended separation Separation reagent Reagent for magnetic labeling of cells e g CliniMACS CD34 Reagent T fitting T sha...

Page 37: ...ear and colorless solutions containing antibody covalently linked to biotin in buffer The antibodies are highly specific making labeling of rare target cells possible CliniMACSTubing Sets are intended...

Page 38: ...system filter Blood Transfusion Filter 1 Haemonetics Syringes and needles Appropriate syringes 1 mL 10 mL 20 mL 50 mL and hypodermic 20 gauge needles Locking forceps Sample tubes Clinical grade immun...

Page 39: ...n Device 2 TSCD or equivalent Orbital rotator Lab Line or equivalent Centrifuge Sorvall or equivalent buckets for centrifugation with aerosol containment caps Plasma extractor Plasma Separation Stand...

Page 40: ...observed All cell preparation and labeling procedures must be performed at room temperature 19 C to 25 C 66 F to 77 F unless otherwise stated Higher ambient temperature results in less purity and yiel...

Page 41: ...lly biohazardous material All blood products must be treated as a potential biohazard Leukapheresis product blood product bone marrow aspirate collected cells used buffer used tubing set and other mat...

Page 42: ...ed room temperature 19 C to 25 C 66 F to 77 F according to standard hospital or institutional blood collection procedures approved for use with the clinical protocol Do not refrigerate The cell concen...

Page 43: ...t This high gradient magnetic cell separation unit consists of a specifically developed powerful permanent magnet and a separation column with a ferromagnetic matrix Thehigh gradientfieldallowsthegene...

Page 44: ...n labeled cells pass through The labeled cells target cells are collected in the Cell Collection Bag and the non labeled cells non target cells in the Negative Fraction Bag see Figure 3 3 Depletion of...

Page 45: ...ld in the separationcolumn whileothernon labeled cells non target cells flow through the column and are collected in the Negative Fraction Bag 2 The magnet is in the OFF position The magnetically labe...

Page 46: ...in the separation column while other non labeled cells target cells flow through the column and are collected in the Cell Collection Bag 2 The magnet is in the OFF position The magnetically labeled ce...

Page 47: ...tically labeled cells are held in the separation column while other non labeled cells target cells flow through and are collected in the Reapplication Bag 2 The magnet is in the OFF position The magne...

Page 48: ...umn Magnet CellPreparationBag 4 SENSITIVE LOADING STAGE The magnet is in the ON position The cells from the Reapplication Bag are reloaded on the separation column The few remaining magnetically label...

Page 49: ...low the instructions of the applicable section Continue with STEP 2 STEP 2 STEP 2 describes the selection of a separation program of the CliniMACS Plus Instrument Depending on cell type and cell numbe...

Page 50: ...CS Tubing Set LS REF 162 01 1 CliniMACS Tubing Set REF 161 01 1 CliniMACS Tubing Set LS REF 162 01 1 CliniMACS Depletion Tubing Set REF 261 01 Separation program DEPLETION 2 1 CD34 SELECTION 1 CD34 SE...

Page 51: ...aration Plasma Waste Wash Waste No 1 and Wash Waste No 2 Determine the weight of the empty Cell Collection Bag and Cell Preparation Bag IV Preparation of leukapheresis product LP Analysis Transfer int...

Page 52: ...Waste Bag and insert pre column Insert separation column and load valve no 5 Load valves nos 1 2 3 and 4 Load pump tubing Load valves nos 7 and 8 Load valves nos 6 9 10 and 11 Recheck all tubing and a...

Page 53: ...ine the weight of the empty Cell Collection Bag and Cell Preparation Bag IV Preparation of leukapheresis product Analysis Transfer into Cell Preparation Bag Dilution Add buffer Weight of buffer to be...

Page 54: ...column Insert separation column and load valve no 5 Load valves nos 1 2 3 and 4 Load pump tubing Load valves nos 7 and 8 Load valves nos 6 9 10 and 11 Recheck all tubing and attachments Seating of va...

Page 55: ...nd Cell Preparation Bag IV Preparation of leukapheresis product Analysis Transfer into Cell Preparation Bag Dilution Add buffer Weight of buffer to be added Weight of leukapheresis product 2 Centrifug...

Page 56: ...cation Bag and insert separation column Load valves nos 1 2 3 4 and 5 Load pump tubing Load valves nos 6 7 8 9 and 10 Recheck all tubings and attachments Seating of valves Attach CliniMACS PBS EDTA Bu...

Page 57: ...nsion through the separation column in which strong magnetic gradients are generated The separation column retains the magnetically labeled CD34 positive cells target cells while the non labeled cells...

Page 58: ...sma transfer sets for use during the cell preparation procedure Plasma Waste Bag and Wash Waste Bags Three 600 mL transfer bags suitable for centrifugation Cell Collection Bag One 150 mL transfer bag...

Page 59: ...table next to the balance Record the weight Label one 600 mL transfer bag as Plasma Waste This should include patient identification date time of run and operator identification Label two 600 mL trans...

Page 60: ...er of leukocytes Percentage of CD34 positive cells Total number of CD34 positive cells Viability Other tests might be required depending on the intended use of the cells e g T cell enumeration Record...

Page 61: ...needle with an appropriate syringe into the sampling site coupler of the Cell Preparation Bag and remove a volume of 0 5 mL of the leukapheresis product Transfer the sample into a sample tube Label t...

Page 62: ...When the appropriate weight of buffer has been transferred slide the clamp on the plasma transfer set to the closed position to stop the liquid flow Close the locking forceps next to the Cell Preparat...

Page 63: ...to leukapheresis 190 g be removed g product g Record the weight of supernatant to be removed 2 Place the empty Plasma Waste Bag on the balance and tare the balance 3 Open the locking forceps next to...

Page 64: ...termine the weight of the leukapheresis product after volume adjustment by subtracting the weight of the empty Cell Preparation Bag from the weight of the filled Cell Preparation Bag Record the calcul...

Page 65: ...A 10 mL syringe is sufficient to remove the contents of one vial or respectively a 20 mL syringe is sufficient to remove the contents of two reagent vials The syringe should be equipped with a 20 gaug...

Page 66: ...seal off the tubing between both clamps leaving at least 15 cm of tubing on the Cell Preparation Bag for further connections Disconnect the buffer bag 6 Holding the Cell Preparation Bag with both hand...

Page 67: ...Slide the clamp on the plasma transfer set to the open position CompletelyfilltheCellPreparationBagwithbuffer i e add approximately 500 g of buffer Slide the clamp on the plasma transfer set to the cl...

Page 68: ...f removed supernatant 29 Using the heat sealer seal off the tubing leaving at least 15 cm of tubing on the Cell Preparation Bag for further connections Disconnect the Wash Waste Bag No 2 30 Keep the W...

Page 69: ...e Cell Preparation Bag 38 When the appropriate weight of buffer has been transferred slide the clamp on the plasma transfer set to the closed position to stop the liquid flow Close the locking forceps...

Page 70: ...Record the calculated weight Weight of leukaphe Weight of Weight of resis product after filled Cell Pre empty Cell Pre addition of buffer g paration Bag g paration Bag g Proceed to STEP 2 DO NOT conne...

Page 71: ...letion in an automated continuous flow separation process The CliniMACS Plus CD19 System passes the antibody labeled cell suspension through the separation column in which strong magnetic gradients ar...

Page 72: ...rocedure Plasma Waste Bag and Wash Waste Bag Two 600 mL transfer bags suitable for centrifugation Cell Collection Bag One 600 mL transfer bag in combination with a Luer Spike Interconnector to connect...

Page 73: ...the empty Cell Preparation Bag with locking forceps positioned close to the bag and the tubing lying on the table next to the balance Record the weight Label one 600 mL transfer bag as PlasmaWaste Thi...

Page 74: ...of CD19 positive cells Viability Recheck the parameters after the labeling procedure This is necessary because the following three sample parameters have to be entered in the software during the setup...

Page 75: ...ther connections see Figure 4 1 1 Keep the original leukapheresis bag until the separation and final analysis of all cells have been accomplished 7 Disinfect the septum of the sampling site coupler In...

Page 76: ...he clamp on the plasma transfer set to the open position By visually monitoring the scale on the balance transfer the calculated weight of buffer to the Cell Preparation Bag 5 Whentheappropriateweight...

Page 77: ...of tubing on the Cell Preparation Bag for further connections Disconnect the Plasma Waste Bag Carefully resuspend the cell pellet Adjust the weight of the Cell Preparation Bag by adding buffer Calcul...

Page 78: ...n both clamps leaving at least 15 cm of tubing on the Cell Preparation Bag for further connections Disconnect the buffer bag 7 Resuspend the cells in the Cell Preparation Bag Avoid intensive mixing of...

Page 79: ...site coupler Use an appropriate sterile syringe and needle to remove the entire volume from one reagent vial 7 5 mL A 10 mL syringe is sufficient to remove the contents of one reagent vial The syringe...

Page 80: ...to the Cell Preparation Bag Record the weight of the filled Cell Preparation Bag 5 Using the heal sealer seal off the tubing between both clamps leaving at least 15 cm of tubing on the Cell Preparatio...

Page 81: ...ation Bag from the weight of the filled Cell Preparation Bag Record the calculated weight Weight of leuka Weight of Weight of pheresis product filled Cell Pre empty Cell Pre after the wash g paration...

Page 82: ...to the sampling site coupler of the Cell Preparation Bag and remove a volume of 0 5 mL of the labeled product Transfer the sample into a sample tube Label the tube as ORIGINAL This should include pati...

Page 83: ...n Reagent After excess reagent is removed from the suspension the cells are ready for the in vitro depletion in an automated separation process The CliniMACS Plus TCR Biotin System passes the antibody...

Page 84: ...the CliniMACS PBS EDTA Buffer with HSA to a final concentration of 0 5 w v Additional materials Cell Preparation Bag One 600 mL transfer bag suitable for centrifugation as well as one sampling site c...

Page 85: ...ance Record the weight Label one 600 mL or 1000 mL transfer bag as Plasma Waste This should include patient identification date time of run and operator identification Label three 600 mL or 1000 mL tr...

Page 86: ...number of leukocytes Percentage of TCR positive cells Total number of TCR positive cells Viability Determine the percentage total number of all TCR labeled cells including unspecific TCR binding not...

Page 87: ...her connections see Figure 4 1 1 Keep the original leukapheresis bag until the separation and final analysis of cells have been accomplished 7 Disinfect the septum of the sampling site coupler Insert...

Page 88: ...ell Preparation Bag Slide the clamp on the plasma transfer set to the open position By visually monitoring the scale on the balance transfer the calculated weight of buffer to the Cell Preparation Bag...

Page 89: ...t has been removed close the locking forceps next to the Cell Preparation Bag to stop the liquid flow Using the heat sealer seal off the tubing leaving at least 15 cm of tubing on the Cell Preparation...

Page 90: ...the heat sealer seal off the tubing leaving at least 15 cm of tubing on the Cell Preparation Bag for further connections Disconnect the buffer bag 7 Resuspend the cells in the Cell Preparation Bag Avo...

Page 91: ...al The syringe should be equipped with a 20 gauge needle 3 Using the injection port on the sampling site coupler inject the entire volume of conjugate into the Cell Preparation Bag Take care not to pu...

Page 92: ...Fold any loose parts of the bags or tubing downwards Transfer the Cell Preparation Bag and Wash Waste Bag No 1 securely to the centrifuge bucket 9 Balance the loaded bucket with a suitable weighted bu...

Page 93: ...ng of the TCR Biotin labeled cells with the CliniMACS Anti Biotin Reagent Weight of Weight of leukaphe buffer to be 190 g resis product after added g the second wash g 22 Using the TSCD connect the bu...

Page 94: ...e septum of the sampling site coupler Use an appropriate sterile syringe and needle to remove the entire volume from each of the two CliniMACS Anti Biotin Reagent vials 7 5 mL each A 20 mL syringe is...

Page 95: ...e filled Cell Preparation Bag 5 Using the heat sealer seal off the tubing between both clamps leaving at least 15 cm of tubing on the Cell Preparation Bag for further connections Disconnect the buffer...

Page 96: ...is product after the wash by subtracting the weight of the empty Cell Preparation Bag from the weight of the filled Cell Preparation Bag Record the calculated weight Weight of leuka Weight of filled W...

Page 97: ...ampling site coupler of the Cell Preparation Bag and remove a sample of 0 5 mL of the labeled product Transfer the sample into a sample tube Label the tube as ORIGINAL This should include patient iden...

Page 98: ...choose CD34 SELECTION 1 or CD34 SELECTION 2 To choose the separation program highlight the name of the program with the black bar Move the bar up and down by using the keys 0 and 8 To proceed with the...

Page 99: ...labeling To confirm and proceed press ENT If the catalogue number of a tubing set or a reagent not specified for the chosen separation program has been entered a message appears Press ENT to confirm a...

Page 100: ...indow will display Screen 4 2 2 as shown Confirm that the correct program has been chosen If not press the Undo key see Figure 1 4 to return to the previous step in order to amend the choice Select th...

Page 101: ...r of the tubing set serves as a security check to ensure that the tubing set the operator selected can be used Enter catalogue number of the selected tubing set and proceed with pressing ENT If a non...

Page 102: ...3 Enter the final volume of the cell sample Confirm that the value entered reflects the value of the sample Otherwise sample processing may not be optimal see Important To continue press ENT Screen 4...

Page 103: ...stem a screen similar to Screen 4 2 7 is shown Ensure the correct sample parameters have been entered and the calculated number of cells is correct Press the Undo key to return to the previous Screen...

Page 104: ...le Do not attach more than three liters of buffer on the bag hanger see Important bullet 2 2 Open the tray of the tubing set under sterile conditions and replace the original bags by larger ones if ne...

Page 105: ...w will display Screen 4 2 2 as shown Confirm that the correct program has been chosen If not press the Undo key see Figure 1 4 to return to the previous step in order to amend the choice Select the tu...

Page 106: ...of the tubing set serves as a security check to ensure that the tubing set the operator selected can be used Enter the catalogue number of the selected tubing set and proceed with pressing ENT If a no...

Page 107: ...he final volume of the cell sample Confirm that the value entered reflects the value of the sample Otherwise sample processing may not be optimal see Important To continue press ENT Screen 4 2 5 Sampl...

Page 108: ...iMACS Plus System a screen similar to Screen 4 2 7 is shown Ensure the correct sample parameters have been entered and the calculated number of cells is correct Press the Undo key to return to the pre...

Page 109: ...d with the tubing set with alternative bags of the appropriate size if replacement is necessary The bags originally attached to the tubing set are connected by luer connections Bags that replace the o...

Page 110: ...S before usage of the tubing set The clamp is labeled with Remove before assembly to CliniMACS PlusInstrument 2 Check luer lock connections to bags Luer lock must be closed tightly Attach Cell Collect...

Page 111: ...or lower the bag hanger to accommodate the height to the size of the PrimingWaste Bag Ensure that it is positioned high enough to prevent severe bending of the tubing that could restrict the flow and...

Page 112: ...iniMACS Tubing Set LS PrimingWasteBag Bubbletrapspike Bubbletrap Pre column Separationcolumn Upperretainingring Pumptubing Lowerretainingring NegativeFractionBag BufferWasteBag Bufferspike 4 wayfittin...

Page 113: ...ration column holder 2 Load the tubing into valve no 5 To proceed press ENT Note As each step is performed check all tubing and attachments for any kinks or severe bending that could restrict the flow...

Page 114: ...ing just below valve no 2 Pay particular attention to the area below valve no 2 see Figure 4 3 5 4 Insert the tubing into valve nos 2 and 3 5 Mount the tubing between valve no 2 and the bubble trap in...

Page 115: ...ng is not pinched at the end of the guide pins If adjustment of the tubing inside the pump is neccessary the tubing can be unloaded by lifting the lower end and turning the pump roller anti clockwise...

Page 116: ...ve no 7 2 Load the tubing into valve no 8 To proceed press ENT Load valves nos 6 9 10 and 11 The window will display Screen 4 3 6 as shown 1 Load the tubing into valves nos 6 9 10 and 11 2 Place the N...

Page 117: ...a valve has been closed do not pull the tubing without pressing the valve button to open the valve If a tubing has been adjusted it is absolutely necessary to press the corresponding valves firmly tw...

Page 118: ...enetrated the bag If more than one liter buffer is necessary for a separation connect two buffer bags using a plasma transfer set 2 Attach the buffer bag to the buffer bag hook on the bag hanger see F...

Page 119: ...lves and columns for the appearance of any leaks or the presence of any folds that may block fluid flow If leaks or malfunctions are observed stop run by pressing STOP The operator will have 600 secon...

Page 120: ...pressed the instrument starts the automated test sequence for the upper part of the tubing set The window will display Screen 4 3 14 as shown Overpressure will be created and held for two minutes Duri...

Page 121: ...for 30 seconds During this time the operator should watch the lower pump tube connection and the T fittings between valves nos 6 8 9 10 and 11 At each point the test sequence can be finished by pressi...

Page 122: ...e system filter spike see Figure 4 3 9 4 Spike the Cell Preparation Bag with the pre system filter see Figure 4 3 9 ensuring that the septum is punctured allowing free flow of liquid Gently squeeze th...

Page 123: ...nd CliniMACS Tubing Set LS CliniMACSPBS EDTABuffer Bag hanger for CellPreparationBag CellPreparationBag Pre systemfilter CellCollectionBag Pre systemfilterspike PrimingWasteBag Figure 4 3 9 CliniMACS...

Page 124: ...order to ensure that the sterility of the cell separation process is guaranteed The sterility of the cell separation process may be compromised during the attachment of the Cell Collection Bag the Cli...

Page 125: ...sure that the septum is punctured allowing free flow of liquid Gently squeeze the bag to ascertain that the spike has penetrated the bag 3 Attachment of pre system filter Remove the cap from the spike...

Page 126: ...reen 4 3 9 1 The buffer bag was attached during Preparation for tubing set installation Therefore only the height of the buffer bag hanger may need to be adjusted Raise or lower the hanger to accomoda...

Page 127: ...Bag pre system filter The window will display Screen 4 3 17 as shown 1 The Cell Preparation Bag and the pre system filter were attached during Preparation for tubing set installation 2 Remove the loc...

Page 128: ...s PrimingWasteBag Bubbletrapspike Bubbletrap Pre column Separationcolumn Upperretainingring Pumptubing Lowerretainingring NegativeFractionBag BufferWasteBag Bufferspike 4 wayfitting T fitting Luerconn...

Page 129: ...Firmly insert the spike of the pre system filter into the tubing set Connect pre system filter and spike connector Spike Cell Preparation Bag Ensure that the connections are secure and that free liqu...

Page 130: ...PreparationBagtubingand Reapplication Bag tubing Spikeconnector CellCollection Bag Pre systemfilter Non TargetCellBag ReapplicationBag CellPreparationBag CliniMACSPBS EDTABuffer Bagcompartement Buffer...

Page 131: ...p used for packaging before usage of the tubing set The clamp is labeled with Remove before assembly to CliniMACS Plus Instrument 2 Check luer lock connections to bags Luer lock must be closed tightly...

Page 132: ...g of the tubing that could restrict the flow and that it is low enough to avoid the tubing or connections being stretched 3 Insert the separation column into the separation column holder as shown see...

Page 133: ...Bag ReapplicationBag Upperretainingring Pumptubing Lowerretainingring BufferWasteBag Bufferspike Y fitting T fitting Luerconnector Spikeconnector Pre systemfilter Checkvalve Twist offcap CellCollectio...

Page 134: ...lly inspect both If any liquid is present dry the area with a soft lint free cloth To proceed press ENT Note As each step is performed check all tubing and attachments for any kinks or severe bending...

Page 135: ...ched at the end of the guide pins If adjustment of the tubing inside the pump is neccessary the tubing can be unloaded by lifting the lower ending and turning the pump roller anti clockwise 4 Insert t...

Page 136: ...he slot and is positioned in the center of the jaws of the valve see Figure 4 3 5 Check that the tubing is not kinked or twisted and does not show any tendency to move away from the center of the pinc...

Page 137: ...spike has penetrated the bag 2 Attach the buffer bag to the buffer bag hook on the bag hanger see Figure 4 3 7 3 Adjust the height of the buffer bag hanger Raise or lower the bag hanger to accommodate...

Page 138: ...es and the separation column for the appearance of any leaks or the presence of any folds that may block fluid flow If leaks or malfunctions are observed stop run by pressing STOP The operator will ha...

Page 139: ...ter the integrity test for the upper part press 9 4 The window will display Screen 4 3 11 as shown Important Clamp the tubing underneath the check valve of the Non Target Cell Bag 5 To start the test...

Page 140: ...RUN button has been pressed the instrument starts the automated test sequence for the lower part of the tubing set The window will display Screen 4 3 14 as shown Overpressure will be created and held...

Page 141: ...e Figure 4 3 3 and connect both parts 4 Remove the other cap from the spike connector and connect the spike to the Cell Preparation Bag see Figure 4 3 3 ensuring that the septum is punctured allowing...

Page 142: ...will display Screen 4 3 16 as shown 1 Check the liquid sensor tubing Ensure the tubing has been properly inserted that it is free of any external liquid and has not been dislodged during the loading p...

Page 143: ...t CliniMACSPBS EDTABuffer CellPreparationBag Spikeconnector CellCollectionBag Pre systemfilter Non TargetCellBag ReapplicationBag BaghangerforCellPreparationBag Figure 4 3 9 CliniMACS Plus Instrument...

Page 144: ...separation column is outside the magnetic field and is not magnetized Separation procedure The general steps of the separation procedure are the same for both CD34 separation programs CD34 SELECTION...

Page 145: ...n column and the cells are reapplied on the separation column Column wash II Reloading of the cells is followed by a second washing step to remove remaining unlabeled cells Also all tubing are rinsed...

Page 146: ...rom the weight of the Cell Collection Bag containing the target cells Record the weight 4 Mix the target cell suspension thoroughly by rotating the bag Take an aliquot of 0 5 mL and retain for analysi...

Page 147: ...must be examined regarding quality and quantity in view of their intended use This must include the following parameters Total number of leukocytes Viability and total number of CD34 positive cells P...

Page 148: ...the magnet withdrawn the separation column is outside the magnetic field and is not magnetized Separation procedure Loading cells The separation procedure starts with the filling of the pre system fil...

Page 149: ...get cells are released from the separation column and collected in the Negative Fraction Bag to reduce carryover with labeled cells in the pump tubing Note If the number of magnetically labeled cells...

Page 150: ...e weight of the Cell Collection Bag containing the target cells Record the weight 4 Mix the target cells suspension thoroughly by rotating the bag Take an aliquot of 0 5 mL and retain for analysis 5 U...

Page 151: ...lls must be examined regarding quality and quantity in view of their intended use This must include the following parameters Total number of leukocytes Viability and total number of target cells Purit...

Page 152: ...ncolumn is outside the magnetic field and is not magnetized Separation procedure The cells are applicated onto the separation column twice In the first loading stages the bulk of labeled cells is depl...

Page 153: ...to reduce cell loss in the system Final removal of non target cells The magnet is moved into the OFF position The magnetically labeled cells non target cells are released from the separation column an...

Page 154: ...ell Collection Bag from the weight of the Cell Collection Bag containing the target cells Record the weight 4 Mix the target cell suspension thoroughly by rotating the bag Take an aliquot of 0 5 mL an...

Page 155: ...s must be examined regarding quality and quantity in view of their intended use This must include the following parameters Total number of leukocytes Viability and total number of target cells Purity...

Page 156: ...kapheresis product Poor viability of cells in the leuka pheresis product The leukapheresis product may have been harvested stored or transported inappropriately To ensure better sample quality the pre...

Page 157: ...bing set after priming Buffer bag is not properly spiked Use a new tubing set and sufficient new buffer and restart the CliniMACS Plus Separation Confirm that the septum of the buffer bag is properly...

Page 158: ...st be liquid in the tubing at this point Check the following points 1 Has the tubing been inserted correctly If not do so 2 Is the tubing filled with buffer If not see point 3 3 If the tubing is not f...

Page 159: ...ng past valve s Tubing set has not been properly inserted If the run is ongoing press the STOP and clamp the line with a locking forceps Adjust the tubing by first depressing the appropriate valve Rem...

Page 160: ...the sequence for more than 600 seconds or the cell separation will be terminated If it is not possible to activate the liquid sensor in this way press STOP then 2 and confirm with ENT to skip sample l...

Page 161: ...l appear and will give the operator the opportunity to confirm or amend the decision because skipping of sample loading is not reversible Warning message no 4 3 Press ENT and the separation program wi...

Page 162: ...instrument on again The magnet will be withdrawn from the magnetic separation unit see Figure 1 7 Check this by holding a small magnetizable item to the magnetic separation unit If the magnet has not...

Page 163: ...ll of the sample had been loaded Abort the current run and check total cell number and depletion efficiency of the cells in the Cell Collection Bag If necessary process the remaining sample with a new...

Page 164: ...insert correct tubing left branch of Reapplication Bag tubing into valve no 3 as described in the installation instructions Press RUN to continue with the depletion procedure within 600 seconds Allow...

Page 165: ...N 1 2 Non specific retention of dead cells from leukapheresis product or high non specific cell losses throughout the procedure Buffer does not contain HSA Supplement the buffer with HSA to a final co...

Page 166: ...s e g when the bag was removed from the centrifuge Compare leukocyte content of the unlabeled leukapheresis product and the labeled leukapheresis product Check centrifugation settings for proper centr...

Page 167: ...ing granulocytes will then bind the CliniMACS Reagent non specifically which may lead to decreased purity of the target cells Valve malfunction occurred Eluted target cell fraction has been contaminat...

Page 168: ...count and percentage of cells to be depleted and enter actual sample parameters during set up of the instrument STEP 2 If visible clumps occur it may be helpful to filter the cells prior to a new run...

Reviews: