2
IN
S
T
A
LL
A
T
IO
N
67
4
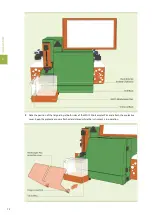
Unscrew the bottom column connector to remove the column.
5
Screw the bottom column connector into the bottom end of the new column. Please note the right
orientation of the column. The top end of the MACSQuant column has a clearly visible inlet, while the metal
balls reach further to the bottom end of the column. The column should be inserted only with the visible
inlet at the top position.
6
Point the column towards the top of the device and screw in the top column connector.
7
Align the column so that the top column connector sits on the guide of the magnet cover. Push the column
into the slot until you hear a click. Verify that the column is placed in the center of the magnet cover.
8
Close the front access cover of the instrument.
9
Prime the new column: select the option
Prime column
from the
Tools tab
on the side pane. Refer also
to the MACSQuantify Software guide.
10
To replace a column, follow the same procedure.
2.5.5
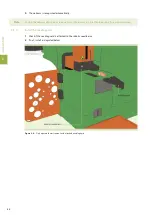
Install the webcam
1
Attach the magnetic webcam holder to the side of the instrument.
2
Plug in the webcam cable into a free USB port at the rear side of the instrument.
3
Place the webcam into its holder.
Summary of Contents for MACSQuant 10
Page 1: ...MACSQuant Instrument User manual ...
Page 8: ...6 ...
Page 18: ...IMPORTANT SAFETY INFORMATION EN DE ES FR IT 16 ...
Page 61: ...1 INTRODUCTION 59 Figure 1 2 BFront view of the MACSQuant Instrument doornot shown ...
Page 62: ...Figure 1 3 BRearview of the MACSQuant Instrument 1 INTRODUCTION 60 ...
Page 76: ...2 INSTALLATION 74 ...
Page 86: ...4 CALIBRATION 84 ...
Page 90: ...5 HARDWARE MONITOR 88 ...
Page 92: ...6 LIVE SUPPORT 90 ...
Page 106: ...10 TECHNICAL SUPPORT 104 ...

