4
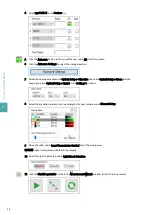
Select xyz-Table Z in the Devices list.
5
Click the Autosave button at the end of the row under AS. It will turn green.
6
Click the Autosave Settings to select the storage location.
7
Select the appropriate objective Optical Setup > Objective, the zoom Optical Setup > Zoom and the
imaging solution Optical Setup > Liquid in the Settings 1 window.
8
Select the excitation and emission wavelengths for your sample under Channel Setup.
9
Move the slider under Laser Transmission Control to set the laser power.
NOTICE! Higher laser power will bleach the sample.
10 Select the light sheet setup under Light Sheet Selection.
11 Click the Start live preview button in the Measurement Wizard window to start the live preview.
7
SE
TT
IN
G
U
P
A
N
EX
P
ER
IM
EN
T
38
Summary of Contents for UltraMicroscope Blaze
Page 1: ...UltraMicroscope Blaze Imaging System User manual...
Page 16: ...1 IMPORTANT SAFETY INFORMATION 16...
Page 20: ...2 INTRODUCTION 20...
Page 24: ...3 INSTALLATION 24...
Page 44: ...7 SETTING UP AN EXPERIMENT 44...
Page 46: ...8 MAINTENANCE 46...
Page 50: ...9 TECHNICAL DATA AND SPECIFICATIONS 50...
Page 52: ...10 TECHNICAL SUPPORT 52...
Page 55: ......


