5
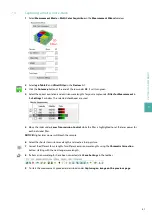
Optional: Move the slider under
Optics > sheet width
to change the sheet width of the light sheet. A lower
sheet width will result in more light being focused on a smaller region of the sample. The field of view
needs to be adjusted.
The settings described may need to be adjusted when the zoom settings are changed.
7.2.3
Capturing an image
1
Move in the z-direction to the starting position.
2
Click
Current Position > Set as Zero
in the
Settings 2
window.
3
Click the
Take
button under
Scan Range > Start
.
4
Move in the z-direction to the end position.
5
Click the
Take
button under
Scan Range > End
.
6
Define the increment by entering it under
Scan Range > Stepsize
.
7
Check the
Autosave Settings
in the
Measurement Wizard
window again.
8
Click the
Start measurement
button to start the measurement.
7
SE
TT
IN
G
U
P
A
N
EX
P
ER
IM
EN
T
40
Summary of Contents for UltraMicroscope II
Page 1: ...UltraMicroscope II Imaging System User manual...
Page 14: ...1 IMPORTANT SAFETY INFORMATION 12...
Page 20: ...2 INTRODUCTION 18...
Page 30: ...5 PREPARING THE INSTRUMENT 28...
Page 38: ...6 LASER ALIGNMENT 36...
Page 46: ...7 SETTING UP AN EXPERIMENT 44...
Page 48: ...8 MAINTENANCE 46...
Page 54: ...10 TECHNICAL SUPPORT 52...
Page 57: ......


