6
7
Fig. 3
A
B
Cleaning
Clean dust and debris from charger and tool
vents. Keep tool handles clean, dry and free of oil
or grease. Use only mild soap and a damp cloth
to clean the tool, battery pack and charger since
certain cleaning agents and solvents are harmful to
plastics and other insulated parts. Some of these
include gasoline, turpentine, lacquer thinner, paint
thinner, chlorinated cleaning solvents, ammonia
and household detergents containing ammonia.
Never use flammable or combustible solvents
around tools.
Repairs
For repairs, return the tool, battery pack and char-
ger to the nearest service center listed on the back
cover of this operator's manual.
Maintaining Tool
Keep your tool, battery pack and charger in good
repair by adopting a regular maintenance pro-
gram. After six months to one year, depending on
use, return thetool, battery pack and charger to
A
MILWAUKEE
service facility for:
MAINTENANCE
WARNING
To reduce the risk of per-
sonal injury and damage, never immerse your
tool, battery pack or charger in liquid or allow
a liquid to fl ow inside them.
WARNING
To reduce the risk of injury,
always unplug the charger and remove the
battery pack from the charger or tool before
performing any maintenance. Never disas-
semble the tool, battery pack or charger.
Contact a MILWAUKEE service facility for
ALL repairs.
ACCESSORIES
For a complete listing of accessories refer to your
MILWAUKEE
Electric Tool catalog or go online to
www.milwaukeetool.com. To obtain a catalog, con-
tact your local distributor or a service center listed
on the back cover of this operator’s manual.
WARNING
Always remove battery
pack before changing or removing acces-
sories. Only use accessories specifically
recommended for this tool. Others may be
hazardous.
FIVE YEAR TOOL LIMITED WARRANTY
Every
MILWAUKEE
electric power tool (including battery charger) is warranted to the original purchaser only to be free
from defects in material and workmanship. Subject to certain exceptions,
MILWAUKEE
will repair or replace any part
on a electric power tool which, after examination, is determined by
MILWAUKEE
to be defective in material or work-
manship for a period of fi ve (5) years* after the date of purchase. Return the electric power tool and a copy of proof of
purchase to a
MILWAUKEE
factory Service/Sales Support Branch location or
MILWAUKEE
Authorized Service Station,
freight prepaid and insured, are requested for this warranty to be effective. This warranty does not apply to damage
that
MILWAUKEE
determines to be from repairs made or attempted by anyone other than
MILWAUKEE
authorized
personnel, misuse, alterations, abuse, normal wear and tear, lack of maintenance, or accidents.
* The warranty period for Hoists (lever, hand chain, & electric chain hoists), all Ni-CD battery packs, Work Lights (cord-
less fl ashlights), Job Site Radios, and Trade Titan™ Industrial Work Carts is one (1) year from the date of purchase.
*The warranty period for Li-Ion battery packs that do not contain V™-technology – 4.0 volts through 18.0 volts - is two
(2) years from the date of purchase.
*There is a separate warranty for V™-technology Li-Ion Battery Packs V™18 volts and above that accompany V™-
technology cordless power tools:
*Every MILWAUKEE V™-technology Li-Ion Battery Pack 18 volts or above is covered by an initial 1000 Charges/2
Years free replacement warranty. This means that for the earlier of the fi rst 1000 charges or two (2) years from the
date of purchase/fi rst charge, a replacement battery will be provided to the customer for any defective battery free
of charge. Thereafter, customers will also receive an additional warranty on a pro rata basis up to the earlier of the
fi rst 2000 charges or fi ve (5) Years from the date of purchase/fi rst charge. This means that every customer gets an
additional 1000 charges or three (3) years of pro rata warranty on the V™-technology Li-Ion Battery Pack 18 volts or
above depending upon the amount of use. During this additional warranty period, the customer pays for only the use-
able service received over and above the fi rst 1000 Charges/2 years, based on the date of fi rst charge and number of
charges found on the battery pack via Milwaukee’s V™-technology Service Reader.
Warranty Registration is not necessary to obtain the applicable warranty on a
MILWAUKEE
product. The manufactur-
ing date of the product will be used to determine the warranty period if no proof of purchase is provided at the time
warranty service is requested.
ACCEPTANCE OF THE EXCLUSIVE REPAIR AND REPLACEMENT REMEDIES DESCRIBED HEREIN IS A CONDI-
TION OF THE CONTRACT FOR THE PURCHASE OF EVERY
MILWAUKEE
PRODUCT. IF YOU DO NOT AGREE
TO THIS CONDITION, YOU SHOULD NOT PURCHASE THE PRODUCT. IN NO EVENT SHALL
MILWAUKEE
BE
LIABLE FOR ANY INCIDENTAL, SPECIAL, CONSEQUENTIAL OR PUNITIVE DAMAGES, OR FOR ANY COSTS,
ATTORNEY FEES, EXPENSES, LOSSES OR DELAYS ALLEGED TO BE AS A CONSEQUENCE OF ANY DAMAGE
TO, FAILURE OF, OR DEFECT IN ANY PRODUCT INCLUDING, BUT NOT LIMITED TO, ANY CLAIMS FOR LOSS
OF PROFITS. THIS WARRANTY IS EXCLUSIVE AND IN LIEU OF ALL OTHER WARRANTIES OR CONDITIONS,
WRITTEN OR ORAL, EXPRESSED OR IMPLIED. WITHOUT LIMITING THE GENERALITY OF THE FOREGOING,
MILWAUKEE
DISCLAIMS ANY IMPLIED WARRANTY OF MERCHANTABILITY OR FITNESS FOR A PARTICULAR
USE OR PURPOSE, AND ALL OTHER WARRANTIES.
This warranty applies to product sold in the U.S.A., Canada and Mexico only.
Please consult the ‘Service Center Search’ in the Parts & Service section of
MILWAUKEE
’s web-site www.milwaukeetool.
com or call 1.800.SAWDUST (1.800.729.3878) to locate your nearest service facility for warranty and non-warranty
service on a
MILWAUKEE
electric power tool.
WARNING
To reduce the risk of explo-
sion, electric shock and property damage,
always check the work area for hidden gas
pipes, electrical wires or water pipes when
making blind or plunge cuts.
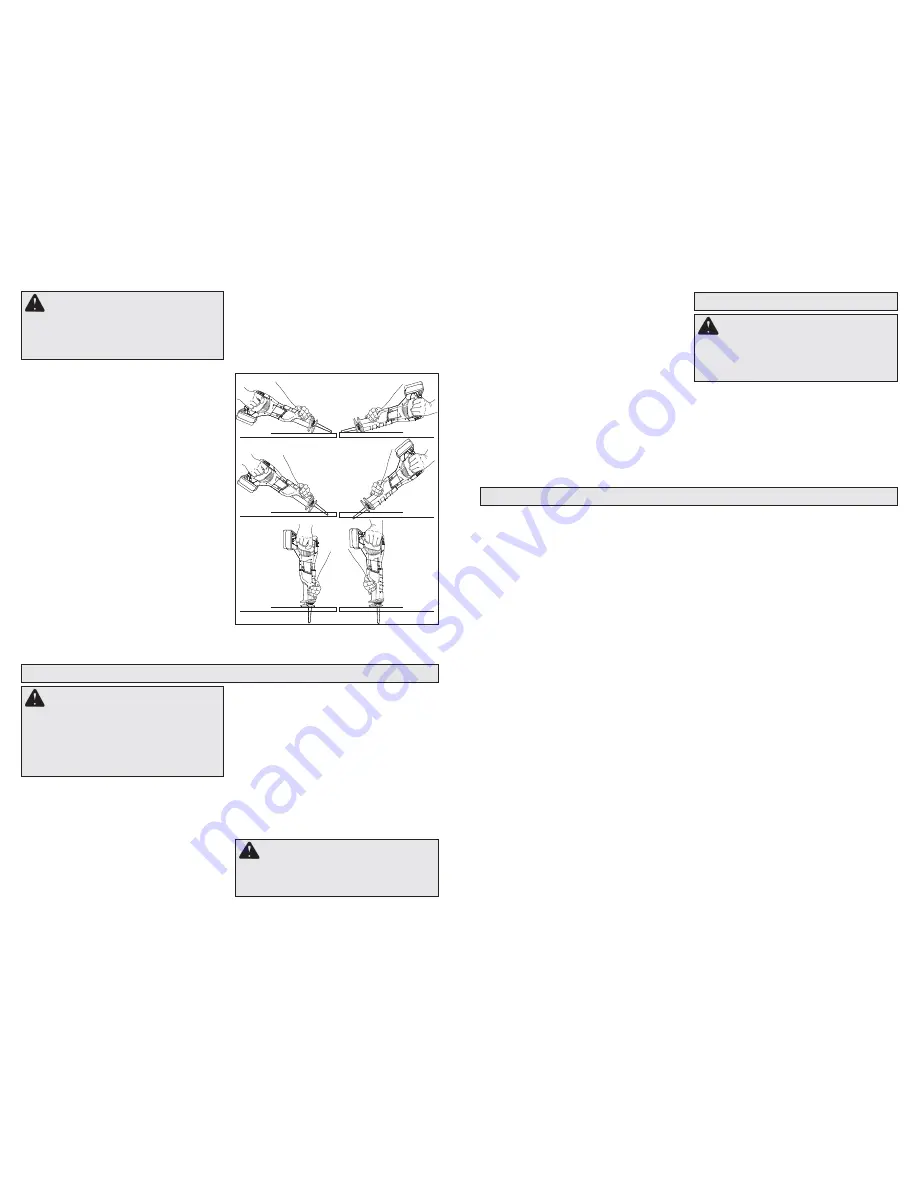
Plunge Cutting
Your
MILWAUKEE
Sawzall
®
is ideal for plunge
cutting directly into surfaces that can not be cut
from an edge, such as walls or fl oors. Plunge cut-
ting may be done two ways depending on how the
blade is inserted. Column A shows how to plunge
cut with the teeth of the blade facing downward.
Column B shows how to plunge cut with the teeth
of the blade facing upward. Do not plunge cut into
metal surfaces (see "Cutting Metals").
1. Insert the blade into the tool.
If you inserted the blade with the teeth facing
downward, hold the tool as shown in Column A,
resting the edge of the shoe on the workpiece.
If you inserted the blade with the teeth facing
upward, hold the tool as shown in Column B,
resting the edge of the shoe on the workpiece.
2. With the blade just above the workpiece, pull the
trigger. Using the edge of the shoe as a pivot,
lower the blade into the workpiece as shown.
3. As the blade starts cutting, raise the handle of
the tool slowly until the shoe rests fi rmly on the
workpiece. Then guide the tool along your cut-
ting line to acquire the desired cut.
NOTE:
To make plunge cutting easier, use a heavy
gauge blade and install the blade with the teeth
facing upward as shown in Column B.
• Lubrication
• Mechanical inspection and cleaning (gears,
spindles, bearings, housing, etc.)
• Electrical inspection (battery pack, charger,
motor)
• Testing to assure proper mechanical and
electrical operation
If the tool does not start or operate at full power
with a fully charged battery pack, clean the contacts
on the battery pack. If the tool still does not work
properly, return the tool, charger and battery pack,
to a
MILWAUKEE
service facility for repairs.


