5
WARNING
Applying greater pressure does
not increase the tool’s effectiveness. If the applied
working pressure is too high, the shock absorber
will be pushed together making the vibrations to
the handle noticeably stronger.
Operator Force
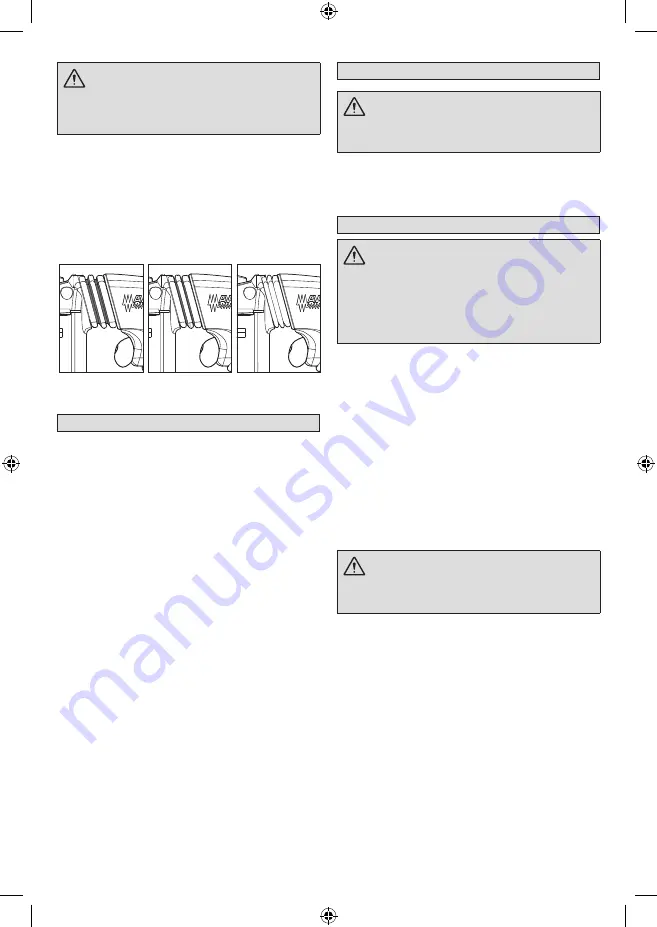
The Anti-Vibration System provides the operator with
comfort without sacrificing power or performance.
Ideal operator force compresses the bellows slightly and
allows the tool to work aggressively while the handle
remains steady.
Excessive force compresses the bellows significantly and
reduces vibration dampening. Users will be able to feel
the difference and should adjust the force to the handle
accordingly.
Too Little
Correct
Too much
force
force
force
APPLICATIONS
Selecting bits
When selecting a bit, use the right type for your job. For
best performance, always use sharp bits.
Drilling
1. Before drilling, be sure the workpiece is clamped
securely. Use backing material to prevent damage
to the workpiece during breakthrough.
2. When starting a hole, place the drill bit on the work
surface and apply firm pressure. Begin drilling at a
slow speed, gradually increasing the speed as you
drill.
3. Always apply pressure in line with the bit. Use enough
pressure to keep the drill biting, but do not push hard
enough to stall the motor.
4. Reduce pressure and ease the bit through the last
part of the hole. While the tool is still running, pull the
bit out of the hole to prevent jamming.
Drilling in wood, composition materials and
plastic
(Use chuck adapter kit Cat. No. M18 CHX)
When drilling in wood, composition materials and plastic,
start the drill slowly, gradually increasing speed as you
drill. When drilling into wood, use wood augers or twist
drill bits. Always use sharp bits. When using twist drill
bits, pull the bit out of the hole frequently to clear chips
from the bit flutes. To reduce the chance of splintering,
back work with a piece of scrap wood. Select low speeds
for plastics with a low melting point.
ACCESSORIES
WARNING
Always remove battery pack
before changing or removing accessories. Only
use accessories specifically recommended for
this tool. Others may be hazardous.
For a complete listing of accessories refer to your
MILWAUKEE
®
electric tool catalogue or go online to
www.milwaukeetools.com.au or www.milwaukeetools.
co.nz. To obtain a catalogue, contact your local
authorised
MILWAUKEE
®
dealer or service centre.
MAINTENANCE
WARNING
To reduce the risk of injury,
always unplug the charger and remove the battery
pack from the charger or tool before performing
any maintenance. Never disassemble the tool,
battery pack or charger.
Contact the store where the product was originally
purchased or one of our MILWAUKEE® authorised
service centre dealer or service centre.
Maintaining tool
Keep your tool, battery pack and charger in good repair
by adopting a regular maintenance program. After six
months to one year, depending on use, return the tool,
battery pack and charger to the store where the product
was originally purchased or one of our authorised
MILWAUKEE®
service centres.
• Lubrication
• Mechanical inspection and cleaning (gears, spindles,
bearings, housing, etc.)
• Electrical inspection (battery pack, charger, motor)
• Testing to assure proper mechanical and electrical
operation
If the tool does not start or operate at full power with a
fully charged battery pack, clean the contacts on the
battery pack. If the tool still does not work properly, return
the tool, charger and battery pack, to the store where the
product was originally purchased or one of our authorised
MILWAUKEE®
service centres for repair.
WARNING
To reduce the risk of personal
injury and damage, never immerse your tool,
battery pack or charger in liquid or allow a liquid to
flow inside them.
Cleaning
Clean dust and debris from charger and tool vents. Keep
tool handles clean, dry and free of oil or grease. Use only
mild soap and a damp cloth to clean the tool, battery pack
and charger since certain cleaning agents and solvents
are harmful to plastics and other insulated parts. Some of
these include gasoline, turpentine, lacquer thinner, paint
thinner, chlorinated cleaning solvents, ammonia and
household detergents containing ammonia. Never use
flammable or combustible solvents around tools.
Repairs
For repairs, return the tool, battery pack and charger to
the nearest service center.


