Not for
Reproduction
9
Installation
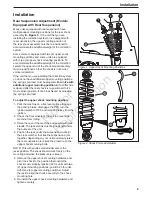
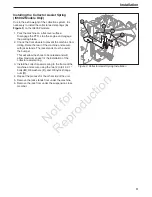
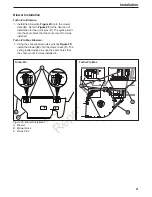
Figure 1. Upper Shock Mounting Positions
Installation
Rear Suspension Adjustment (Models
Equipped with Rear Suspension)
Many units equipped with rear suspension have
multiple upper mounting positions for the rear shock
assembly (
A,
Figure 1
). If the unit that you are
installing the collection system on is equipped with
rear suspension, the upper mounting position of
the rear shock assembly must be re-positioned to
accommodate the additional weight of the collection
system.
Some units are equipped with two (2) upper shock
mounting positions and some units are equipped
with three (3) upper shock mounting positions. To
accommodate the additional weight of the collection
system the upper end of the shock mount assembly
must re-positioned so that the shock is in its most
vertical orientation.
If the unit that you are installing the collection system
on does not have additional upper mounting positions,
the spring’s pre-load must be adjusted.
For unit’s with
additional upper mounting positions:
if a stiffer ride
is desired after the rear shock is re-positioned to it’s
most vertical position, it can be achieved by adjusting
the spring’s pre-load.
To adjust the upper shock mounting position:
1. Park the machine on a flat, level surface. Engage
the parking brake, disengage the PTO, turn the
ignition switch to OFF, and remove the key from the
ignition.
2. Chock the front wheels of the unit to prevent the
machine from rolling.
3. Raise the rear of the machine and secure with jack
stands. The jack stands must be positioned under
the bumper of the unit.
4. Position the jack under the suspension cradle (or
the cross member that ties the suspension arms
together, depending on your unit) and slowly raise
the rear suspension to relieve the pressure on the
upper shock mounting bolts.
NOTE: This will require small adjustments to the
jacks position. The shock should move freely on the
mounting bolt when the pressure is relieved.
5. Remove the upper shock mounting hardware and
pivot the shock to the position that orients the
shock most vertically (position #2 for units with two
(2) upper mounting positions; position #3 for units
with three (3) upper mounting positions). Adjust
the jack to align the shock assembly to the shock
mounting hole.
6. Re-install the upper shock mounting hardware and
tighten securely.
1
2
A
3
C
B
A
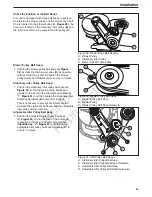
Figure 2. Shock Pre-Load Adjuster


