Chapter 4 Helpful Tips
117
Setting Sorting
1
Press the [FUNCTION] key in local mode.
2
Use
to select [SET UP], then press the [ENTER/HOLD] key.
3
Use
to select [SORTING], then press the [ENTER/HOLD] key.
4
Use
to select [ON], then press the [ENTER/HOLD] key.
5
Use
to select the [AUTO FEED] setting, then press the [ENTER/HOLD] key.
• Select [ON] if auto feed is required.
6
Use
to select the [AREA] setting, then press the [ENTER/HOLD] key.
• Setting: OFF or 10 to 5,100 cm (in 10 cm increments)
7
Press the [END] key several times to exit.
• The settings are retained even when the power is turned off.
• Altering the setting clears the receive buffer contents.
• Enabling sorting reduces the receive buffer size to approximately 20 MB.
Sorting Procedure
1
Send the data.
• The size of unprocessed data within the receive buffer is displayed.
• Cutting (printing) is not performed.
• Processed line segments are loaded into the sorting buffer.
• Once the data has been sent, the waiting time until cutting starts is displayed.
• The remaining time is displayed in seconds.
• The countdown starts provided no data is received while waiting for cutting to start.
2
Use auto feed.
• The sheet is pulled out by the amount corresponding to the cut before cutting starts.
• Send data or perform multiple sheet cutting after replacing with a long sheet.
Copies of the Same Data [No. COPIES]"(P. 106)
3
Start cutting.
• The progress of the data that has been cut is displayed as a percentage.
• The machine switches to remote mode once cutting is complete.
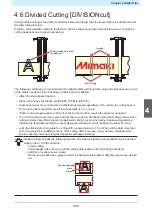
When the sorting function is enabled, cutting does not start after all of the cutting data has
been received until the close time has elapsed.
However, sorting and cutting will start before the close time has elapsed in the following
cases:
• When the sorting buffer becomes full (with approximately 500,000 line segments)
• When the cut conditions, such as tool number, speed, and pressure, have been changed
• When the feed command or origin update command has been executed
4
Summary of Contents for CG-100AR
Page 39: ...Chapter 1 Before Using This Machine 39 2 Shut down the computer connected to the machine 1 ...
Page 76: ...Chapter 2 Cutting 76 ...
Page 98: ...Chapter 3 Cutting Data with Register Marks 98 ...
Page 131: ...Chapter 4 Helpful Tips 131 4 Press the END key several times to exit 4 ...
Page 132: ...Chapter 4 Helpful Tips 132 ...
Page 133: ...Chapter 5 Settings This chapter Describes the individual settings FUNCTION 134 SET UP 135 ...
Page 150: ...Chapter 6 Maintenance 150 ...
Page 158: ...Chapter 7 Options 158 ...
Page 178: ...Chapter 9 Appendix 178 ...
Page 182: ...MEMO ...


