Chapter 4 Helpful Tips
124
10
Use
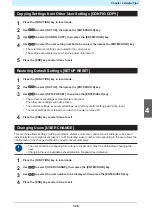
to alter the setting, then press the [ENTER/HOLD] key.
11
Press the [END] key several times to exit.
• Turn the power off then on again to update the network settings.
Event Email Function Settings [EVENT MAIL]
An email can be sent to a specified email address when an event (e.g., print start, print end, and abort)
occurs.
• SSL (Secure Socket Layer) encoding is not supported.
• Connect the LAN cable to use the event mail function.
Disclaimers
• Internet communication charges for email notifications, etc. are the responsibility of the customer.
• Event emails may not be delivered if problems arise with the Internet setup or equipment. Mimaki
rejects all liability for damages resulting from delivery failure or delay.
l
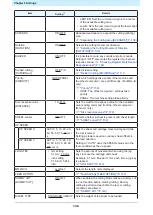
Event email setting item list
Item
Setting
*1
Details
Mail Delivery
[Delivery]
ON/OFF
Sets whether event emails are sent.
Select Event
[Event]
-
PlotStart Event
ON/OFF
Sets whether an email is sent when cutting starts.
Plot End Event
ON/OFF
Sets whether an email is sent when cutting ends.
Error Event
ON/OFF
Sets whether an email is sent when an error occurs.
Warning Event
ON/OFF
Sets whether an email is sent when a warning occurs.
Mail Addr.
Alphanumeric
characters or symbols
(Not more than 96)
Set the email address to which event emails are to be
sent.
Message Subject
[Subject]
Alphanumeric
characters or symbols
(Not more than 8)
Sets the text used as the event email subject.
Server Setup
[SERVER]
-
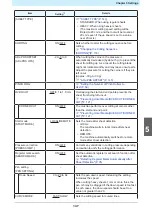
SMTP Address
-
Sets the SMTP server.
SMTP Port No.
-
Sets the SMTP port number.
Sender Address
[Sender Adr.]
Alphanumeric
characters or symbols
(Not more than 64)
Sets the email sender address. Depending on the
server used, it may not be possible to send emails
unless an email address corresponding to the server
account is set.
• Setting an email address corresponding to the
server account allows emails to be sent.
Summary of Contents for CG-100AR
Page 39: ...Chapter 1 Before Using This Machine 39 2 Shut down the computer connected to the machine 1 ...
Page 76: ...Chapter 2 Cutting 76 ...
Page 98: ...Chapter 3 Cutting Data with Register Marks 98 ...
Page 131: ...Chapter 4 Helpful Tips 131 4 Press the END key several times to exit 4 ...
Page 132: ...Chapter 4 Helpful Tips 132 ...
Page 133: ...Chapter 5 Settings This chapter Describes the individual settings FUNCTION 134 SET UP 135 ...
Page 150: ...Chapter 6 Maintenance 150 ...
Page 158: ...Chapter 7 Options 158 ...
Page 178: ...Chapter 9 Appendix 178 ...
Page 182: ...MEMO ...


