Chapter 7 Options
153
1
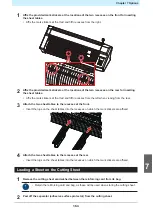
Affix the provided mark stickers at the locations of the two recesses on the front for inserting
the sheet tables.
• Affix the mark stickers at the third and fifth recesses from the right.
2
Affix the provided mark stickers at the locations of the two recesses on the rear for inserting
the sheet tables.
• Affix the mark stickers at the third and fifth recesses from the left when viewing from the rear.
3
Attach the two sheet tables to the recesses at the front.
• Insert the lugs on the sheet tables into the recesses on which the mark stickers are affixed.
4
Attach the two sheet tables to the recesses at the rear.
• Insert the lugs on the sheet tables into the recesses on which the mark stickers are affixed.
Loading a Sheet on the Cutting Sheet
1
Remove the cutting sheet sandwiched between the reinforcing card from its bag.
• Retain the reinforcing card and bag, as these will be used when storing the cutting sheet.
2
Peel off the separator (adhesive surface protector) from the cutting sheet.
7
Summary of Contents for CG-100AR
Page 39: ...Chapter 1 Before Using This Machine 39 2 Shut down the computer connected to the machine 1 ...
Page 76: ...Chapter 2 Cutting 76 ...
Page 98: ...Chapter 3 Cutting Data with Register Marks 98 ...
Page 131: ...Chapter 4 Helpful Tips 131 4 Press the END key several times to exit 4 ...
Page 132: ...Chapter 4 Helpful Tips 132 ...
Page 133: ...Chapter 5 Settings This chapter Describes the individual settings FUNCTION 134 SET UP 135 ...
Page 150: ...Chapter 6 Maintenance 150 ...
Page 158: ...Chapter 7 Options 158 ...
Page 178: ...Chapter 9 Appendix 178 ...
Page 182: ...MEMO ...


