Chapter 2 Cutting
49
2
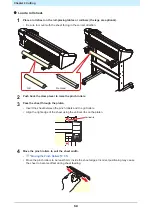
Align the slots in the roll-placing table with the groove underneath the machine and slide to
the left or right to attach.
• The figure below shows the roll-placing table attached after sliding it to the left.
3
Attach the other roll-placing table to the machine in the same way.
4
Adjust the roll-placing table positions to suit the roll width.
l
Attach the optional CG-60AR legs.
For more information on how to attach the optional CG-60AR legs, refer to the assembly instructions
provided with the legs.
2
Summary of Contents for CG-100AR
Page 39: ...Chapter 1 Before Using This Machine 39 2 Shut down the computer connected to the machine 1 ...
Page 76: ...Chapter 2 Cutting 76 ...
Page 98: ...Chapter 3 Cutting Data with Register Marks 98 ...
Page 131: ...Chapter 4 Helpful Tips 131 4 Press the END key several times to exit 4 ...
Page 132: ...Chapter 4 Helpful Tips 132 ...
Page 133: ...Chapter 5 Settings This chapter Describes the individual settings FUNCTION 134 SET UP 135 ...
Page 150: ...Chapter 6 Maintenance 150 ...
Page 158: ...Chapter 7 Options 158 ...
Page 178: ...Chapter 9 Appendix 178 ...
Page 182: ...MEMO ...


