Chapter 2 Cutting
47
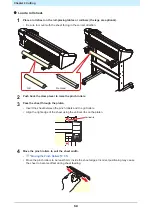
Loading a Leaf Sheet (Cut Sheet)
1
Push back the clamp lever to raise the pinch rollers.
2
Pass the sheet through the platen.
• Insert the sheet between the pinch rollers and the grit rollers.
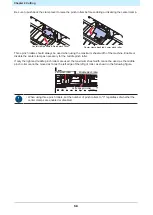
• Either align the right edge of the sheet, using the vertical ribs on the platen, or align the front of the
sheet to be parallel with the platen.
Vertical rib
3
Move the pinch rollers to suit the sheet width.
•
"Pinch Rollers and Grit Rollers"(P. 28)
• Move the pinch rollers to be at least 5 mm inside the sheet edges. Incorrect positioning may cause
the sheet to become offset during sheet feeding.
4
Set the clamps at both edges to High mode.
•
"Setting the Clamp High/Low Mode"(P. 57)
5
If using three pinch rollers, select High mode or Low mode for the center clamp as appropriate
to suit the sheet being used.
•
"Setting the Clamp High/Low Mode"(P. 57)
6
The center clamps can be enabled or disabled when using three pinch rollers.
•
"Enabling and Disabling the center clamp"(P. 57)
• The center clamp should be enabled (center clamp up) if you do not wish leave pinch roller marks
on the sheet.
7
Pull the clamp lever toward you.
8
Check to confirm that the pinch rollers are evenly spaced.
• Hold the sheet between the pinch rollers and grit rollers.
• If the spacing is not uniform, repeat all steps from the start.
2
Summary of Contents for CG-100AR
Page 39: ...Chapter 1 Before Using This Machine 39 2 Shut down the computer connected to the machine 1 ...
Page 76: ...Chapter 2 Cutting 76 ...
Page 98: ...Chapter 3 Cutting Data with Register Marks 98 ...
Page 131: ...Chapter 4 Helpful Tips 131 4 Press the END key several times to exit 4 ...
Page 132: ...Chapter 4 Helpful Tips 132 ...
Page 133: ...Chapter 5 Settings This chapter Describes the individual settings FUNCTION 134 SET UP 135 ...
Page 150: ...Chapter 6 Maintenance 150 ...
Page 158: ...Chapter 7 Options 158 ...
Page 178: ...Chapter 9 Appendix 178 ...
Page 182: ...MEMO ...


