3-13
Cut Out Data with Registration Mark
3
Use
ful Func
tion
Precautions in inputting data with registration marks
There are some limitations on preparing data with registration marks.
In order to make full use of this function, read the following instructions carefully and prepare data with
registration marks properly.
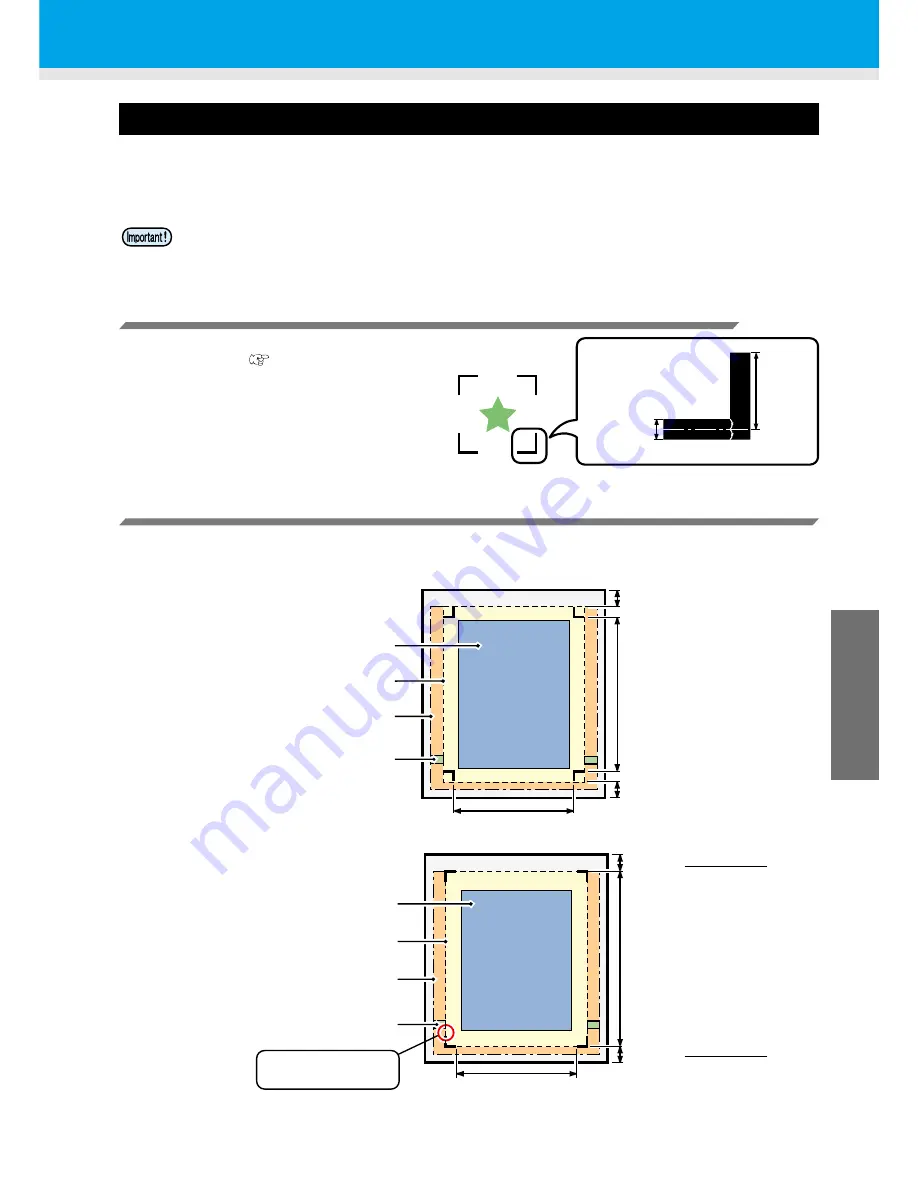
Size of the registration marks
Refer to "The size of, and the distance between,
registration marks"(
P.3-15) for the
relationship between the data and the length of
one side of a registration mark.
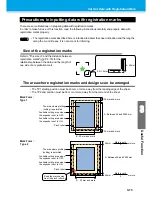
The area where registration marks and designs can be arranged
• The TP1 starting position must be 20 mm or more away from the leading edge of the sheet.
• The TP2 end position must be 30 mm or more away from the tail end of the sheet.
Mark Form :
Type 1
Mark Form :
Type 2
• The registration mark described here is intended to detect the sheet inclination and the lengths
along the A and B axes. It is not a mark for trimming.
0.3~1.0mm
4~40mm
The area where plotting
(cutting) is permitted
Available cutting area when
the expands is set to OFF.
Available cutting area when
the expands is set to ON.
Pinch roller
30 mm and more
A : Between 50 and 3000 mm
20 mm and more
B : 50 mm and more
The area where plotting
(cutting) is permitted
Available cutting area when
the expands is set to OFF.
Available cutting area when
the expands is set to ON.
Pinch roller
30 mm + or more
Mark length
2
20 mm + or more
Mark length
2
A : Between 50 and 3000 mm
B : 50 mm and more
Keep the marks away
from the pinch rollers.
Summary of Contents for CG-60SR
Page 1: ...D201611 16 MIMAKI ENGINEERING CO LTD URL http www mimaki co jp...
Page 5: ...iv...
Page 14: ...xiii...
Page 141: ...Function Flowchart 5 15 5 Appendix FORM TYPE1 4 40 SPEED 1 0 cm s TYPE1 TYPE2...
Page 142: ...5 16...
Page 143: ...D201611 16 30112011...

