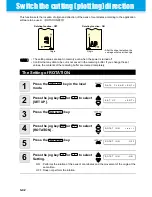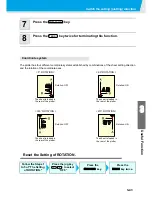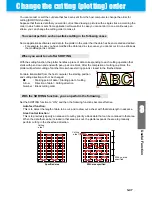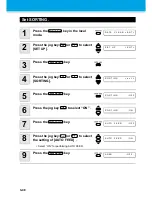
Perform DIVISION CUT.
3-46
Cut Data via DIVISION CUT.
1
Send data from the host computer to
the plotter.
• If the data exceeds the available cutting area, the
display shown at right will appear.
2
When cutting completes, the plotter
automatically cuts the frame and area
marked for gluing.
• On the display panel, the time for completing
cutting of the frame and area marked for gluing
appears.
3
Upon completion of the frame cutting,
the plotter will return to local mode.
• Do not replace the sheet when any other display is shown.
4
Set the new origin.
• Move the carriage using jog keys (arrow keys) to establish the origin.
• If the sheet has no space for cutting, replace the sheet with a new one.
5
Press the
key to set the plotter in remote mode.
• Feed the sheet by the maximum sheet length necessary for the cuting data and start
cutting.
• If the sheet is not fed or the sheet is not sufficiently long, replace the sheet with a larger
one in step 4 above.
6
Repeat steps 4 and 5.
• Repeat those steps until there is no data that exceeds the sheet width.
• Upon completion of cutting for all the data, the plotter will return to local mode, displaying
the tool conditions
* *
O F F
S C A L E
* *
Available
area
Origin
* * D I V I S I O N * *
X X s
The remaining time until
the completion of cutting
the frame and marks
C U T 1
D I V I S I O
REMOTE
C U T 1
2 0
0 5 0
0 . 3 0
Summary of Contents for CG-60SR
Page 1: ...D201611 16 MIMAKI ENGINEERING CO LTD URL http www mimaki co jp...
Page 5: ...iv...
Page 14: ...xiii...
Page 141: ...Function Flowchart 5 15 5 Appendix FORM TYPE1 4 40 SPEED 1 0 cm s TYPE1 TYPE2...
Page 142: ...5 16...
Page 143: ...D201611 16 30112011...

