- 6 -
12.
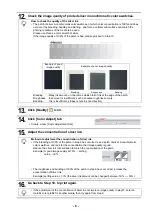
Check the image quality of printed silver monochromatic color swatches.
13.
Click [Quality]
icon.
14.
Click [Color Adjust] tab
.
• Create a new [Color Adjustment Set].
15.
Adjust the concentration of silver ink.
16.
Go back to Step 10, to print again.
How to check the quality of the silver ink
• The patch of silver monochromatic color swatches, of which color concentration is 100% and does
not occur the bleeding, banding and blurring, and form a uniform print surface can match the
printing conditions of the media to be used.
Please use this as a color swatch of silver.
If the image quality of 100% of the patch is bad, please proceed to Step 13.
Bleeding
:Many ink amount, or it becomes whitish full of ink at the edge of the patch.
Roughness :Ink amount is insufficient, such as hoarse roughness occurs.
Banding
: Ink is insufficient, stripes occurs in scan direction.
Method of adjustment the concentration of silver ink
• If the bleeding at 100% of the patch in step 9 has occurred, see a patch of silver monochromatic
color swatches, and look for the concentration that image quality is good.
Reduce the silver ink concentration to match the concentration of the patch.
Example) A good image quality at 70%
→
setting
value : -30%
• The roughness and banding at 100% of the patch in step 9 have occurred, increase the
concentration of Silver ink.
Example) setting value: + 10% (the silver ink amount can be changed between -50% ~ + 50%).
• If the adjustment of the concentration of silver ink not improve image quality in step15, select a
metallic color profile for another media, then try again from step 9.
Example of good
image quality
Example of poor image quality
Bleeding
Roughness
Banding

