- 3 -
Prepare this product
Following the procedures below, prepare this product.
1.
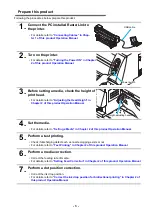
Connect the PC installed RasterLink to
the printer.
• For details, refer to
“Connecting Cables” in Chap-
ter 1 of this product Operation Manual
.
2.
Turn on the printer.
• For details, refer to
“Turning the Power ON” in
Chapter
2 of this product Operation Manual
.
3.
Before setting a media, check the height of
print head.
• For details, refer to
“Adjusting the Head Height” in
Chapter 2 of this product Operation Manual
.
4.
Set the media.
• For details, refer to
“Setting a Media” in Chapter 2 of this product Operation Manual
.
5.
Perform a test printing.
• Check if discharging defect such as nozzle clogging exists or not.
• For details, refer to
“Test Printing” in Chapter 2 of this product Operation Manual
.
6.
Perform a media correction.
• Correct the feeding rate of media.
• For details, refer to
“Setting Feed Correction” in
Chapter 2 of this product Operation Manual
.
7.
Perform a dot position correction.
• Correct the ink drop position.
• For details, refer to
“Correct the ink drop position for bidirectional printing” in
Chapter 2 of
this product Operation Manual
.
USB cable
Power switch
Height-adjusting handle
Summary of Contents for JV400-SUJV-160
Page 10: ... 10 ...
Page 11: ... 11 ...
Page 12: ...D202396 20 30072020 MIMAKI ENGINEERING CO LTD 2015 MK ...


