3-19
3
2
2
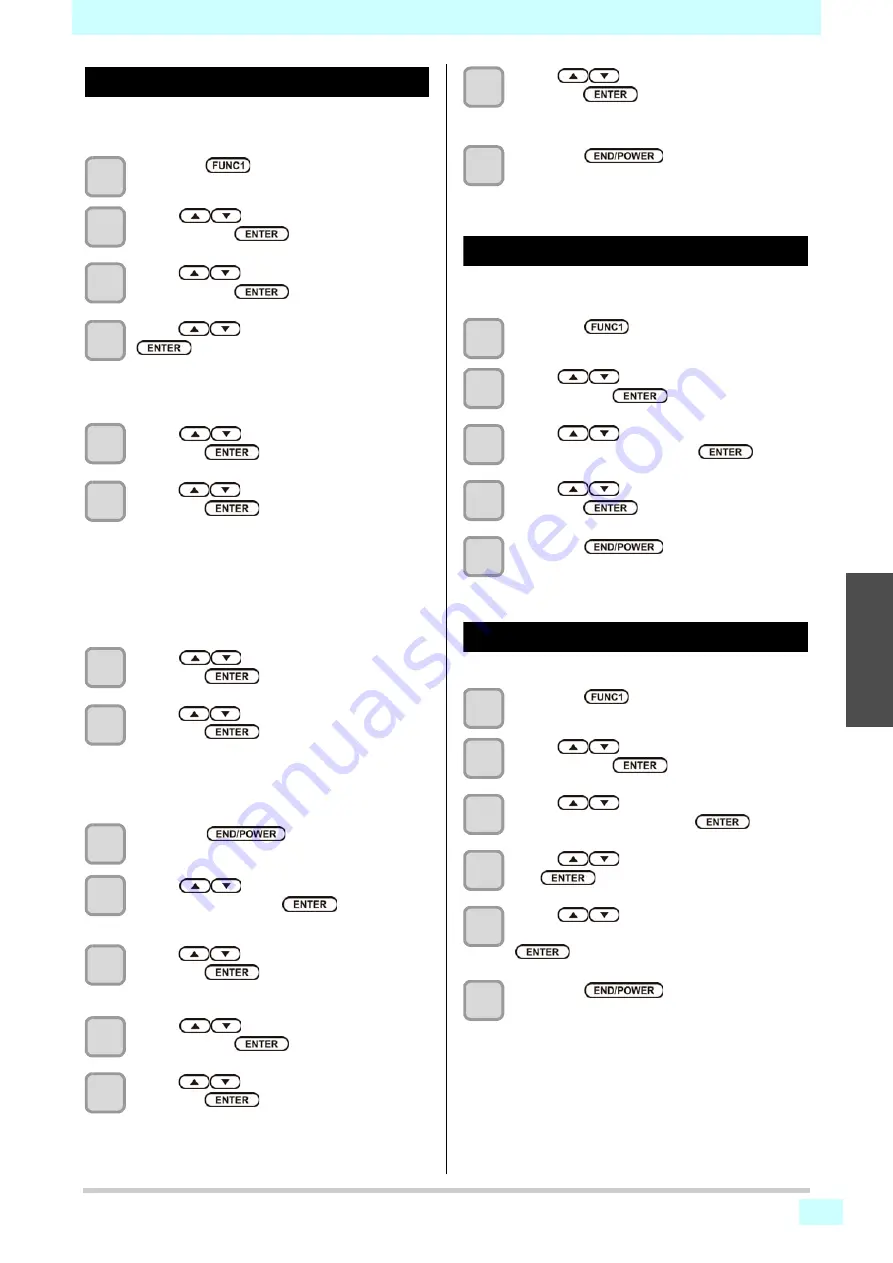
Setting the Printing Check
Select ON when you want to conduct nozzle check at the
start of online printing.
1
Press the
(MENU)
in Local.
2
Press
to select “Nozzle Check”,
and press the
key.
3
Press
to select “Printing Check”,
and press the
key.
4
Press
to select ON, and press the
key twice.
• The “Check Interval” setting screen appears.
• “Select OFF to not set nozzle check. Proceed to
Step 11.
5
Press
to select “Setup”, and
press the
key.
6
Press
to select setting value, and
press the
key.
• select the nozzle check interval from “Length” or
“FILE”.
Length
: nozzle check is conducted when the
printed length reaches the set length.
FILE
: nozzle check is conducted when the
number of printed files reaches the
set number.
7
Press
to select “Interval”, and
press the
key.
8
Press
to select setting value, and
press the
key.
• The set value will differ according to the setting
selected in Step 5.
Length
: 0.1 to 100 m
FILE
: 0 to 300 files
9
Press the
key.
10
Press
to select “Continuation
Print”, and press the
key.
11
Press
to select setting value, and
press the
key.
Setting value
: Stop/ Continue
12
Press
to select cleaning type,
and press the
key.
13
Press
to select setting value, and
press the
key.
Setting value
: Soft/ Normal/ Hard
14
Press
to select retry count, and
press the
key.
Setting value
: 0 to 3
15
Press the
key several times to
end the setting.
Setting the Auto Nozzle Recoverry
set this if you want to conduct automatic nozzle recovery
when nozzle missing is detected.
1
Press the
(MENU)
in Local.
2
Press
to select “Nozzle Check”,
and press the
key.
3
Press
to select “Auto Nozzle
Recoverry”, and press the
key.
4
Press
to select ON/OFF, and
press the
key.
5
Press the
key several times to
end the setting.
Setting the Judgement Condition
Set the conditions for judging nozzle missing.
1
Press the
(MENU)
in Local.
2
Press
to select “Nozzle Check”,
and press the
key.
3
Press
to select “Judgement
Condition”, and press the
key.
4
Press
to select color, and press
the
key.
5
Press
to set the number of
nozzles for judgment, and press the
key.
6
Press the
key several times to
end the setting.
Summary of Contents for SIJ-320UV
Page 1: ...MIMAKI ENGINEERING CO LTD URL http mimaki com D202809 13 Original instructions ...
Page 14: ...xiii Warning labels ...
Page 28: ...1 14 Chapter 1 Before Use ...
Page 98: ...4 26 ...
Page 116: ...5 18 Chapter 5 Troubleshooting ...
Page 122: ...Chapter 6 Appendix 6 6 ...

