background image

- A.4 -

SPECIFICATION FOR INK

Item

Specifications

Form

Ink cartridge exclusive to the device

Color

Black ink cartridge (SPC-0268K)

(Acid dye ink)

Cyan ink cartridge (SPC-0268C)
Magenta ink cartridge (SPC-0268M)
Yellow ink cartridge (SPC-0268Y)
Lightd cyan ink cartridge (SPC-0268LC)
Light magenta ink cartridge (SPC-0268LM)
Gray ink cartridge (SPC-0268GR)
Blue ink cartridge (SPC-0268BL)
Red ink cartridge (SPC-0268R)

Color

Black ink cartridge (SPC-0269K)

(Disperse dye ink)

Cyan ink cartridge (SPC-0269C)
Magenta ink cartridge (SPC-0269M)
Yellow ink cartridge (SPC-0269Y)
Lightd cyan ink cartridge (SPC-0269LC)
Light magenta ink cartridge (SPC-0269LM)
Gray ink cartridge (SPC-0269GR)
Blue ink cartridge (SPC-0269BL)
Light Blue ink cartridge (SPC-0269LBL)

Color

Black ink cartridge (SPC-0270K)

(Reactive dye ink)

Cyan ink cartridge (SPC-0270C)
Magenta ink cartridge (SPC-0270M)
Yellow ink cartridge (SPC-0270Y)
Lightd cyan ink cartridge (SPC-0270LC)
Light magenta ink cartridge (SPC-0270LM)
Gray ink cartridge (SPC-0270GR)
Blue ink cartridge (SPC-0270BL)
Orange ink cartridge (SPC-0270OR)
Red ink cartridge (SPC-0270OR)
Golden yellow ink cartridge (SPC-0270GY)

Contents of inkcartridge

220 cc per cartrige

Shelf life

Two years from the data of manufacture (at room temperature)
Described on the cartridge.
Within six months after opening the package
Within the expiration period described on the cartridge.

Storage temperature

-30 to 40 

°

C

During storage:

(Storage at temperature of 40

C is permitted within a month.)

Storage temperature

-30 to 60 

°

C

During:

(Storage at temperature of 60

°

C is only permitted within

120 hours, and at temperature of 40

°

C is permitted within

a month.)

The ink will freeze when it is left for a long time under temperature below

-4

°

C.  Should it freeze, leave the ink cartridge at room temperature

(at 25

°

C) for three hours or more to allow the ink to melt.

Disassembling the ink cartridge or refilling the ink shall be avoided.

Summary of Contents for TextileJet Tx2-1600 Series

Page 1: ...EERING CO LTD TKB Gotenyama Building 5 9 41 Kitashinagawa Shinagawa ku Tokyo 141 0001 Japan Phone 81 3 5420 8671 Fax 81 3 5420 8687 URL http www mimaki co jp E mail traiding mimaki co jp D200595 OPERA...

Page 2: ......

Page 3: ...caused by a product that is manufactured the fabric Please be noted that MIMAKI ENGINEERING CO LTD shall have no liability for any debts unearned profits and any claims from any third party resulting...

Page 4: ...m the product Use a power line for the receiver that is not shared with the product FCC Statement USA This equipment has been tested and found to comply with the limits for a Class A digital device pu...

Page 5: ...nce of Model Tx2 1600 Color InkJet Plotter hereinafter referred to as the plotter Please read and fully understand this Operation Manual before putting the machine into service It is also necessary to...

Page 6: ...ed by MIMAKI for the fabric used APPLICABILITY OF FABRICS UP TO 7 MM IN THICKNESS Even thick fabric such as boards can be used The plotter accepts fabric whose thickness is in the range of 0 1mm to 7...

Page 7: ...and 5 5 mm DITCH FOR PENETRATED INK Even with printing to a coarse textured fabric the backing fabric is not stained by penetrated ink Removable platen boards are prepared for fabrics without ink pene...

Page 8: ...tes the case where some phenomenon that re quires a CAUTION sign including DANGER and WARNING signs exists A concrete precaution precaution against an electric shock in the case of the sketch given on...

Page 9: ...repair your device by yourself since it is very dangerous for you to do so Roll fabric Roll fabric is heavy Be careful not to drop it If you drop it on your foot or any other part of your body person...

Page 10: ...to fall abruptly down on the fabric during printing If this phenomenon takes place be sure to clean up the head See Chapter 4 Maintenance functions Periodic exchange parts There are some parts which...

Page 11: ...k cartridges in a cold and dark place Never replenishes the ink cartridge with ink Using any ink type other than the exclusive one can cause a trouble Remember that the user shall be charged for a rep...

Page 12: ...THE FRONT COVER 1 7 Carriage 1 7 Capping station 1 8 The pinch roller and feed roller 1 8 The media sensor 1 9 Head hight adjustment rod and adjustment screw 1 10 Fablic retainer 1 11 Ditch for penet...

Page 13: ...way high speed printing 1 32 Setting for 2 way multi printing 1 33 TO REPLENISH INK SET A NEW INK CARTRIDGE IN THE INK STATION 1 34 FABRIC THAT CAN BE USED 1 35 Types of fablic that can be used 1 35...

Page 14: ...2 9 Cleaning ink heads 2 9 ROUTINE MAINTENANCE 2 10 When the device is left unused for a long period of time 2 10 Notes on cleaning 2 10 Cleaning wiper 2 10 Cleaning ink at the bottom of the slider 2...

Page 15: ...ANCE 4 2 BEFORE STARTING MAIANTENANCE 4 3 Checking the menu mode 4 3 Invoking a maintenance function 4 3 MAINTENANCE FUNCTIONS 4 4 Drawing Setup Conditions LIST 4 4 Printing HEX code of printing comma...

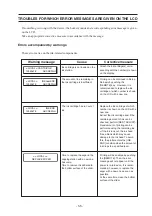
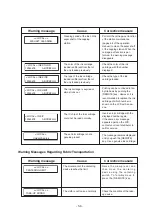
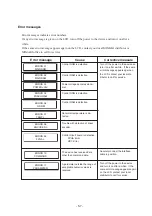
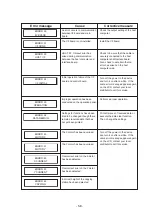
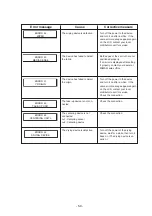
Page 16: ...he respective color ink injected by the respective color heads do not properly overlap 5 4 TROUBLES FOR WHICH ERROR MESSAGES ARE GIVEN ON THE LCD 5 5 Errors accompanied by warnings 5 5 Warning Message...

Page 17: ...e is explained The pages of each chapter are given serial numbers starting from 1 Notes to sentences caution on device operation and hints for effective use of the device are given The item to select...

Page 18: ...lay is shown in characters in a box as shown at right Operate the device according to the explanation of the operation procedure and the content of display on the LCD In this instruction manual each s...

Page 19: ...LICATION FUNCTIONS This chapter describes the application functions of the device such as the function menu for setting printing conditions CHAPTER 4 MAINTENANCE FUNCTIONS This chapter describes funct...

Page 20: ...xvi...

Page 21: ...COVER 1 7 UNPACKING AND ASSEMBLING 1 13 LAPEL BAR 1 20 CONNECTING THE CABLES 1 22 CONNECTING THE POWER CABLE 1 23 SWITCHING ON OFF THE POWER SUPPLY 1 24 FRONT COVER 1 26 INK CARTRIDGES 1 27 INITIAL S...

Page 22: ...e before assembling the device The place of installation must have space required not only for the device itself but also for printing operation Length Width Height Gross weight 2750 mm 750 mm 1350 mm...

Page 23: ...ged one please contact your local dealer It varies according to your order for Ink Cartridge and the additional accesories Main unit Take up device Take up auxiliary bar Left stand Right stand Loading...

Page 24: ...Slip sheet bar Centering sensor unit Phillips screwdriver Power cable Hexagonal wrench L Ink Cartridge 8 x 2 Device Driver Grouding adapter M4 cap bolt M8 cap bolt Lapel bar x 3 for fitting the take u...

Page 25: ...for displaying set items etc 7 Maintenance cover This is the station cover During maintenance of the station See page 4 8 open it by loosening the screws 8 Waste ink hose Waste ink hose 9 Stand It sup...

Page 26: ...oading unit Inserted into both ends of the fabric core to retain the roll fabric 5 Roll holder Applicable to roll paper with a thickness of 1 35 2 or 3 inches 6 Loading auxiliary bar This shaft suppor...

Page 27: ...the thickness of the fabric used The carriage moves during printing and fabric detection When cleaning detecting of fabric the capping station execute the STATION MAINTENANCE function to move the car...

Page 28: ...This device retains a fabric with the pinch roller and the feed roller During printing operation the feed roller feeds the fabric forward While the plotter is not being used keep the pinch roller in...

Page 29: ...a transparent fabric or a fabric whose reverse side is colored in black the sheet sensors may fail to detect the sheet In this case LCD gives the following message Set up fabric to cover media sensor...

Page 30: ...height the head may get caught on the fabric causing damage to the heads For the method of head height adjustment see Adjusting the Head Height Height Adjustment page 1 37 in this chapter Height adjus...

Page 31: ...rinting width Printing with the full width up to 1620mm width is possible by setting the fablic ratainer to a position apart from the edge 1620mm width or less If a fablic retainer is stained by ink i...

Page 32: ...ard to the projection at the edge of the ditch for penetrated ink The width of the ditch for penetrated ink can be changed in three steps depending on the way of attachment Pattern1 Amount of penetrat...

Page 33: ...four persons to ensure safety Exercise added care not to drop the main unit on your feet STEP 1 Remove the four bolts that fixes the packed pedestals and packed pads Take care not to lose these bolts...

Page 34: ...up each stand with the side having a groove for fitting the stay coming inside 4 Attach the take up device to the leg Put the take up device on the leg and then temporarily secure it using the suppli...

Page 35: ...caught between them Set the device on the stand at the position where the screw holes in the device align with the screw holes in the tops of the stands Fix to the stands with the screws from under t...

Page 36: ...take up auxiliary bar with the screw hole on the front face of the stand then fasten the screws Attaching loading auxiliary bar Align the screw hole of the take up auxiliary bar with the screw hole o...

Page 37: ...bar then fasten the screws Attaching loading unit Align the screw hole of the run out device with the screw hole of the stand then fasten the screws See page 1 52 Connecting connectors and cables Conn...

Page 38: ...g on the maintenance cover 1 Put on the maintenance cover 2 Fix the maintenance cover with the screws Do not open the maintenance cover except when it is necessary to clean the station interior page 4...

Page 39: ...bar Put the slip sheet on the hanger on the inner side of the stand Preparing the waste ink tank Prepare a tank for reserving waste ink This plotter is not provided with a standard waste ink tank Pre...

Page 40: ...acteristics of material of medium may be changed by pre treat ment If the pre treatment is changed be sure to perform test printing The centering may give no effect if the winding angle of the lapel b...

Page 41: ...umb screw push and move the slide plate toward the plotter unit it hit the stopper 3 Insert the lapel bar into the hole of the side plate and then allow it to slip in the lower slot 4 Make sure that t...

Page 42: ...EEE1394 interface cable to connect the computer and the plotter together It is possible to use an IEEE1284 interface cable for connection between the computer and the plotter In this case however the...

Page 43: ...to the connection of the power cable Be sure to insert the power cable into an approriately grounded receptacle If not there is a fear of arising electric shock hazards and damage to the device STEP 1...

Page 44: ...ched on 3 When the power is switched on the LCD first displays BOOT and then displays the firm ware version number 4 The message Please Wait appears flashing on the LCD 5 The device enters the LOCAL m...

Page 45: ...d there remains data that has not yet been output Also be sure that the head rests at the capping station If the power is turned off while the plotter is engaged in printing the head may fail to be re...

Page 46: ...on Otherwise the print ing data is lost Cautions during operation STEP 1 When opening the cover during printing the message shown on the right will be displayed 2 After the completion of data transmis...

Page 47: ...nd print head See to page 4 16 Relationships between ink station and head row The right ink station supplies ink to the front row F row of heads The left ink station supplies ink to the rear row R row...

Page 48: ...YELLOW SPC 0269Y YELLOW SPC 0270Y 8 BLUE SPC 0268BL or BLUE SPC 0269BL ORANGE SPC 0270OR or RED SPC 0270R or RED SPC 0268R GOLDEN YELLOW SPC 0270GY A GRAY SPC 0268GR GRAY SPC 0269GR GRAY SPC 0270GR B...

Page 49: ...c Suitable for wool silk in addition to cotton rayon etc Available ink colors include black cyan magenta yellow light cyan light magenta gray blue oraange red and golden yellow IC chip in Ink cartridg...

Page 50: ...using Be sure to thoroughly consume the ink in the ink cartridge once it is opened within six months If an extended period of time has passed after opening the cartridge tank printing quality would be...

Page 51: ...tations Once the ink cartridge is inserted to reach the normal position the buzzer will sound 3 By pushing the JOG keys and specify the type of ink set in the left ink station R row Acid Acid dye ink...

Page 52: ...A 2 and B 3 and C 4 and D 5 and E 6 and F 7 and G and 8 and H respectively During initial ink setting or ink change register the appropriate ink type for each ink station See page 1 31 The registered...

Page 53: ...e left ink station In either case the printing operation is performed in the same way since the heads are selected when used R row ink station F row ink station Set the left and right ink cartridge ca...

Page 54: ...e the printing P 4 21 2 When the amount of ink completely runs out during printing The amount of ink of the cartridge number indicated has completely run out Install a new ink cartridge into Slot C of...

Page 55: ...s roll fabric be careful about the setting position of leaf fabric When using the Leaf the following functions are disabled CENTERING TAKE UP DRYING DEV DRYING DEVICE is an option Sizes of fabric that...

Page 56: ...Expansion and contraction of the fabric Do not use ink adhered fabric with high elasticity Do not use fabrics with high elasticity Use of such a fabrics may cause contact with the print head nozzle di...

Page 57: ...fabric kept set on the platen the fabric gets caught on the carriage during carriage out operation causing damage to the head If you set the head height to 1 1mm minimum value from the platen surface...

Page 58: ...ront cover and then move the carriage manually 8 Adjust the head height 1 Loosen the support screw 1 turn the height adjustment screw 2 in the direction shown and move the head upward 2 Push down the...

Page 59: ...surface of the fabric 4 Retighten the support screw after completing the head height adjustment 9 Close the front cover 10 Push the ENTER key The carriage will come back to the capping station 11 The...

Page 60: ...even when the head is raised To avoid fluffing of the fabric surface warp of the fabric edge or waving of the fabric during printing the distance between the head and the printing surface of the fabr...

Page 61: ...When setting the fabric be sure to check that the head height has been properly adjusted STEP 1 Center the centering indicator Push the switch to the left and right so that the red indicator be positi...

Page 62: ...ave been inserted all the way into the fabric core secure it with the screw 5 Viewing from the rear side of the plotter align the left edge of the roll with the scale of the fabric setting position pl...

Page 63: ...over 7 Insert the leading edge of the fabric between the driver roller and pinch roller Be sure to lead the fabric outside the shaft of the centering sensor 8 Insert the roll fabric that has been pull...

Page 64: ...then pull out the fabric 10 Rewind the roll holder or fabric core several times from the rear face of the plotter Make the fabric slack to alleviate the tension of the fabric Do not pull the fabric di...

Page 65: ...2 Align the arrow of the centering sensor with the edge of the fabric Move the sensor unit When the edge of the fabric intersects the sensor optical axis a beep sounds Stop the centering sensor arrow...

Page 66: ...When applying an adhesive tape be sure to secure the center of the fabric first and then both edges In this case gently pull the fabric to prevent it from being slack 4 Move down the switch of the ta...

Page 67: ...of the fabric is thickened because of gumming processing to prevent fray slack may occur easily In this case remove the pinch rollers at both ends of the fabric STEP 1 Move up the clamp lever on the f...

Page 68: ...the hand screws lightly fasten them If the lengths of the fabrics at the left and right pinch rollers removed are different remarkably reset the fabric Perform the operation of SETTING THE ROLL from...

Page 69: ...ad space from the printing fabric The dead space at the front and rear edges of the fabric can be reduced using a guiding fabric Changing the dead space The dead space may be changed as required The e...

Page 70: ...an origin by pushing the JOG keys and As the carriage is moved the origin shifts in position The origin that changes with the movement of the carriage is displayed on the LCD 2 After deciding the orig...

Page 71: ...specifies the direction in which a fabric is wound UP The take up device winds the fabric with its printing face faced out OFF The take up device will not wind the fabric DOWN The take up device winds...

Page 72: ...function The range of the centering function is 100mm to the left and right When the indicator is set to the center position the function applies to 50mm fluctuation of the fabric edge Fabrics for wh...

Page 73: ...oved down to the bottom of the long hole and then se cured with a screw When the thickness of the fabric used is 1 5mm to 5 5mm use it with the stainless plate moved up to the top of the long hole and...

Page 74: ...parallelism of loading unit If the parallelism of the loading unit is remarkably broken the fabric deviation or wrinkle may occur In this case adjust the parallelism of the loading unit 1 Fasten the s...

Page 75: ...when the take up device is used with the slack method 1 Set the fabric to the take up device Refer to page 1 44 2 After printing is started if the fabric becomes slack and the slack sensor operates mo...

Page 76: ...ng the plotter it must be held up by at least two persons as illustrated at right The cover of the device may break if it is pressed hard Locking unlocking the casters When moving the plotter unlock e...

Page 77: ...unctions understand how to use the basic functions of the keys on the operation panel and the modes in which the menus are displayed on the LCD Table of contents OPERATION 2 2 PRINTING AN IMAGE FROM S...

Page 78: ...t lights up in green when the power to the device is turned on DATA CLEAR key Used to erase the data that has been input to the device REMOTE key It is used to change the operation mode between the RE...

Page 79: ...ng three modes Each of the three modes is explained below LOCAL mode This is the mode in which the preparations for printing operation are made When the power is switched on and the detection of a fab...

Page 80: ...e page 1 24 2 LOCAL Invoke the local mode on the LCD 3 To set up a specific function from the operation panel follow the procedure shown below 1 Push the appropriate operation key on the operation pan...

Page 81: ...ink that remains is displayed LOCAL INKremain 99321155 99321155 The type of ink being used is displayed LOCAL INK TYPE R Acid F Acid The height of head is displayed LOCAL HEAD Height XXmm Changing th...

Page 82: ...5 Receive data from the computer The printing conditions that have been set for the data are displayed For the method of data transmission see the manual for the output attached to the software 6 Dur...

Page 83: ...the DATE CLEAR key The data that has been received is erased 4 Push the ENTER key The device enters the LOCAL mode After completing the printing operation The operation to be performed by the operato...

Page 84: ...ttern 4 The device enters the LOCAL mode This function can be executed even during host data printing In this case however some host data will be missing The amount of missing data depends on the medi...

Page 85: ...ge amount of ink is consumed strong Select this if there are many missing portions STEP 1 The device enters the LOCAL mode See page 1 24 2 Push the CLEANING key See page 1 41 3 Select the ink head to...

Page 86: ...cable If not unexpected troubles can arise Do not use benzine thinner and chemical agents containing abrasives Such materials can deteriorate or deform the surface of the cover Do not apply lubricatin...

Page 87: ...printing is made on a thin cloth the ditch for penetrated ink may be stained by penetrated ink In this case clean the ditch with water Maintenance for frame components If the frame components of the d...

Page 88: ...2 12...

Page 89: ...set printing conditions on the device side and put the device into operation By using the application functions you can set printing conditions appro priate to data that is provided for the printing o...

Page 90: ...y to understand the proper sequence of key operations In Set up of the function menu allocate printing methods to be set to Types 1 to 4 before detailed setting of the individual printing conditions s...

Page 91: ...or the FUNCTION mode Check also that the mode displayed on the LCD is either LOCAL or FUNCTION See page 2 3 Setting the display language Set the language in which to display characters on the LCD Eng...

Page 92: ...EP 1 Make sure that the mode is LOCAL mode See Page 4 3 2 Push the FUNCTION key 3 Push the ENTER key 4 Select any of Types 1 through 4 by pushing the JOG keys and There are four types which you can se...

Page 93: ...ng on diverse types of media with appropriate tension which best suits each medium it is necessary to adjust the mount position of the lapel bar and the number of bars mounted CHANGING THE WINDING ANG...

Page 94: ...Increase the resistance of the lapel bar Increase the number of lapel bars Change the mount position of the lapel bar so that the contact angle of the medium be increased Refer to the previous page 3...

Page 95: ...ENTER key Test printing for correction of the fabric feed rate starts Seven types of fabric correction patterns are plotted 5 Enter a correction value from the output pat tern Enter the correction val...

Page 96: ...ality and low printing speed HIGHspd High printing speed and slightly inferior image quality STEP 1 Select a type see page 3 4 Here select Type 1 2 Push the ENTER key 3 Select PRINT MODE by pushing th...

Page 97: ...ncreased Performs printing with the resolution established by command STEP 1 Select a type see page 3 4 Here select Type 1 2 Push the ENTER key 3 Select PRINT MODE by pushing the JOG keys and 4 Push t...

Page 98: ...slightly deteriorates since emphasis is placed on printing carriage STEP 1 Select a type see page 3 4 Here select Type 1 2 Push the ENTER key 3 Select PRINT MODE by pushing the JOG keys and 4 Push the...

Page 99: ...expansion and contraction of the cloth or the head may catch the cloth to push it to a position resulting in cloth jam STEP 1 Select a type see page 3 4 Here select Type 1 2 Push the ENTER key 3 Set a...

Page 100: ...nning by push ing the JOG keys and This is the drying time from the instant at which the carriage returns to the capping station till the instant at which the carriage starts moving again for printing...

Page 101: ...ting operation is performed with priority given to the printing conditions set on the device Priority needs to be specified for each of the following items PRINT MODE MEDIA COMP INK LAYERS INK TYPE DR...

Page 102: ...that is given a priority using the and key Here select PLOT 14 Push the ENTER key 15 Select the REFRESH that is given a priority using the and key Here select PLOT 16 Push the ENTER key 17 Push the E...

Page 103: ...Push the and key until the display gives the indication MARGIN 4 Push the ENTER key 5 Push the ENTER key 6 Set a dead space by pushing the JOG keys and You can set a dead space in the range 9 mm to 9...

Page 104: ...m Here set 10 mm 8 Push the ENTER key 9 Push the END key three times and the menu returns to the LOCAL mode This plotter sets the width of the printing area by detecting the position of the fabric ret...

Page 105: ...1 Frequency of refreshing is normal LEVEL 2 Frequency of refreshing is slightly high LEVEL 3 Frequency of refreshing is high STEP 1 Select a type See page 3 4 Here select Type 1 2 Push the ENTER key...

Page 106: ...are expressed in millimeters INCH Numerics are expressed in inches STEP 1 Select a type See page 3 4 Here select Type 1 2 Push the ENTER key 3 Push the and key until the display gives the indication...

Page 107: ...k stations Acid Acid dye ink Disp Disperse dye ink Reac Reactive dye ink If the same type of ink is set in the ink stations on both sides the type of ink cannot be set since INKTYPE is not displayed o...

Page 108: ...not cleaned automatically STEP 1 Select a type See page 3 4 Here select Type 1 2 Push the ENTER key 3 Push the and key until the display gives the indication AUTO CLEAN 4 Push the ENTER key 5 Set a A...

Page 109: ...ypes of ink are set in the two ink stations this function cannot be used since PRINT CONT is not displayed on the LCD If INKEND occurs during printing printing is stopped STEP 1 Select a type See page...

Page 110: ...g data be sure to perform MEDIA COMP This function can be activated even during data printing You can enter correction values while checking the cloth condition and data printing condition STEP During...

Page 111: ...type See page 3 4 Here select Type 1 2 Push the ENTER key 3 Push the and JOG key to select the CENTERING function to prevent meandering of the fabric 4 Push the ENTER key 5 Push the and JOG key to se...

Page 112: ...ethod without using the slack sensor With this method wrinkle may occur easily at the platen It is necessary to frequently adjust the strength of the torque limiter to the minimum allow able torque OF...

Page 113: ...ere select Type 1 2 Push the ENTER key 3 Push the and JOG key until the display gives the indication DRYING DEV 4 Push the ENTER key 5 Push the and JOG key to specify the use of DRYING DEV Since the d...

Page 114: ...See page 3 4 Here select Type 1 2 Push the ENTER key 3 Push the and key until the display gives the indication SETUP RESET 4 Push the ENTER key 5 Push the ENTER key The current printing conditions ar...

Page 115: ...dically This chapter describes the functions that help solve the problem of dete rioration in image quality and replace a waste ink tank and worn cutter blade The device needs maintenance when it is l...

Page 116: ...of the device it is necessary to understand the proper sequence of key operations FUNCTION See Chapter 2 HOW TO USE THE BASIC FUNCTION SET UP FUNCTION LIST MAINTENANCE DATA DUMP PRINT adjust PRINT STA...

Page 117: ...tion on the operation panel You have to understand how to invoke the desired maintenance function to carry out maintenance STEP 1 Put the device into the LOCAL mode Push the REMOTE key and put the de...

Page 118: ...age specified on the operation panel 3 PRINTadjust Indicates a correction value for dot position 4 REPLACE COUNTER Indicates the number of times the ink car tridgesare replaced 5 VERSION Indicates the...

Page 119: ...e long side set horizontally DATA DUMP automatically feeds line according to the size of paper used STEP 1 Put the device into the LOCAL mode See page 4 3 2 Push the ENTER key 3 Push the and key until...

Page 120: ...l the display gives the indication PRINTadjust 4 Push the ENTER key Printing of the test patterns for the correction of dot position starts There are seven types of test patterns that are plotted 5 Pu...

Page 121: ...correct dot positions on each of the patterns 8 Push the END key twice and the menu re turns to the LOCAL mode MAINTENANCE PATTERN2 0 0 MAINTENANCE PATTERN3 0 0 MAINTENANCE PATTERN4 0 0 MAINTENANCE P...

Page 122: ...NT be sure to move down the clamp lever on the front side of this device STEP 1 Move down the clamp lever on the front face of the device 2 Put the device into the LOCAL mode See page 4 3 3 Push the E...

Page 123: ...defective printing IS not corrected even after the cleaning function is executed Cleaning the ink caps Clean the ink caps if a defective printing is not corrected or nozzles are clogged even after the...

Page 124: ...dirt Rubbing the felt side surface will make it fluffy and result in clogged nozzle Wipe ink off the rubber side surface with a swab When executing this function the carriage will come out of the cap...

Page 125: ...E WIPER The device counts the number of times the wipers are cleaned and tells when to replace them When the message RIPLACE WIPER is displayed on the LCD replace the wipers with new ones The message...

Page 126: ...ided It can cause the nozzle to be clogged Insert the wiper so that its felt side surface is placecd on the left as viewed from your position 10 Clean the wiper guide shaft using a cotton bud or cloth...

Page 127: ...ider around the head Never rub the surface of the nozzle as this may cause discharge failure 14 Close the front cover then push the ENTER key In the case where a fabric is loaded on the Device the fab...

Page 128: ...1 Put the device into the FUNCTION mode See page 4 3 2 Push the ENTER key 3 Push the and key until the display gives the indication STATION 4 Push the ENTER key 5 Push the and key until the display g...

Page 129: ...ead height when the fabric used is changed head height See page 1 37 ADJUSTING THE HEAD HEIGHT WHEN THE FABRIC USED IS CHANGED Before adjusting the head height be sure to remove the fabric from the pl...

Page 130: ...MIMAKI Please be noted that MIMAKI ENGINEERING CO LTD shall have no liability for any trouble that arises when using any ink cartridge or ink other than the genu ine MIMAKI brand ones An additional he...

Page 131: ...8 Washing is started automatically 10 Take out the washing liquid cartridge from the ink station Discharge of the washing liquid is started 11 Repeat steps 9 and 10 12 Install new ink cartridges Filli...

Page 132: ...t displayed and you cannot make setting STEP 1 Put the device into the FUNCTION mode See page 4 3 2 Push the ENTER key 3 Push the and key until the display gives the indication USE HEAD 4 Push the ENT...

Page 133: ...s the following order cruciform fill pattern square mark The stretch condition of the cloth can be verified by the gap between the cruciform and the square mark When the cloth is stretched The square...

Page 134: ...the pass 4 8 8 Push the ENTER key 9 Push the and JOG key to select the color 1A 2B 3C 4D 5E 6F 7G 8H 10 Push the ENTER key Start printing the check pattern 11 Screen will return to the color selection...

Page 135: ...ate amount of ink 10 cc or more in the ink cartridge at the time of ink end If the remaining amount of ink is too little ink cannot be discharged or air enters the ink tube resulting in abnormal print...

Page 136: ...cted Cartridges with INKnearEND or INK END Cartridges with which the remaining amount of ink was corrected previously 7 Push the ENTER key 8 Press the and JOG keys to set the correction value of the r...

Page 137: ...sures to be taken in the case where an abnormal phenomenon arises on the device and where an error mes sage is given on the display Table of contents BEFORE TAKING A PHENOMENON AS A SIGN OF FAILURE 5...

Page 138: ...nting This occurs when the data is not being transmitted to the device properly It can also occur when any of the device functions fails or the fabric has been set improperly Has the power cable been...

Page 139: ...c is set improperly Is a pre processed cloth which suits the ink used Yes Is the cloth wrinkled or folded at both edges Yes Use cloths which do not become elastic with water Use a pre processed cloth...

Page 140: ...hite lines thin spots are obvious In the direction of travel of the head Corrective measure Execute the head cleaning See page 2 9 Corrective measure Clean the interior of the station See Page 4 8 Cor...

Page 141: ...he slider Attach the ink cartridge s corre sponding with the number s shown on the display Printing can be continued in file by file basis by pushing the REMOTE key However it is recommended to replac...

Page 142: ...pushing the REMOTE key However it is recommended to replace the ink cartridge of which number is shown on the LCD with a new one Insert an ink cartridge with the displayed number again If the same er...

Page 143: ...s abnor mal Control ROM is defective Control RAM is defective Abnormal temperature is de tected Trouble with detection of linear encoder Control circuit board is defective FPGA Error HDC Error The dev...

Page 144: ...re Check the output setting of the host computer Install the I F board Check to be sure that the cable is securely connected to the host computer and interface board Also check to ascertain that no er...

Page 145: ...istributor to call for service Both edges of the set cloth are not positioned properly If an error is displayed after setting it properly contact your dealer or MIMAKI sales office Turn off the power...

Page 146: ...5 10...

Page 147: ...appendix describes the specifications and components the device function menu structure Table of contents BASIC SPECIFICATIONS A 2 SPECIFICATION FOR INK A 4 FUNCTION MENU STRUCTURE A 5 POSITION OF THE...

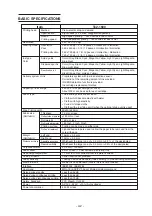
Page 148: ...hich become elastic with water Cloths with high elasticity Curled or folded cloths Cloths with a low firing point when the optional drying unit is used Max Printing width Width 1620 mm Fabric size Thi...

Page 149: ...15 30 C Enviroment Humidity 35 65 Rh No condensation Accuracy guaranteed 18 25 C temperature Temperature change 10 C h or less Dust Equivalent to normal office level Outside dimensions mm 2750 x 780 x...

Page 150: ...ink cartridge SPC 0270Y Lightd cyan ink cartridge SPC 0270LC Light magenta ink cartridge SPC 0270LM Gray ink cartridge SPC 0270GR Blue ink cartridge SPC 0270BL Orange ink cartridge SPC 0270OR Red ink...

Page 151: ...sp Reac Displayed at the time of SETTING FOR 1 way HIGH SPEED AUTO CLEANING OFF ON PRINTING PRINT CONT OFF ON Displayed at the time of SETTING FOR 2 way MULTI PRINTING CENTERING OFF ON TAKE UP OFF ON...

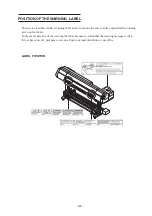
Page 152: ...bel at two locations Be sure to fully understand the warning given on the labels In the case where any of the warning label has become so soiled that the warning message is illeg ible or has come off...

Page 153: ......

Page 154: ...D200595 2 20 08032002...

Reviews: