Probes and Biopsy 12-37
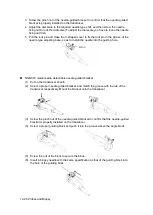
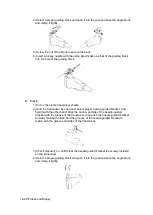
(2) Turn on the knob of fixing guiding block and remove the guiding block from the hole
of installing guiding block.
(3) Turn on the knob of fixing needle-guided bracket and remove the needle-guided
bracket.
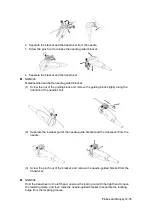
NGB-010
(1)
Remove the guiding block slightly along the direction of the needle’s tail, and
separate the residual part of the needle-guide bracket and the transducer from the
needle.
(2) Remove the support of needle-guided bracket from the transducer.
NGB-016
1. Screw the nut of the guiding block and remove the guiding block slightly along the
direction of the needle’s tail.
2. Separate the residual part of the needle-guide bracket and the transducer from the
needle.
3. Screw the pinch nut of the bracket, and remove the needle-guided bracket from the
transducer.
4. Separate the transducer and the needle-guided bracket.
12.2.9 Clean and Sterilize the Needle-guided Bracket
Cleaning
1. Wear sterile gloves to prevent infection.
2. Or, wash with clean water or soapy water to remove all the foreign matters, or, wipe the
bracket with a soft ethyl carbamate sponge.
3. Wipe off the water on the needle-guided bracket using sterile cloth or gauze after
washing it.
Please follow the instructions in the manual for cleaning.
Sterilization
1. Wear sterile gloves to prevent infection.
Summary of Contents for DP-50 Exp Vet
Page 2: ......
Page 34: ...2 6 System Overview 2 6 Introduction of Each Unit Right View Left View...
Page 42: ......
Page 68: ......
Page 128: ......
Page 148: ......
Page 166: ...10 18 DICOM For details on tast manager see 9 6 Animal Task Manager...
Page 180: ......
Page 220: ......
Page 224: ......
Page 236: ......
Page 242: ......
Page 248: ......
Page 342: ...D 2 Printer Adapter Type Model SONY X898MD...
Page 343: ...P N 046 017713 02 1 0...


