5 - 5
Calibration Procedure
Services
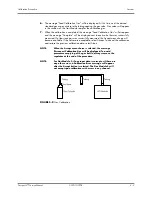
FIGURE 5-4
NIBP Accuracy Test
5.4.2.2
NIBP Leakage Test
The purpose of the leak test is to verify the leak rate of the pneumatic components.
1.
Connect the dummy cuff/test chamber to the side panel fitting.
2.
Select NIBP Leakage Test using the Navigator
TM
Knob to activate the test.
3.
The chamber is inflating. At the same time, the “NIBP Leakage Test” button changes to
“Stop Leakage Test”, and the real-time pressure and the message “Leakage Testing…”
appears in the prompt message area.
4.
When the leakage test is completed, the button “Stop Leakage Test” changes back to
“NIBP Leakage Test.” If any leakage is detected, the message “NIBP Pneumatic Leak”
appears.
5.4.2.3
NIBP Calibration
The purpose of this test is to verify the pressure transducer sensitivity for optimal accuracy.
1.
Connect the equipment as shown in FIGURE 5-4.
2.
Use the Navigator
TM
Knob to select Calibrate NIBP.
3.
Select Inflate to activate the calibration. At the same time, the Inflate button changes to
Accept.
4.
Select Reference Pressure to set the calibration reference pressure.
NOTE:
The reference pressure can be set from 240 mmHg to 260
mmHg. The default pressure is 250 mmHg and the input
step is 1 mmHg.
5.
When the pressure viewed on the manometer matches the reference pressure, select
Accept to accept the calibrated result. The measured pressure will replace the reference
pressure to complete the calibration.
NOTE:
If the calibration is successful, the calibration time will be
displayed in the format of year, month, day, hour, and
minute. Otherwise, the calibration time is displayed as
dashes.


