3-2 System Installation
3.1.2
Installation Condition
3.1.2.1
Space Requirements
Place the system with the necessary accessories at a proper position for convenient use.
1. Place the system in a room with good ventilation or having an air conditioning unit.
2. Leave at least 20cm clearance around the system to ensure effective cooling.
3. A combination lighting system in the room (dim/bright) is recommended.
4. Except the receptacle dedicated for the ultrasound system, at least 3-4 spare receptacles
on the wall are available for the other medical devices and peripheral devices.
5. Power outlet and place for any external peripheral are within 2 m of each other with
peripheral within 1 m of the unit to connect cables.
3.1.2.2
Network Environment
The wired LAN is supported by this ultrasound system.
Confirm the network devices and network conditions before the installation.
1. General information: default gateway IP address, and the other routers related information.
2. DICOM application information: DICOM server name, DICOM port, channels, and IP
address.
3.1.2.3
Confirmation before Installation
Please confirm the following items before installation:
1. The video format used in the region or country where the system is installed.
2. The language used in the region or country where the system is installed.
3. The power voltage and frequency used in the region or country where the system is
installed.
4. Obstetric formulae and other measurement formulae used in the region or country where
the system is installed.
5. Other settings to be used in the region or country where the system is installed but different
from the factory settings.
6.
The doctor’s habits when using the system.
Please confirm the items above prior to the installation training, and do the system settings
according to the universal setting of installed region or country.
3.2
Unpacking
Tools Required: None.
Installation duration: 1 person, 0.5 hour.
Summary of Contents for Z6
Page 2: ......
Page 14: ......
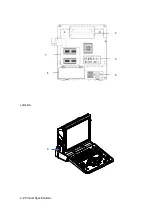
Page 16: ...2 2 Product Specifications Left side 9 4 7 5 6 8 ...
Page 72: ......
Page 119: ...Structure and Assembly Disassembly 7 35 图 7 59 Disassembly of Speaker 8 ...
Page 120: ......
Page 132: ......
Page 142: ......
Page 152: ......
Page 168: ......
Page 171: ...Phantom Usage Illustration B 3 ...
Page 172: ......
Page 173: ...P N 046 010452 00 5 0 ...


