12
5
−
2
−
2.
CSA−591
−
99
(with automatically zero function) calibration procedure by the actual load.
Procedures
1
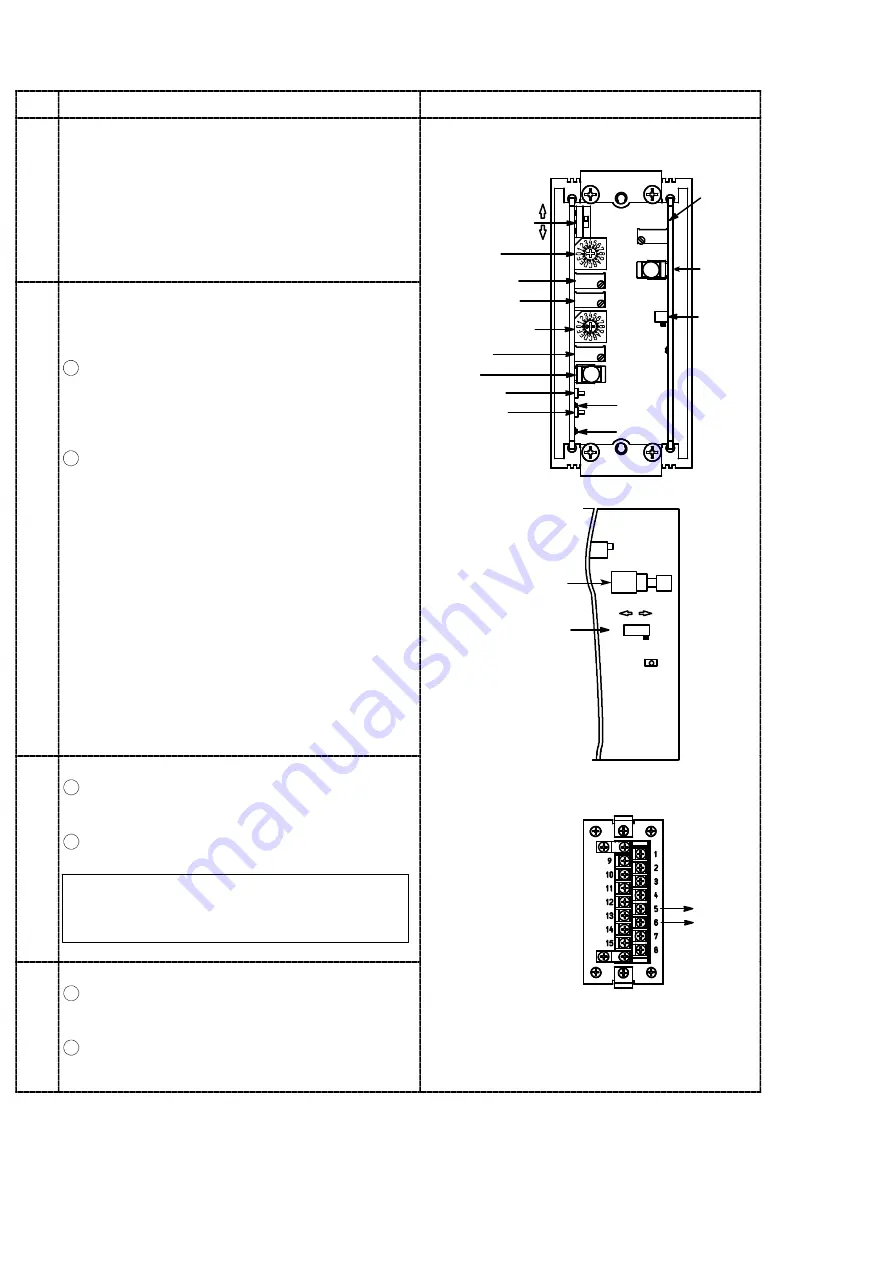
Set the gage to the tie bar.
Connect the tester, digital voltage meter, etc.,
between “+” and “
−
” of the check pin, or
between V
−
OUT “+” and “
−
” of the voltage
output in the rear panel.
Set the automatic zero off switch to the OFF side.
Set the gage to the condition for adjusting zero.
Set the “ZERO” adjustment rotary switch to zero
position.
“ZERO” adjustment
polarity switch
“ZERO” adjustment
rotary switch
“ZERO” coarse
PC board for
automatic zero
The front panel was removed.
2
ZERO adjustment
Confirm whether the output voltage can be
adjustable to approx.
±
0.2 V or less by “ZERO”
coarse adjustment trimmer.
1
Adjustable case
Adjust the output voltage to approx.
±
0.2 V or
less by “ZERO” coarse adjustment trimmer,
and then adjust the output voltage to 0.000 V
by “ZERO” fine adjustment trimmer.
2
Not adjustable case
Set the “ZERO” adjustment rotary switch at
the position in which the output voltage
becomes
±
10 V or less.
When the output voltage does not change, set
the “ZERO” adjustment polarity switch to the
position which the output voltage becomes
±
10
V or less. After that, set the output voltage to
approx.
±
0.2 V or less by “ZERO” coarse
adjustment trimmer, and adjust the output
voltage to 0.000 V by “ZERO” fine adjustment
trimmer.
・
When both LED1 and LED2 are turned off, the
output voltage outputs approx.
±
50 mV or less.
・
When LED1 lights on, the output voltage is
approx. +50 mV or more. When LED2 lights on,
the output voltage is approx.
−
50 mV or more.
“ZERO” coarse
adjustment trimmer
“ZERO” fine
adjustment trimmer
“GAIN” rotary switch
“GAIN” trim-
mer
CAL switch
LED1
Check pin “+”
Check pin “
−
”
LED2
Automatic
zero
off
switch
VR
1
A/
Z
A/
Z
O
F
F
LE
D
1
OFF ON
3
Sensitivity adjustment
1
Take the rated load to the gage, and turn the
“GAIN” rotary switch so that the output
voltage may approach 10.00 V most.
2
Adjust the output voltage to 10.000 V by using
the “GAIN” trimmer.
The sensitivity adjustment range is
±
10 V of
output voltage at the input of
±
300
μ
ST to
±
2 000
μ
ST.
V
−
OUT “+”
V
−
OUT “
−
”
Rear panel
4
Zero adjustment and Sensitivity adjustment
1
Remove the rated load which put on in step 3,
and confirm the zero of output voltage. When
zero shifts, adjust zero by executing step 2.
2
Put the rated load on the gage again and
confirm the sensitivity. When sensitivity shifts,
adjust the sensitivity by executing step 3.
Automatic
zero on
switch
Automatic
zero off
switch
Automatic
zero
on
switch
PCB
for
auto
−
zero
Summary of Contents for CSA-591
Page 1: ...Transmitter CSA 591 Instruction Manual EN294 1141 F ...
Page 2: ......
Page 10: ......
Page 31: ......


