- 24 -
Mini Crosser A/S
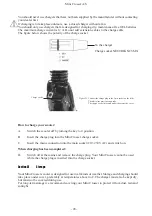
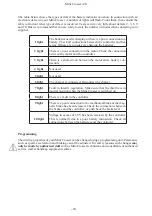
The table below shows the types of defect the battery indicator can show in connection with an
electronic defect in your Mini Crosser. A number of lights will fl ash. Count them, then consult the
table to fi nd out what type of defect is involved. Users can do very little about defects 2, 3, 8, 9
and 10. But we recommend that you are ready to state the number of diodes when contacting your
supplier.
1 light
The batteries need recharging or there is a poor connection to a
battery. Check all connections between the controller and bat-
teries. If these are in order, try charging the batteries.
2 light
There is a poor connection to the motor. Check the connection
between the motor and the controller.
3 light
There is a short-circuit between the motor and a battery con-
nection.
4 light
Not used.
5 light
Not used.
6 light
The charger is connected. Disconnect the charger.
7 light
Fault in throttle regulation. Make sure that the throttle is in
neutral position when the Mini Crosser is switched on.
8 light
There is a fault in the controller.
9 light
There is a poor connection to the mechanical brake or the mag-
netic brake has been released. Check the connections between
the brakes and the controller, or push back the brake lever.
10 light
Voltage in excess of 38 V has been received by the controller.
This is normally due to a poor battery connection. Check all
connections between the batteries and the controller.
Programming
The driving properties of your Mini Crosser can be changed using a programming unit. Parameters
such as speed, acceleration and braking can all be adjusted. For safety reasons such changes
may
only be made by authorised staff
such as Mini Crosser technicians and consultants or authorised
service staff at handicap equipment centres.


