background image

- 9 -

Mini Crosser A/S

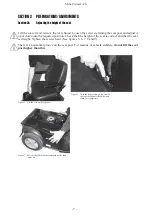
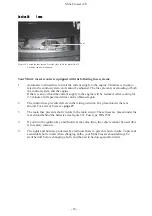
Figure 11  Release lever to rotate the seat
 

Release lever for seat forwards/backwards

Lever to rotate seat

Release lever 
forwards/backwards

Section 3D 

Tiller


The tiller can be adjusted forwards/backwards with the release lever. Pull the lever down and pull 
the tiller closer to obtain a good driving position. Use the lever again to push the tiller forwards 
when you want to get off - this will make it easier to get off.

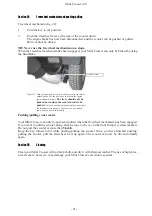
The height of the tiller can be adjusted about 11 cm up or down. First remove the rubber plug co-
vering the Allen screw. Adjust the height using a 4 mm Allen key as shown in fi gure 12A. This is 
the procedure for the 3W and 4W. Remember to tighten the screws properly after adjustment.

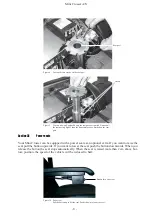
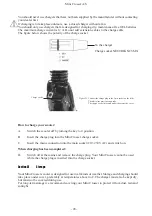
Figure 12 A 

Adjusting the tiller 

  angle. 

Applies 

to 

both 

  3W 

and 

4W

Section 3C 

Rotating the seat

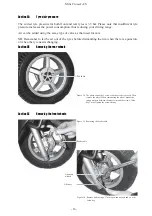
Pull back the release lever. The seat can rotate 90 degrees to each side. When you release the lever 
it engages automatically and retains the seat every 45 degrees.
Other seats available for Mini Crosser scooters are designed according to similar principles.
The release lever is normally mounted on the right-hand side, but can be mounted on the left-hand 
side if required.

NB!
Your Mini Crosser scooter is most stable when the seat is in its lowest position. So drive carefully 
when the seat has been raised. Never use the power seat mechanism when driving on uneven 
ground or in hilly terrain.

Be very careful when lowering the seat using the power seat mechanism. Make sure that nothing 
gets stuck between the seat and the chassis.

Lever to adjust the tiller 
angle

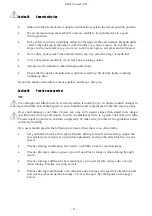
Figure 12 B 

Adjusting the tiller height. Ap- 


plies to both 3W and 4W

Allen screw for 
adjusting the height

Summary of Contents for MC 130 T 3W

Page 1: ...UCTIONS FOR USE Mini Crosser 130T 140T 3W 4W Serial number _______ ________ _________ Delivery date ___ ____ 200 Version 2 2 3 Mini Crosser T 3W Mini Crosser T 4W Product number of these instructions...

Page 2: ...perfect 11 Section 4E Highway code 12 Section 4F Specific driving situations with illustrations and descriptions 13 Section 4G Anti tip support wheels 14 SECTION 5 MAINTENANCE 15 Section 5A Tyres air...

Page 3: ...y be lent to people who are completely familiar with the way it works The vehicle is designed for use by one person at a time only Mini Crosser 130T 140T scooters are designed for a maximum personal w...

Page 4: ...waives all liability if the control console is opened adjusted or modified by anyone not authorised to do so Indicator switches Light switch Hazard light switch Battery indicator Horn switch Handbrake...

Page 5: ...e required setting The tortoise in the bottom position indicates the lowest speed zone ap prox 0 6 km h The hare in the top position indicates the highest speed zone The speed can be adjusted continuo...

Page 6: ...e button again to switch off the indicators Horn A powerful electrical horn Activate by pressing the horn switch Figure 4 The serial number plate states the model year month of production and serial n...

Page 7: ...rews hard See figures 5 6 7 8 and 9 There is a horizontal groove on the seat post For reasons of vehicle stability do not lift the seat post higher than this Figure 5 Lift the seat up the seat post Fi...

Page 8: ...ni Crosser can be equipped with a power seat as an optional extra If you want to raise the seat pull the button upwards If you want to lower the seat push the button downwards When you release the but...

Page 9: ...ng the tiller angle Applies to both 3W and 4W Section 3C Rotating the seat Pull back the release lever The seat can rotate 90 degrees to each side When you release the lever it engages automatically a...

Page 10: ...s chair is stable too There are 3 braking systems on your Mini Crosser Engine brake magnetic brake and handbrake The engine brake controls the speed of the scooter even downhill The magnetic brake is...

Page 11: ...speed in poor conditions and in particular when driving on a slope Over short distances your Mini Crosser can cope with steeper slopes than stated in its design specifications both up and down In suc...

Page 12: ...h At speeds of up to 6 km h Mini Crosser scooters are regarded as pedestrians and at this speed they are allowed to drive on the pavement Tortoise speed is 6 km h Lights are only required during light...

Page 13: ...with anti tip wheels make sure that they do not get stuck on the edge of the kerb In particular please note the following when driving in the traffic Mini Crosser scooters are low vehicles that are no...

Page 14: ...peed Your Mini Crosser scooter is a very stable vehicle However there is a risk of tip ping in case of incorrect weight distribu tion or incautious driving We recommend mounting anti tip wheels in suc...

Page 15: ...e mechanism When the brake release lever is pushed forwards the battery indicator should flash to indicate a defect when your Mini Crosser is switched on It should be impossible to drive your Mini Cro...

Page 16: ...im when there is a puncture or when the tyre needs changing Section 5B Removing the rear wheels Figure 14 The photo shows the 5 screws that have to be removed Then remove the wheel When remounting the...

Page 17: ...the hub and brake drum from the rim using a 5 mm Allen key Figure 19 Mounting the front wheel Make sure the brake calibre is placed in the top stop screw REMEMBER to let all the air out before dismant...

Page 18: ...ooling for 2 5 minutes full speed and drive can be obtained again 2 The control fuse prevents defects in the wiring network It is placed under the rear shroud For a list of fuses see page 27 3 The mai...

Page 19: ...ow temperatures In practice this means that a vehicle with old batteries has a lower range than when its batteries were new The battery capacity at 10o C is about half the corresponding capacity at 20...

Page 20: ...osser scooter is designed for use in all kinds of weather Storage and charging should take place under cover preferably at temperatures above 0oC The charger must also be kept dry but must not be cove...

Page 21: ...finished pushing the scooter pull the freewheel lever up again The scooter is now braked again and can be driven normally Pushing pulling your scooter Your Mini Crosser can only be pushed or pulled w...

Page 22: ...ust always be fixed firmly in position with the handbrake on during transport by car or on a trailer Do not try to lift your scooter by the tiller armrests or shrouds If you do need to lift the scoote...

Page 23: ...pressure Range per charge too small Defective batteries Low temperature Defective charger Too little air in tyres Wrong charging procedure Charge batteries and check that green light on charger is on...

Page 24: ...ection 4 light Not used 5 light Not used 6 light The charger is connected Disconnect the charger 7 light Fault in throttle regulation Make sure that the throttle is in neutral position when the Mini C...

Page 25: ...25 Mini Crosser A S...

Page 26: ...Max speed 15 km h 15 km h 15 km h 15 km h Braking length at max speed 3 5 meter 3 5 meter 3 5 meter 3 5 meter Effective seat depth 44 cm 44 cm 44 cm 44 cm Effective seat width 48 cm 48 cm 48 cm 48 cm...

Page 27: ...ty ISO 7176 16 and crash test ISO 7176 19 Mini Crosser 130 T 3W 4W Mini Crosser 140 T 3W 4W 56 Ah batteries Max range with new batteries at 20o C on flat firm road 73 Ah batteries Max range with new b...

Page 28: ...28 Mini Crosser A S Transport height 68 cm Measured with no seat and with the tiller down...

Page 29: ...29 Mini Crosser A S Transport height 68 cm Measured with no seat and with the tiller down...

Page 30: ...When you release the lever the seat stops automatically at the nearest stop point A backstop is mounted at the front and back of the slide rail Setting the angle of the armrest At the end of the armre...

Page 31: ...laced on the left hand side Lever to move seat forwards backwards In order to release the seat on the slide rail pull the lever out and up The seat can then be pushed for wards or backwards as require...

Page 32: ...ckwards The armrest can be moved forwards backwards in the C rail by loosening the screws as shown Once the required setting has been achieved tighten the screws again Backrest forwards backwards The...

Page 33: ...hments 3 Pull out the belts and place the hooks in the fittings designed for this purpose marked yellow on the scooter 4 Drive the scooter forwards until the attachment belt has an angle of about 45 d...

Page 34: ...34 Mini Crosser A S...

Reviews: