background image


miniDSP Ltd – Hong Kong / Email : 

info@minidsp.com

 / Features and specifications subject to change without prior notice


13 

2.2


S

OFTWARE INSTALLATION AND LICENSE ACTIVATION


2.2.1


Framework installation 

Prior to installing the software, download and install the following frameworks. You will need to accept the 
license agreements in order to successfully complete the installation. If you haven’t updated these recently, 
check that you have the latest versions prior to running the miniDSP install programs. 


Microsoft .NET framework

 (version 3.5 or later) 


Latest version of 

Adobe Flash


Latest version of 

Adobe Air


Microsoft Visual C++ 2010 Redistributable Package: for 

x86

 (32-bit operating system) or 

x64

 (64-bit operating 

system). 

2.2.2


Software installation 

When you receive notification that your order has shipped, your installation software downloads will be 
available at the User Downloads section of the miniDSP website, under the 

Dirac Series

 heading. 

http://www.minidsp.com/userdownloads


Download two installation zip files: the 

Dirac Live Calibration Tool Stereo version for miniDSP

, and the 

DDRC 

Configuration Plugin

. Unzip each file and double-click to run each installer. Follow the on-screen instructions to 

complete installation. 

2.2.3


License activation 

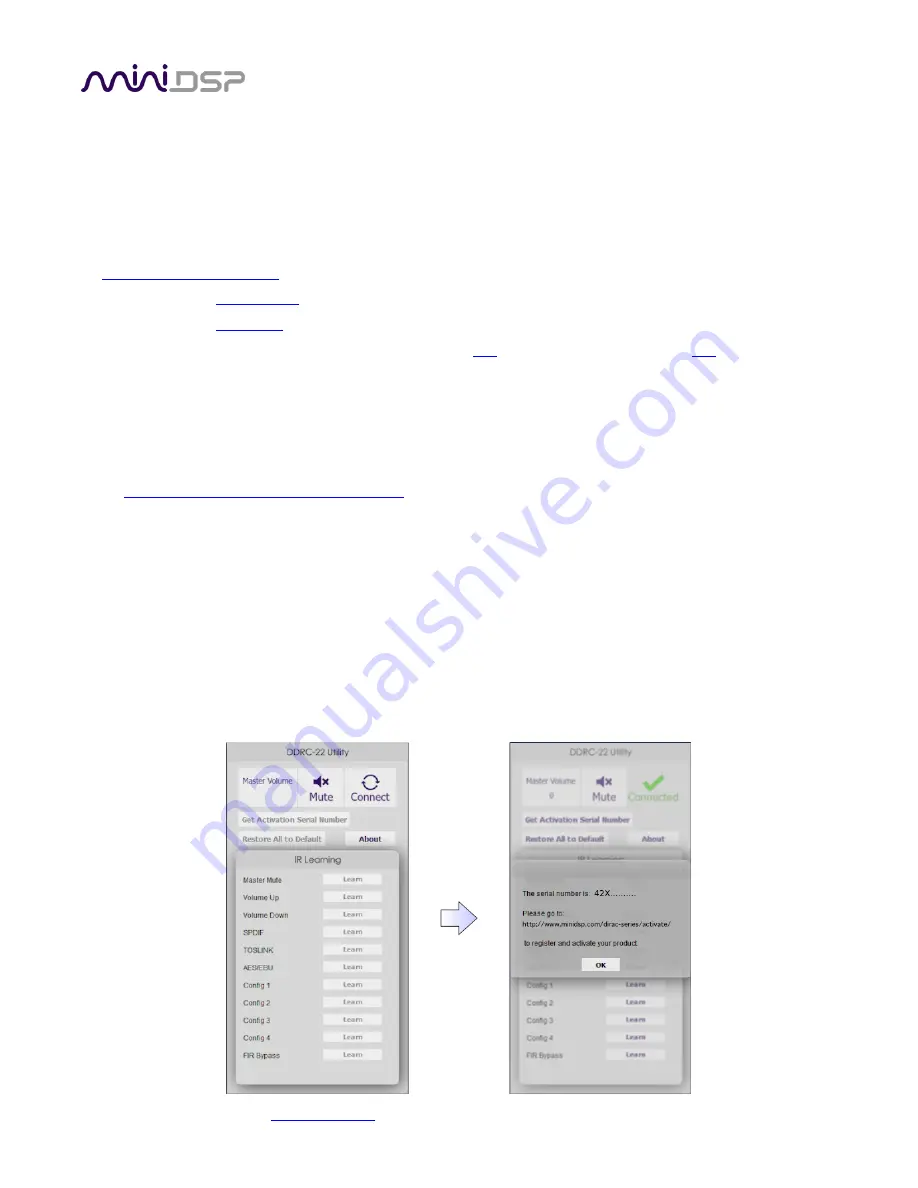
1.


Start the miniDSP 

DDRC-2x2

 utility program. It will appear as shown on the left below. 

2.


Connect your 

Dirac Series

 processor to your computer via USB, then click on the 

Connect

 button. It will 

change to a green tick. 

3.


Click on 

Get Activation Serial Number

. The program will get your unique serial number from the connected 

DDRC and display it, as shown on the right below. 

Summary of Contents for Dirac DDRC-22D

Page 1: ...Ltd Hong Kong Email info minidsp com Features and specifications subject to change without prior notice 1 DIRAC SERIES HIGH RESOLUTION AUDIO PROCESSORS WITH DIRAC LIVE TECHNOLOGY User Manual DDRC 22A...

Page 2: ...ng Email info minidsp com Features and specifications subject to change without prior notice 2 Revision history Revision Description Date 0 9 Initial public release 26 Mar 2014 1 0 First production ve...

Page 3: ...ense activation 13 2 2 1 Framework installation 13 2 2 2 Software installation 13 2 2 3 License activation 13 2 2 4 License validation 14 3 Acoustic Measurement 15 3 1 Loudspeaker and microphone posit...

Page 4: ...ting correction filters 28 4 4 Downloading and managing filter sets 29 5 Using the Dirac Series audio processor 31 5 1 Status indicators 31 5 2 Front panel controls 31 5 3 Infrared remote control 32 6...

Page 5: ...nd how to operate and use this product as incorrect use or use beyond the parameters and ways recommended in this manual have the potential to cause damage to your audio system Please also note that m...

Page 6: ...ng in both print and on the computer If printing the manual please print double sided The embedded page size is 8 x 11 Printing on A4 paper will result in a slightly reduced size For reading on the co...

Page 7: ...duce a tighter bass Reduce listening fatigue Improve the timbre Remove resonances and room modes Reduce early reflections Dirac Series processors are available in different versions The DDRC 22A has a...

Page 8: ...rrects the system s magnitude response often referred to imprecisely as frequency response In contrast to fully automated systems Dirac Live corrects the magnitude response towards a user adjustable t...

Page 9: ...agnitude response independently of controlling the impulse response In some cases they may even make things worse Mixed phase filters are more difficult to design but the audible performance of Dirac...

Page 10: ...coustic measurements using the Dirac Live Calibration Tool Stereo for miniDSP program to capture the acoustic behavior of your speakers and room See Section 3 Acoustic Measurement 3 Generate digital r...

Page 11: ...evice with a digital input All digital outputs are simultaneously active so multiple output connections can be made if necessary The digital outputs of the DDRC 22D operate at 96 kHz sample rate Any c...

Page 12: ...to perform acoustic measurements in your listening room and to generate and download the digital room correction filters to the Dirac Series processor To configure the processor connect the USB port o...

Page 13: ...ystem 2 2 2 Software installation When you receive notification that your order has shipped your installation software downloads will be available at the User Downloads section of the miniDSP website...

Page 14: ...if you purchase more than one Dirac Series processor each will need to be activated with its unique serial number Use the screen on the right and enter the serial number of each processor and they wil...

Page 15: ...still be achieved if optimal loudspeaker placement is used together with Dirac Live Many loudspeakers perform best away from the walls both the front wall behind the loudspeakers and the side walls Ex...

Page 16: ...uses the DDRC 22D No changes to existing audio connections are needed Simply 1 Connect the supplied USB type A to type B cable from the processor to a USB port on the computer 2 Connect the supplied U...

Page 17: ...hese are generally worked through in order from top to bottom This section covers the first four tabs the final two are covered in Filter Design Load and save a project Each measurement project can be...

Page 18: ...is will ensure that test signals are sent into your audio system via the Dirac Series processor If this is not present check that your Dirac Series processor is connected via USB and powered on and cl...

Page 19: ...click the Proceed button 3 3 3 Output Levels tab On the Output Levels tab set Output volume quite low If you have another volume control down stream of the DDRC set it about halfway or 20 dB if digita...

Page 20: ...each measurement Chair for a single listening seat and Sofa for multiple listening seats Select a listening environment by clicking on the chosen icon The center of the screen contains a pictorial rep...

Page 21: ...ting measurements With the microphone in place at the central location and pointed between the two speakers click on the Start button The Dirac Series audio processor will generate a test signal audib...

Page 22: ...locations have been successfully measured Note that it is good practice to save the project periodically while performing measurements see Saving and loading projects below Once all nine measurements...

Page 23: ...number of plots that can individually be turned on and off with the checkboxes near the top of the screen Avg spectrum before The average of the measured magnitude responses These plots are shown in...

Page 24: ...ted impulse response after correction shown in light green To return to the magnitude response click on the Spectrum button The magnitude and impulse response graphs can be viewed at a larger scale To...

Page 25: ...nels drag the disconnected channel tab over the top of the selected channel 4 2 DESIGNING YOUR TARGET CURVE The target curve is the desired in room frequency response with the Dirac Series processor p...

Page 26: ...correction for your system and environment For example low frequency noise traffic machinery may be present in some environments so it is best to adjust the frequency range to exclude these frequencie...

Page 27: ...frequency tilt The target curve is the desired measured response of loudspeakers in a room In contrast to measurements made of a loudspeaker during its design under anechoic measured in free space co...

Page 28: ...If the channels are not linked then the currently visible target is saved to the file To load a target curve click on Load Target Note that loading a target will erase the current target so be sure t...

Page 29: ...el and one filter for the right channel The two main controls on this screen are Filter Turn this on to enable the Dirac Live correction filters The indicator on the front panel of your Dirac Series p...

Page 30: ...ot and drop it on the trashcan icon at the top right To load a filter set into a slot that already has filters loaded first delete the loaded filter set by dragging it onto the trashcan icon Then drag...

Page 31: ...Live filtering on off remote control only Filter set selection Front panel layout DDRC 22D Front panel layout DDRC 22A 5 1 STATUS INDICATORS The current status of the processor is indicated by a set o...

Page 32: ...eady 5 3 INFRARED REMOTE CONTROL Many standard and programmable remote control units can be used with the Dirac Series processors Instead of adding another remote to your collection the processor can...

Page 33: ...sformer SPDIF on RCA connector Isolated with digital audio transformer Toslink on Optical connector Digital audio is always output at a sample rate of 96 kHz Analog Audio Inputs DDRC 22A Balanced audi...

Page 34: ...t d Check that the downstream device has the Dirac Series processor selected for input e Check that any downstream volume control is not set to zero f Check that no downstream device is muted 3 No inp...

Page 35: ...ser Downloads section of the miniDSP website and unzip it 2 With power removed from the Dirac Series processor remove four screws and detach the lid 3 Press the button shown in the photograph below an...

Page 36: ...ade 8 Click on the Reset Device button 9 Disconnect power and re attach the lid 10 Reapply power and the processor can be used as normal 6 4 OBTAINING SUPPORT 1 Check the forums on miniDSP com to see...

Reviews: